Author: Gonçalo Valério

  • New Nostr and Lightning Addresses

    Bitcoin Atlantis is just around the corner. This conference, happening here in Madeira, is something unusual for us locals. The common pattern is that we have to fly to attend such conferences.

    I plan to attend the event, and I will be there with an open mindset, since there are always new things to learn. I’m particularly interested in the new technologies and advancements powering the existing ecosystem.

    So this post is an early preparation for the conference. I noticed that the community is gathering increasingly around a protocol called Nostr. I also noticed that a great deal of new cool applications are being built on top of the Lightning Network.

    To blend in, to actively participate and to make the most of my time there, I just set up my Nostr presence with a lightning address pointing to one lightning network wallet.

    This setup allows me to interact with others using a Twitter/X like interface. Instead of likes and favorites, people can express their support by sending small bitcoin tips (zaps) directly to the authors by clicking/tapping a button.

    Before describing what I did, I will do a rapid introduction to Nostr and also the Lightning Network, to contextualize the reader.

    Lightning network

    Built on top of the Bitcoin blockchain, the lightning network allows users to send and receive transactions rapidly (couple of seconds) and with minimal fees (less than a cent). These records are kept off-chain and are only settled later when the users decide to make the outcome permanent.

    It works very well and led to the development of many websites, apps, and services with use cases that weren’t previously possible or viable. One example is quickly paying a few cents to read an article or paying to watch a stream by the second without any sort of credit.

    One of the shortcomings is that for every payment to happen, the receiving party needs to generate and share an invoice first. For certain scenarios, this flow is not ideal.

    Recently, a new protocol called LNURL was developed to allow users to send transactions without the need of having a pre-generated invoice first. The only thing that is needed is this “URL”, which can work like a traditional address.

    On top of this new protocol, users can create Lightning Addresses, which looks and works just like an e-mail address. So, you can send some BTC to joe@example.com, which is much friendlier than standard bitcoin addresses.

    Nostr

    Twitter is centralized, Mastodon is not, but it is federated, which means you still need an account on a given server. Nostr, on the other hand, is an entirely different approach to the social media landscape.

    Just like Bitcoin, users generate a pair of keys, one is the identifier and the other allows the user to prove is identity.

    Instead of having an account where the user stores and publishes his messages, on Nostr the user creates a message, signs and publishes it to one or more servers (called relay).

    Readers can then look for messages of a given identifier, on one or more servers.

    One of the characteristics of this approach is that it is censorship resistant, and the individual is not at the mercy of the owner of a given service.

    The relationship between Nostr and the Bitcoin’s lightning network, that I described above, is that the Bitcoin community was one of the first to adopt Nostr. Furthermore, many Nostr apps already integrated support for tipping using the lightning network, more specifically using lightning addresses.

    My new contacts

    With that long introduction done, this post serves as an announcement that I will start sharing my content on Nostr as well.

    For now, I will just share the same things that I already do on Mastodon/Fediverse. But as we get closer to the conference, I plan to join a few discussions about Bitcoin and share more material about that specific subject.

    You can follow me using:

    npub1c86s34sfthe0yx4dp2sevkz2njm5lqz0arscrkhjqhkdexn5kuqqtlvmv9

    View on Primal

    To send and receive some tips/zaps, I had to set a lightning address. Unfortunately, setting up one from scratch in a self-custodial way still requires some effort.

    The app that I currently use can provide one, but they take custody of the funds (which in my humble opinion goes a bit against the whole point). This address uses their domain, something like: raremouse1@primal.net. It doesn’t look so good, especially if I want to switch providers in the future or have self-custody of my wallet.

    Looking at the Lightning Address specification, I noticed that it is possible to create some kind of “alias”, that allows us to easily switch later.

    To test, I just quickly wrote a Cloudflare worker that essentially looks like the following:

    const url = 'https://primal.net/.well-known/lnurlp/raremouse1'
    
    export default {
      async fetch(request, env, ctx) {
        async function MethodNotAllowed(request) {
          return new Response(
            `Method ${request.method} not allowed.`,
            {
              status: 405,
              headers: {
                Allow: "GET",
              },
            });
        }
        // Only GET requests work with this proxy.
        if (request.method !== "GET")
          return MethodNotAllowed(request);
    
        let response = await fetch(url);
        let content = await response.json();
    
        content.metadata = content.metadata.replace(
          "raremouse1@primal.net",
          "gon@ovalerio.net"
        );
    
        return new Response(
          JSON.stringify(content),
          response
        )
      },
    };

    Then I just had to let it handle the https://ovalerio.net/.well-known/lnurlp/gon route.

    The wallet is still the one provided by Primal. However, I can now share with everyone that my lightning address is the same as my email: gon at ovalerio dot net. When I move to my infrastructure, the address will remain the same.

    And this is it, feel free to use the above script to set your lightning address and to follow me on Nostr. If any of this is useful to you, you can buy me a beer by sending a few sats to my new lightning address.

  • My setup to keep up with podcasts

    To be sincere, I have a strong preference for written content. There is something with audio and video (podcasts and streams) that doesn’t fit very well with me or how I consume content when I’m at the computer.

    Nevertheless, there is a lot a great content that is only available through podcasts. So sometimes I need to tune in.

    Given I like to go for a run once in a while, listening to a podcast is a great way to learn something while training. For this reason, I decided to be as organized with the podcasts as I am with the written content that I consume.

    One great thing about the podcast ecosystem, is that it is one of the few that haven’t totally succumbed to the pressures of centralization. Sure, there have been many attempts, but you can still follow and listen to most of your favorite producers without being tied to an app that belongs to an internet giant.

    You can use open-source software on your computer or phone to manage sources and listen to episodes, and then rely on RSS feeds to find out when new content is available. It works pretty well.

    After some trial and error… there are tons of apps for all platforms… today I’m sharing my current setup, one I’m pleased with.

    • For my phone and tablet: AntennaPod. It is open-source, lets you download the episodes to listen offline, and doesn’t require any account.
    • For my computers: Kasts. Almost the same as AntennaPod, but for standard Linux distros.

    Syncing

    The apps work great when used standalone. However, with multiple devices, I need the subscriptions to be the same, to know the episodes I already listened to and to keep track of the status of the episode I’m currently listening. So I can jump from one device to another.

    If I can’t have everything in sync, it becomes a total mess. Fortunately, we can do that using another piece of open-source software that is self-hostable.

    To keep all the devices on the same note, I use GPodder Sync on an existing Nextcloud instance. Both AntennaPod and Kasts have built-in support for it and work “flawlessly” together.

    This is it, if you think there is a better way to do this in an “open” way, please let me know, I’m always open to further enhancements.

  • Filter sensitive contents from Django’s error reports

    Reporting application errors to a (small) list of admins is a feature that already comes built in and ready to use in Django.

    You just need to configure the ADMINS setting and have the application ready to send emails. All application errors (status 500 and above) will trigger a new message containing all the details, including a traceback.

    However, this message can contain sensitive contents (passwords, credit cards, PII, etc.). So, Django also provides a couple of decorators that allow you to hide/scrub the sensitive stuff that might be stored in variables or in the body of the request itself.

    These decorators are called @sensitive_variables() and @sensitive_post_parameters(). The correct usage of both of them is described in more detail here.

    With the above information, this article could be done. Just use the decorators correctly and extensively, and you won’t leak user’s sensitive content to your staff or to any entity that handles those error reports.

    Unfortunately, it isn’t that simple. Because lately, I don’t remember working in a project that uses Django’s default error reporting. A team usually needs a better way to track and manage these errors, and most teams resort to other tools.

    Filtering sensitive content in Sentry

    Since Sentry is my go-to tool for handling application errors, in the rest of this post, I will explore how to make sure sensitive data doesn’t reach Sentry’s servers.

    Sentry is open-source, so you can run it on your infrastructure, but they also offer a hosted version if you want to avoid having the trouble of running it yourself.

    To ensure that sensitive data is not leaked or stored where it shouldn’t, Sentry offers 3 solutions:

    • Scrub things on the SDK, before sending the event.
    • Scrub things when the event is received by the server, so it is not stored.
    • Intercept the event in transit and scrub the sensitive data before forwarding it.

    In my humble opinion, only the first approach is acceptable. Perhaps there are scenarios where there is no choice but to use one of the others; however, I will focus on the first.

    The first thing that needs to be done is to initiate the SDK, correctly and explicitly:

    sentry_sdk.init(
        dsn="<your dsn here>",
        send_default_pii=False
    )

    This will ensure that certain types of personal information are not sent to the server. Furthermore, by default certain stuff is already filtered, as we can see in the following example:

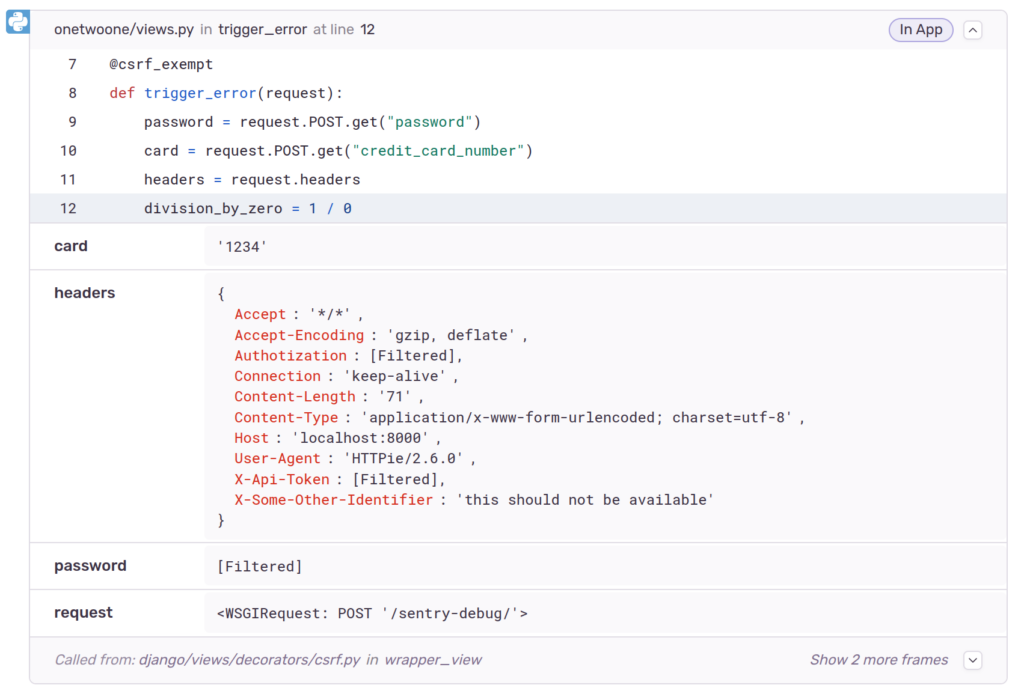
    Screenshot of Sentry's error page, focusing on the section that shows the code that caused the error and the local variables. Variables are not filtered.
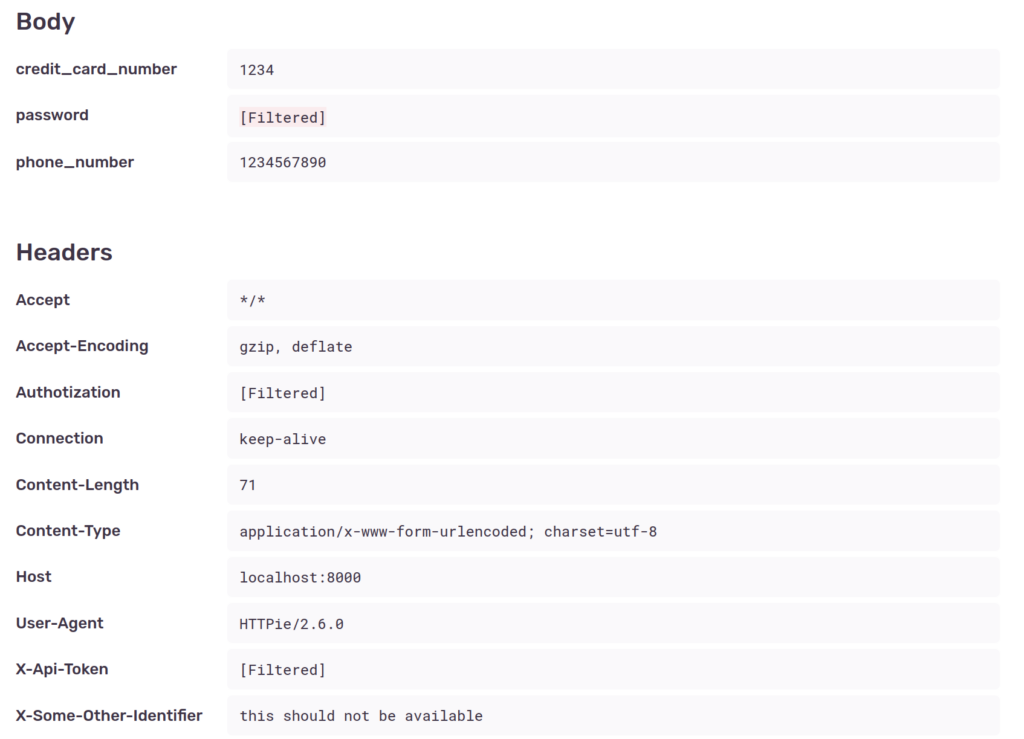
    Screenshot of Sentry's error page, focusing on the section that shows the contents of the request. Content is not filtered.

    Some sensitive contents of the request such as password, authorization and X-Api-Token are scrubbed from the data, both on local variables and on the shown request data. This is because the SDK’s default deny list checks for the following common items:

    ['password', 'passwd', 'secret', 'api_key', 'apikey', 'auth', 'credentials', 'mysql_pwd', 'privatekey', 'private_key', 'token', 'ip_address', 'session', 'csrftoken', 'sessionid', 'remote_addr', 'x_csrftoken', 'x_forwarded_for', 'set_cookie', 'cookie', 'authorization', 'x_api_key', 'x_forwarded_for', 'x_real_ip', 'aiohttp_session', 'connect.sid', 'csrf_token', 'csrf', '_csrf', '_csrf_token', 'PHPSESSID', '_session', 'symfony', 'user_session', '_xsrf', 'XSRF-TOKEN']

    However, other sensitive data is included, such as credit_card_number (assigned to the card variable), phone_number and the X-Some-Other-Identifier header.

    To avoid this, we should expand the list:

    DENY_LIST = DEFAULT_DENYLIST + [
        "credit_card_number",
        "phone_number",
        "card",
        "X-Some-Other-Identifier",
    ]
    
    sentry_sdk.init(
        dsn="<your dsn here>",
        send_default_pii=False,
        event_scrubber=EventScrubber(denylist=DENY_LIST),
    )

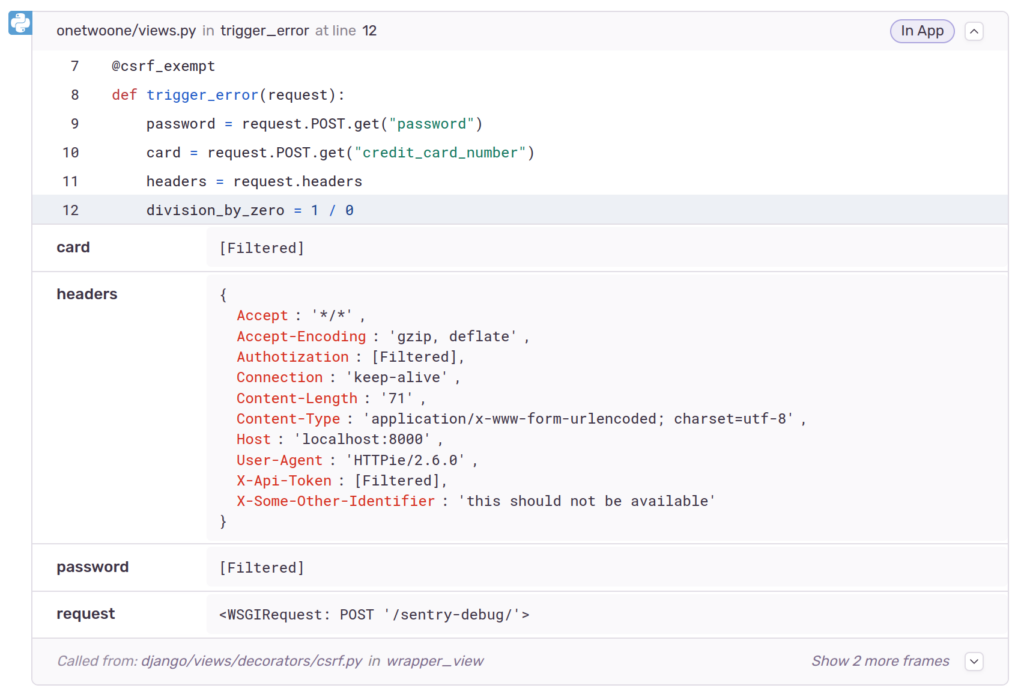
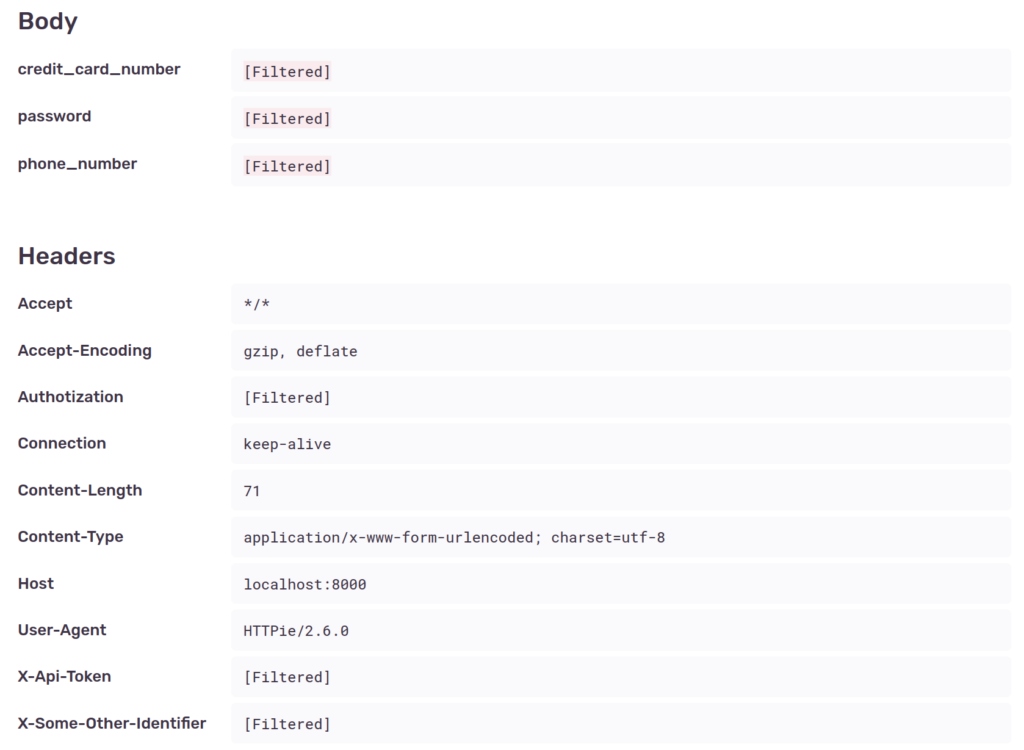
    If we check again, the information is not there for new errors:

    Screenshot of Sentry's error page, focusing on the section that shows the code that caused the error and the local variables. Variables are filtered.
    Screenshot of Sentry's error page, focusing on the section that shows the contents of the request. Content is filtered.

    This way we achieve our initial goal and just like Django’s decorators we can stop certain information from being included in the error reports.

    I still think that a deny list defined in the settings is a poorer experience and more prone to leaks, than the decorator approach used by Django error reporting. Nevertheless, both rely on a deny list, and without being careful, this kind of approach will eventually lead to leaks.

    As an example, look again at the last two screenshots. Something was “filtered” in one place, but not in the other. If you find it, please let me know in the comments.

  • Take advantage of Django’s system checks

    Today, let’s go back to the topic of the first post in this series of Django tips.

    At the time, I focused on the python manage.py check --deploy command. In this article, I will explore the feature on which it is built and how it can be quite handy for many other scenarios.

    So, the System Check Framework, what is it?

    The system check framework is a set of static checks for validating Django projects. It detects common problems and provides hints for how to fix them. The framework is extensible so you can easily add your own checks.

    Django documentation

    We already have linters, formatters, and static analysis tools that we run on the CI of our projects. Many companies also have strict peer review processes before accepting any changes to the code. However, this framework can still very useful for many projects in situations such as:

    • Detect misconfigurations when someone is setting a complex new development environment, and help them correctly resolve the issues.
    • Warn developers when project-specific approaches are not being followed.
    • Ensure everything is well configured and correctly set up before deploying to production. Otherwise, make the deployment fail.

    With the framework, the above points are a bit easier to implement, since “system checks” has access to the real state of the app.

    During development, checks are executed on commands such as runserver and migrate, and before deployment a call to manage.py check can be executed before starting the app.

    Django itself makes heavy use of this framework. I’m sure you have already seen messages such as the ones shown below, during development.

    Screenshot of a Django app being launched and system checks warnings showing in the terminal.

    I’m not going to dig deeper into the details, since the Django documentation is excellent (list of built-in checks). Let’s just build a practical example.

    A practical example

    Recently, I was watching a talk and the speaker mentioned a situation when a project should block Django’s reverse foreign keys, to prevent accidental data leakages. The precise situation is not relevant for this post, given it is a bit more complex, but let’s assume this is the requirement.

    The reverse foreign key feature needs to be disabled on every foreign key field. We can implement a system check to ensure we haven’t forgotten any. It would look very similar to this:

    # checks.py
    from django.apps import apps
    from django.core import checks
    from django.db.models import ForeignKey
    
    
    @checks.register(checks.Tags.models)
    def check_foreign_keys(app_configs, **kwargs):
        errors = []
    
        for app in apps.get_app_configs():
            if "site-packages" in app.path:
                continue
    
            for model in app.get_models():
                fields = model._meta.get_fields()
                for field in fields:
                    errors.extend(check_field(model, field))
    
        return errors
    
    
    def check_field(model, field):
        if not isinstance(field, ForeignKey):
            return []
    
        rel_name = getattr(field, "_related_name", None)
        if rel_name and rel_name.endswith("+"):
            return []
    
        error = checks.CheckMessage(
            checks.ERROR,
            f'FK "{field.name}" reverse lookups enabled',
            'Add "+" at the end of the "related_name".',
            obj=model,
            id="example.E001",
        )
        return [error]

    Then ensure the check is active by loading it on apps.py:

    # apps.py
    from django.apps import AppConfig
    
    
    class ExampleConfig(AppConfig):
        name = "example"
    
        def ready(self):
            super().ready()
            from .checks import check_foreign_keys

    This would do the trick and produce the following output when trying to run the development server:

    $ python manage.py runserver
    Watching for file changes with StatReloader
    Performing system checks...
    
    ...
    
    ERRORS:
    example.Order: (example.E001) FK "client" reverse lookups enabled
            HINT: Add "+" at the end of the "related_name".
    example.Order: (example.E001) FK "source" reverse lookups enabled
            HINT: Add "+" at the end of the "related_name".
    example.OrderRequest: (example.E001) FK "source" reverse lookups enabled
            HINT: Add "+" at the end of the "related_name".

    On the other hand, if your test is only important for production, you should use @checks.register(checks.Tags.models, deploy=True). This way, the check will only be executed together with all other security checks when running manage.py check --deploy.

    Doing more with the framework

    There are also packages on PyPI, such as django-extra-checks, that implement checks for general Django good practices if you wish to enforce them on your project.

    To end this post, that is already longer than I initially desired, I will leave a couple of links to other resources if you want to continue exploring:

  • Meet the InfoSec Planet

    If you are a frequent reader of this blog, you might already know that I created a small tool to generate a simple webpage plus an RSS feed, from the content of multiple other RSS sources, called worker-planet.

    This type of tool is often known as a “planet”:

    In online media a planet is a feed aggregator application designed to collect posts from the weblogs of members of an internet community and display them on a single page.

    Wikipedia

    While the tool is open-source, a person needs to deploy it before being able to see it in action. Not great.

    This brings us to last week. I was reading a recent issue of a popular newsletter, when I found an OPML file containing 101 infosec related sources curated by someone else.

    Instead of adding them to my newsreader, which to be honest, already contains a lot of cruft that I never read and that I should remove anyway, I saw a great fit to build a demo site for `worker-planet`.

    Preparing the sources

    The first step was to extract all the valid sources from that file. This is important because there is the chance that many of the items might not be working or online at all, since the file is more than 2 years old.

    A quick python script can help us with this task:

    # Extract existing URLs
    urls = []
    tree = ET.parse(opml_file)
    for element in tree.getroot().iter("outline"):
        if url := element.get("xmlUrl"):
            urls.append(url)
    
    # Make sure they are working
    def check_feed(url):
        try:
            response = urlopen(url)
            if 200 <= response.status < 300:
                body = response.read().decode("utf-8")
                ET.fromstring(body)
                return url
        except Exception:
            pass
    
    working_urls = []
    with ThreadPoolExecutor(max_workers=20) as executor:
        for result in executor.map(check_feed, urls):
            if result:
                working_urls.append(result)

    As expected, from the 101 sources present in the file, only 54 seem to be working.

    Deploying

    Now that we already have the inputs we need, it is time to set up and deploy our worker-planet.

    Assuming there aren’t any customizations, we just have to copy the wrangler.toml.example to a new wrangler.toml file and fill configs as desired. Here’s the one I used:

    name = "infosecplanet"
    main = "./worker/script.js"
    compatibility_date = "2023-05-18"
    node_compat = true
    account_id = "<my_id>"
    
    workers_dev = true
    kv_namespaces = [
        { binding = "WORKER_PLANET_STORE", id = "<namespace_id_for_prod>", preview_id = "<namespace_id_for_dev"> },
    ]
    
    [vars]
    FEEDS = "<all the feed urls>"
    MAX_SIZE = 100
    TITLE = "InfoSec Planet"
    DESCRIPTION = "A collection of diverse security content from a curated list of sources. This website also serves as a demo for \"worker-planet\", the software that powers it."
    CUSTOM_URL = "https://infosecplanet.ovalerio.net"
    CACHE_MAX_AGE = "300"
    
    [triggers]
    crons = ["0 */2 * * *"]

    Then npm run build plus npm run deploy. And it is done, the new planet should now accessible through my workers.dev subdomain.

    The rest is waiting for the cron job to execute and also configure any custom routes / domains on Cloudflare’s dashboard.

    The final result

    The new “Infosec Planet” is available on “https://infosecplanet.ovalerio.net” and lists the latest content in those infosec related sources. A united RSS feed is also available.

    In the coming weeks, I will likely improve a bit the list of sources to improve the overall quality of the content.

    One thing I would like to highlight, is that I took a special precaution to not include the full content of the feeds in the InfoSec Planet’s output.

    It was done this way because I didn’t ask for permission from all those authors, to include the contents of their public feeds in the page. So just a small snippet is shown together with the title.

    Nevertheless, if some author wishes to remove their public feed from the page, I will gladly do it so once notified (by email?).

  • The books I enjoyed the most in 2023

    We reached the end of another year, and generally, this is a good time to look back, to evaluate what was done, what wasn’t done and eventually plan ahead.

    While dedicating some time to the first task, it occurred to me that I should share some of this stuff. I doubt it will be useful to the readers of this blog (but you never know), however it could be useful to me as notes that I leave behind, so I can come back to them later.

    Today I decided to write a bit about the books I’ve read and enjoyed the most during 2023. I don’t mean they are masterpieces or references in a given field, what I mean is that I truly enjoyed the experience. It could be because of the subject, the kind of book, the writing style or for any other reason.

    What matters is that I was able to appreciate the time I spent reading them.

    “The founders”, by Jimmy Soni

    When the events described in the book happened, I wasn’t old enough to follow, comprehend and care about them. I certainly was already playing with computers, but this evolving thing called the Internet, and more precisely the web, was more like a playground to me.

    Nevertheless, the late 90s and early 00s were a remarkable period and many outstanding innovations were being developed and fighting their way through at that time.

    Internet payments were one of those things and the story of how PayPal came to be, is not only turbulent, as for any startup, but is also fascinating. Its survival in the end is the result of immense talent, hard work, troublesome politics and luck.

    The team not only had to face hard technical challenges and also fight on multiple other fronts, including with themselves.

    One quote from the introduction tells a lot about how some arguments against change are timeless:

    … and sites like PayPal were often thought to be portals for illicit activity like money laundering or the sale of drugs and weapons. On the eve of its IPO, a prominent trade publication declared that the country needed PayPal “as much as it does an anthrax epidemic”.

    From the introduction of the book

    Nevertheless, they changed the way we do things and helped unleash a new era. An era that people like me, who always worked online and for businesses that depend on the Internet, were able to be part of due to many of these achievements. Not to mention the unusual number of individuals who were part of PayPal and would later start other world-changing businesses.

    “On Writing”, by Stephen King

    The second book is related to an entirely different field, but shares many similarities with the first. It tells us the story behind the name that authored many well-known books during several decades.

    It is a book not only about the person and the challenges faced throughout his life, but also how his path impacted the writing and “taste”.

    When I started with the book, I was expecting something entirely different, more of a collection of rules and tips on how to write clearly. In the end, the book was much more than that, of course, the important teachings are there, but it also provides you with a great story and context.

    I can’t say I learned all the tips the book has to offer and that I’ve put them in practice, but the experience remains.

    As with all crafts, it requires time, dedication, and much more.

  • An attempt at creating a DIY baby monitor

    Occasionally, “modern” baby monitors hit the news, but not for the best reasons. Sometimes for the lack of security, other times for exploitative practices, etc.

    This also applies to many other categories of products that we can include in the so-called “Internet of Things”.

    After reading a recent article about the topic, some comments with clever approaches, made me wonder how hard would it be, to build a simple and reasonably secure alternative with common tools (DIY style)?

    Starting with the approach above, that uses ffmpeg and ffplay, I will describe how far I was able to go with:

    • 1 Raspberry Pi
    • 1 Standard webcam (with microphone)
    • (Optional) 1 Wi-Fi USB dongle, if board doesn’t include one.

    The goal of the solution: Non-technical people can easily and securely check their baby or their pet, anywhere. They should be able to move the “monitor” around (plug out and then plug in), it should start working right away once turned on (and a known Wi-Fi connection is available).

    Figuring it out

    After playing a bit with the solution described in the mentioned comment, I found that while it seems ok for a quick setup, it falls short in 2 points:

    • Only works for one viewer at a time
    • The viewer IP address needs to be set on the monitor, which means a config change and a restart are required every time you change the device you are using to view the video stream.

    Falling short of achieving my main goal. It does require a different approach.

    After additional research, I tried several alternatives that can be found with a quick online search. Including, uv4l using WebRTC (not quite what I’m looking for), motion (no sound, but perhaps can be used together with the final solution for extra functionality) and others. None of them were easy to set up or could achieve the defined goal.

    Later, I found another blog post describing how the author achieved the goal using picam. However, that software only supports the Raspberry Pi camera module, a strict hardware limitation that falls out of scope. The same for libcamera.

    In the end, the easiest solution was to turn to vlc, the well known media player. It already comes installed on the Raspberry Pi OS.

    I checked the documentation, which already provides a great deal of information, and started tinkering with it. It turned out to be a good fit, however couldn’t get it working exactly as I wished. Fortunately, I’m not the first to try this and someone else already wrote a great answer to a similar question.

    All things set, the following command does exactly what is needed:

    cvlc -vvv v4l2:///dev/video0 :input-slave=alsa://hw:1,0 --sout '#transcode{deinterlace,vcodec=mpgv,acodec=mpga,ab=128,channels=2,samplerate=44100,threads=4,audio-sync=1}:standard{access=http,mux=ts,mime=video/ts,dst=device.local.ip.address:8080}'

    Then you just need to open a network stream, using VLC or other player, on any of your devices, using the following URL:

    http://device.local.ip.address:8080

    Done, phase one complete. It has a slight delay (just a couple of seconds), the quality is very reasonable, and we kept it simple (one command).

    Making it persistent

    Now 2 things are missing:

    1. Set and start everything once the device is turned on
    2. Be able to access it from anywhere (without exposing it to the internet and with proper access controls).

    To address the first, a person can rely on systemd. The following “service” config, will start the stream when the device is turned on and connected to a Wi-Fi network:

    [Unit]
    Description=Cam Stream
    Wants=network-online.target
    After=network-online.target
    
    [Service]
    Type=simple
    User=pi
    WorkingDirectory=/home/pi
    ExecStart=/usr/bin/bash vlc_streaming.sh
    RestartSec=5
    Restart=always
    
    [Install]
    WantedBy=multi-user.target

    This file should be placed in /etc/systemd/system/ and then enabled using the systemctl command. The vlc_streaming.sh file contains the single cvlc command I mentioned above.

    Making it available

    To address the second point (Be able to access it from anywhere), I opted to add the device to a Tailscale network and turn on Magic DNS.

    This way, I can authorize which devices on the VPN will access the “cam”. Once those devices connect to the network, regardless of where they are, they can access the stream. Tailscale will handle access-control to this device and will encrypt all connections to it.

    A simple ACL rule for defining the right access-controls could be:

    {
      "acls": [
        {"action": "accept", "src": ["tag:camviewer"], "dst": ["tag:cam:8080"]},
        ...
      ]
      ...
    }

    Where tag:camviewer represents the devices allowed to access the cam stream.

    Regarding the configuration described in the previous sections, a few changes might be required.

    The first is replacing dst=device.local.ip.address:8080 with the new interface address created by Tailscale (dst=device.tailscale.ip.address:8080), so the stream is only available on that protected network.

    You might want to edit the systemd service to only start after Tailscale is up and running:

    [Unit]
    Description=Baby Cam Streaming
    Wants=tailscaled.service
    After=network-online.target tailscaled.service sys-subsystem-net-devices-tailscale0.device
    
    ...

    Then on your other devices, you would use the following URL to connect:

    http://<device_name>:8080

    Note: Due to some timing related issues, you might need to prepend a sleep command with a couple of seconds, to the vlc_streaming.sh file.

    Wrapping up

    I want to finish this post, by going back to the question I asked myself before starting this exploration: “how hard would it be to build something like this?”.

    I have to say that the solutions are not obvious. But it also isn’t that hard for a “power user” or for someone with basic technical knowledge to leverage existing tools and build a system that works reasonably well.

    The solution I ended up assembling, can look complicated, but it is actually simple, and I quite like it.

    I will just leave it here as a future reference, since I might need to return to it someday in the future, or it can be helpful to someone else. If you think there is something wrong, vulnerable or missing, please let me know in the comments.

  • You can now follow this blog on the fediverse

    The possibilities of the ActivityPub protocol, and what it can bring to the table regarding interoperability in the social media landscape, are immense. It is specially welcome after a decade (and half?) plagued by the dominance of centralized walled gardens that almost eradicated the diverse ecosystem that previously existed.

    It is used by many software packages, such as Mastodon, Peertube, Lemmy and others. For all of them, you can run your own instance if you don’t want to sign up for the existing providers (just like email).

    By speaking the ActivityPub “language”, these services can communicate with each other, forming a network that we call the Fediverse.

    Recently, WordPress joined the party by adding support through a plugin. Since this blog runs on WordPress, its content is now available to be followed on any of those networks.

    Together with the existing RSS feeds, that you can add to your newsreader, you now have another way of getting the latest content without having to directly visit the website.

    To accomplish that, you just have to search for content@blog.ovalerio.net on any instance in the Fediverse.

    Keep in mind that my “real” account on that network is still dethos@s.ovalerio.net, where I share, much more frequently, short form content, such as links, that I find interesting.

  • So you need to upgrade Django

    No matter how much you try to delay and how many reasons you find to postpone, eventually the time comes. You need to update and upgrade your software, your system components, your apps, your dependencies, etc.

    This happens to all computer users. On some systems, this is an enjoyable experience, on other systems as painful as it can get.

    Most of the time, upgrading Django on our projects falls in the first category, due to its amazing documentation and huge community. Nevertheless, the upgrade path takes work and “now” rarely seems the right time to move forward with it, specially if you are jumping between LTS versions.

    So, today’s tip is a mention of 2 packages that can help you reduce the burden of going through your codebase looking for the lines that need to be changed. They are:

    Both of them do more or less the same thing, they will automatically detect the code that needs to be changed and then fix it according to the release notes. Attention, this is no excuse to avoid reading the release notes.

    django-upgrade is faster and probably the best choice, but django-codemod supports older versions of Python. Overall, it will depend on the situation at hand.

    And this is it… I hope these libraries are as helpful to you as they have been to me.

  • Improving your online privacy: An update

    Ten years ago, after it became clear to almost everyone that all our online activity was being tracked and stored, I wrote a blog post about simple steps a person could take to improve their privacy online.

    Essentially, it contains a few recommendations that everyone could follow to reduce their fingerprint without much effort. It wasn’t meant to be exhaustive, and it wasn’t meant to make you invisible online. If your personal situation needs more, you have a lot more ground to cover, which was totally out of the scope of that post.

    The target audience was the average Joe, that doesn’t like to be spied on. Specially by commercial companies that just want to show you ads, sell you stuff or use your habits against you.

    Many things have changed in the last 10 years, while others remained the same. With this in mind, I think it is time for an update to my suggestions, keeping in mind that no specialized knowledge should be required and the maximum amount of effort should not surpass 30 minutes.

    1. Pick an ethical browser

    For regular users on any computer or operating system, the main window to the outside world is the browser. Nowadays, this app is of the utmost importance.

    My initial suggestion remains valid these days, you should install and use Firefox.

    There are other browsers that could also do the trick, such as Brave or Safari, but my preference still goes to Mozilla’s browser.

    No matter your choice, you should avoid Chrome and Edge. If you want a more detailed comparison, you can check this website.

    Expected effort: 5 minutes

    2. Install important extensions

    Unfortunately, the default configuration of a good browser is not enough, even considering it already includes many protections enabled from the start.

    For a minimal setup, I consider 2 extensions indispensable:

    These will ensure that most spyware, included in a huge number of websites, isn’t loaded and does not leak your private information to third-parties. They will also block ads and other junk that make the web slow and waste your bandwidth.

    Expected effort: 2 minutes

    3. Opt out of any data collection

    This topic is specially problematic for Microsoft Windows users. However, it is becoming an increase prevalent practice in all software vendors.

    They will tell you they are collecting anonymous data to improve their products and services, while often the data is not that anonymous and/or the purposes are far wider than the ones they make you believe initially.

    Nowadays, Windows is an enormous data collection machine, so to minimize the damage, you should disable as much of this as possible. If this is your operating system, you can find a step-by-step tutorial of the main things to disable here (note: you should evaluate if the last 3 steps make sense for your case).

    If you use a different operating system, you should do a small research about what data the vendor collects.

    The next action is to do the same on your browser. In this case, in Firefox you should paste about:preferences#privacy in the URL bar, look for Firefox Data Collection and Use and then disable all options.

    Expected effort: 2–8 minutes

    4. Use a better DNS resolver

    This suggestion is a bit more technical, but important enough that I decided to include it in this guide that only covers the basics.

    With the new configuration that we set up on points 2 and 3, in theory, we are well protected against these forms of tracking. However, there are 2 big holes:

    • Are you sure the operating system settings are being respected?
    • Trackers on the browser are being blocked, but what about the other installed applications? Are they spying on you?

    To address the 2 points above, you can change your default DNS server to one that blocks any queries to sites tracking your activity. Two examples are Mullvad DNS and Next DNS, but there are others.

    Changing your DNS server can also help you block tracking on other devices you have less control, such as your phone or TV.

    The links contain detailed guides on how to proceed.

    Expected effort: 4–10 minutes

    5. Segregate your activity

    This step is more related to your behavior and browsing habits than to any tools that you need to install and configure.

    The goal here is to clean any data websites leave behind to track you across visits and websites through time.

    You should configure your browser to delete all cookies and website related data at the end of each session, and by this, I mean when you close your browser.

    In Firefox, you should again to about:preferences#privacy search for “Cookies and Site Data” and check the option: “Delete cookies and site data when Firefox is closed“.

    Sometimes this is impractical because it will force you to login into websites and apps all the time. A good compromise is to use “Multi-Account Containers“, they allow you to segregate your activity into multiple isolated containers, so you can limit any tracking capabilities.

    Expected effort: 3 minutes

    6. Prefer privacy preserving tools and services

    Most online services that common folk use, go to huge lengths to track your activities. For most of them, this is their business model.

    Luckily, there are drop-in replacements for common tools that will provide you with similar or better service:

    The above are just a few examples, these choices will depend on your own needs. At first, you might find them strange, but experience tells me that soon enough you will get used to them and discover they are superior in many ways.

    Expected effort: 3–5 minutes

    7. Adopt better habits

    I’m already a few minutes over budget, but hey, privacy is hard to achieve nowadays.

    For this last point, the lesson is that you must be careful with the information you share and make use of GDPR to control when someone is overstepping.

    Here are a few tips, just for you to get an idea:

    • Don’t provide your personal data just because they ask (input random data if you think it will not be necessary).
    • Always reject cookies and disable data collection when websites show those annoying pop-ups. Look for the “reject all” button, they usually hide it.
    • Even if websites don’t prompt you about privacy settings, go to your account preferences and disable all data collection.
    • Use fake profiles / identities.
    • When too much information is needed, and you don’t see the point, search for other alternatives.

    The main message is: Be cautious and strict with all the information you share online.

    Concluding

    If you followed up to this point, you already made some good progress. However, this is the bare minimum and I only covered what to do on your personal computer, even though some of these suggestions will also work on your other devices (phone, tablet, etc.).

    I avoided suggesting tools, services and practices that would imply monetary costs for the reader, but depending on your needs they might be necessary.

    Nowadays, it is very hard not to be followed around by a “thousand companies and other entities”, specially when we carry a tracking device in our pockets, attached to our wrists, or move around inside one of them.

    In case you want to dig deeper, there are a many sources online with more detailed guides on how to go a few steps further. As an example, you can check “Privacy Guides“.

    Now, to end my post with a question (so I could also learn something new), what would you recommend differently? Would you add, remove or replace any of these suggestions? Don’t forget about the 30-minute rule.

  • New release of worker-planet

    Two years ago, I made a small tool on top of Cloudflare’s Workers to generate a single feed by taking input from multiple RSS sources, a kind of aggregator or planet software as it was usually known a few years ago. You can read more about it here and here.

    This is a basic tool that is meant to be easy to deploy. The codebase itself doesn’t need too much maintenance.

    However, after all this time, the code started to become outdated to the point it could become unusable soon, since the ecosystem has moved on.

    So during this last week, I did a few upgrades and released a new version. The changes include:

    • It now uses a recent version of wrangler.
    • The development workflow was updated.
    • A new example template was added.
    • A new template helper and new context data were added to help with the development of new templates.

    You can grab a copy here. Any bugs or improvements, feel free to create new issues on the GitHub repository or contribute with new patches.

  • Playing with maps

    I’ve always been astonished about how well mapping apps work. Sure, when Google Maps was first released the sense of wonder was much greater than it is nowadays, nevertheless it is still impressive.

    The number of situations when/where this kind of software becomes handy is huge, from the well-known GPS guides to even games (remember “Pongo”?).

    Today it is even easier to work and play with maps, by using free sources such as OpenStreetMap or by using many existing APIs. Even without any programming knowledge, you can build outstanding maps and experiences with services like Felt.

    Some time ago, by reading a random blog post on the web, I learned about this tool called “prettymaps“, which lets you generate beautiful images based on the map of a given location.

    It has been lost in my notebook since then. Today I decided to give it a try and generate a few renders of the capital city of Madeira Island. Here are the results:

    Funchal downtown, rendered using pretty maps.
    Funchal, as a combination of 4 rendered images of 4 different localities
    Render of a small part of Funchal

    Unfortunately, I wasn’t able to include the ocean. I tried multiple approaches, downloaded files with that information, but ultimately the results were always the same. In the package’s issue tracker on GitHub there are multiple people facing the same issues, perhaps a future version will include a fix for this.

  • What to use for “TOTP” in 2023?

    At the start of last week, we received great news regarding new improvements to a very popular security app, “Google Authenticator”. A feature it was lacking for a long time was finally implemented, “cloud backups”.

    However, after a few days, the security community realized the new feature wasn’t as good as everybody was assuming. It lacks “end-to-end encryption”. In other words, when users back up their 2FA codes to the cloud, Google has complete access to these secrets.

    Even ignoring the initial bugs (check this one and also this one), it is a big deal because any second factor should only be available to the “owner”. Having multiple entities with access to these codes, defeats the whole purpose of having a second factor (ignoring again any privacy shortcomings).

    Summing up, if you use Google Authenticator, do not activate the cloud backups.

    And this brings us to the topic of today’s post: “What app (or mechanism) should I use for 2FA?”

    This question is broader than one might initially expect, since we have multiple methods at our disposal.

    SMS codes should be on their way out, for multiple reasons, but specially because of the widespread SIM swapping vulnerabilities.

    Push-based authenticators don’t seem to be a great alternative. They are not standardized, they tie the user to proprietary ecosystems, and they can’t be used everywhere.

    In an ideal scenario, everyone would be using FIDO2 (“Webauthn”) mechanisms, with hardware keys or letting their device’s platform handle the secret material.

    While support is growing, and we should definitely start using it where we can, the truth is, it is not yet widely accepted. This means we still need to use another form of 2FA, where FIDO2 isn’t supported yet.

    That easy to use and widely accepted second factor is TOPT.

    This still is the most independent and widely used form of 2FA we have nowadays. Basically, you install an authenticator app that provides you temporary codes to use in each service after providing the password. One of the most popular apps for TOPT is the “problematic” Google Authenticator.

    What are the existing alternatives?

    Many password managers (1Password, Bitwarden, etc.) also offer the possibility to generate these codes for you. However, I don’t like this approach because the different factors should be:

    • Something you know
    • Something you have
    • Something you are

    In this case, the password manager already stores the first factor (the “something you know”), so having all eggs in the same basket doesn’t seem to be a good idea.

    For this reason, from now on, I will focus on apps that allow me to store these codes in a separate device (the “something you have”).

    My requirements for such an app are:

    • Data is encrypted at rest.
    • Access is secured by another form of authentication.
    • Has easy offline backups.
    • It is easy to restore a backup.
    • Secure display (tap before the code is displayed on the screen).
    • Open source.
    • Available for android.

    There are dozens of them, but many don’t comply with all the points above, while others have privacy and security issues that I can’t overlook (just to give you a glimpse, check this).

    In the past, I usually recommended “andOTP“. It checks all the boxes and is indeed a great app for this purpose. Unfortunately, it stopped being maintained a few months ago.

    While it is still a solid app, I don’t feel comfortable recommending it anymore.

    The bright side is that I went looking for a similar app and I found “Aegis“, that happens to have great reviews, fulfills all the above requirements and is still maintained. I guess this is the one I will be recommending when I’m asked “what to use for 2FA nowadays”.

  • New release of “inlinehashes”

    Last year, I built a small tool to detect inline styles and scripts in a given webpage/document and then calculate their hashes. It can be useful for someone trying to write a strict “Content-Security-Policy” (CSP) for pre-built websites. I described the reasoning at the time in this blog post.

    Today, I’m writing to announce that I released the version 0.0.5 of inlinehashes. The main changes are:

    • CSP directives are now displayed for each hash, helping you to know right away where to place them.
    • The --target option now uses CSP directives to filter the output instead of needing to remember any custom value.
    • New output formats were added, instead of relying just on JSON.
    Screenshot of the output of inlinehashes 0.0.5

    One problem of this version is that it only supports Python 3.11. So for other interpreter versions, you are stuck with version 0.0.4. I expect to fix this soon and make everything work for, at least, the last three versions of Python.

    You can find out more on PyPI and on the source code repo.

  • Cleaning my follow list using “jacanaoesta”

    Last year we saw the rise of the Fediverse. Mostly because of a series of external events, that ended up pushing many people to try other alternatives to their centralized platform of choice.

    Mastodon was clearly the software component that got most attention and has been under the spotlight in the last few months. It wasn’t launched last year, in fact, mastodon instances (servers) have been online since 2016, managed by its developers and other enthusiasts.

    I’ve been running my own instance since 2017 and since then, I’ve seen people come and gone. I started following many of them, but some no longer are active. This brings us to the real topic of this post.

    Since I couldn’t find a place in the Mastodon interface that would allow me to check which users I follow are inactive, I decided to build a small tool for that. It also served as a nice exercise to put my rust skills into practice (a language that I’m trying to slowly learn during my spare time).

    The user just needs to specify the instance and API key, plus the number of days for an account to be considered inactive if the default (180 days) is not reasonable. Then the tools will print all the accounts you follow that fit that criteria.

    Find people that no longer are active in your Mastodon follow list.
    
    Usage: jacanaoesta [OPTIONS] <instance>
    
    Arguments:
      <instance>
    
    Options:
      -k, --api-key      Ask for API key
      -d, --days <days>  Days since last status to consider inactive [default: 180]
      -h, --help         Print help information
      -V, --version      Print version information

    And this is an example of the expected output:

    Paste API Key here:
    Found 171 users. Checking...
    veracrypt (https://mastodon.social/@veracrypt) seems to be inactive
    ...
    fsf (https://status.fsf.org/fsf) seems to be inactive
    38 of them seem to be inactive for at least 180 days

    Without the -k option, the program tries to grab the API key from the environment variables instead of asking the user for it.

    Problem solved. If you want or need to give it a try, the code and binaries can be found here: https://github.com/dethos/jacanaoesta

    Note: After publishing this tool, someone brought to my attention that Mastodon does indeed have a similar functionality in its interface. The difference being it only considers accounts that don’t publish a status for 1 month as inactive (it’s not configurable).

    You can find it in “Preferences → Follows and Followers → Account Activity → Dormant”

    Screenshot of where to find the "dormant" functionality.