Author: Gonçalo Valério

  • Secure PostgreSQL connections on your Django project

    Last week, an article was published with some interesting numbers about the security of PostgreSQL servers publicly exposed to the internet (You can find it here).

    But more than the numbers, what really caught my attention was the fact that most clients and libraries used to access and interact with the databases have insecure defaults:

    most popular SQL clients are more than happy to accept unencrypted connections without a warning. We conducted an informal survey of 22 popular SQL clients and found that only two require encrypted connections by default.

    Jonathan Mortensen

    The article goes on to explain how clients connect to the database server and what options there are to establish and verify the connections.

    So, this week, let’s see how we can set up things in Django to ensure our apps are communicating with the database securely over the network.

    Usually, we set up the database connection like this:

    DATABASES = {
        "default": {
            "ENGINE": "django.db.backends.postgresql",
            "NAME": "db_name",
            "USER": "db_user",
            "PASSWORD": "db_password",
            "HOST": "127.0.0.1",
            "PORT": "5432",
        }
    }

    The above information can also be provided using a single “URL” such as postgres://USER:PASSWORD@HOST:PORT/NAME, but in this case, you might need some extra parsing logic or to rely on an external dependency.

    Now, based on that article psycopg2 by default prefers to use an encrypted connection but doesn’t require it, or even enforces a valid certificate. How can we change that?

    By using the field OPTIONS and then set the sslmode:

    DATABASES = {
        "default": {
            "ENGINE": "django.db.backends.postgresql",
            "NAME": "db_name",
            "USER": "db_user",
            "PASSWORD": "db_password",
            "HOST": "127.0.0.1",
            "PORT": "5432",
            "OPTIONS": {
                "sslmode": "<mode here>"
            }
        }
    }

    The available modes are:

    • disable
    • allow
    • prefer
    • require
    • verify-ca
    • verify-full

    The obvious choice for a completely secure connection is verify-full, specially when the traffic goes through a public network.

    If you are using a URL, something like this should do the trick: postgres://USER:PASSWORD@HOST:PORT/NAME?sslmode=verify-full.

    And that’s it, at least on the client’s side.

    If the above is not an option for you, I recommend taking a look at pgproxy. You can find more details here.

  • Preparing for Hacktoberfest

    It already starts tomorrow… the next edition of “Hacktoberfest”. For those who don’t know, it basically is an initiative that incentivizes participants to contribute to open-source software.

    During the month of October, those who do 4 contributions or more, can either receive a t-shirt or opt for a tree to be planted in their name.

    While the last editions seem to have been plagued with spam problems (as in “low-value contributions”), I still think it is an important initiate. Perhaps raising the bar for participation or completion would prevent these issues, but that is not the point of this post.

    Having already participated twice in the past, this year I will try to do it again (as you might have guessed from the post’s title).

    With this in mind, I spent a “few minutes” looking at my currently active/maintained repositories to see which ones could make use of a few extra contributions (the others will probably be archived).

    Here are the ones I ended up enabling for the “event”:

    • hawkpost – This old project that is still used, allows you to receive content in a secure end-to-end way from people without any encryption knowledge. Nowadays, there are better alternatives, but in some use cases it still is useful. The project has been unmaintained for a while and the idea for the next month is to upgrade its dependencies, fix the CI, improve the documentation and bring it to shape by making a new release.
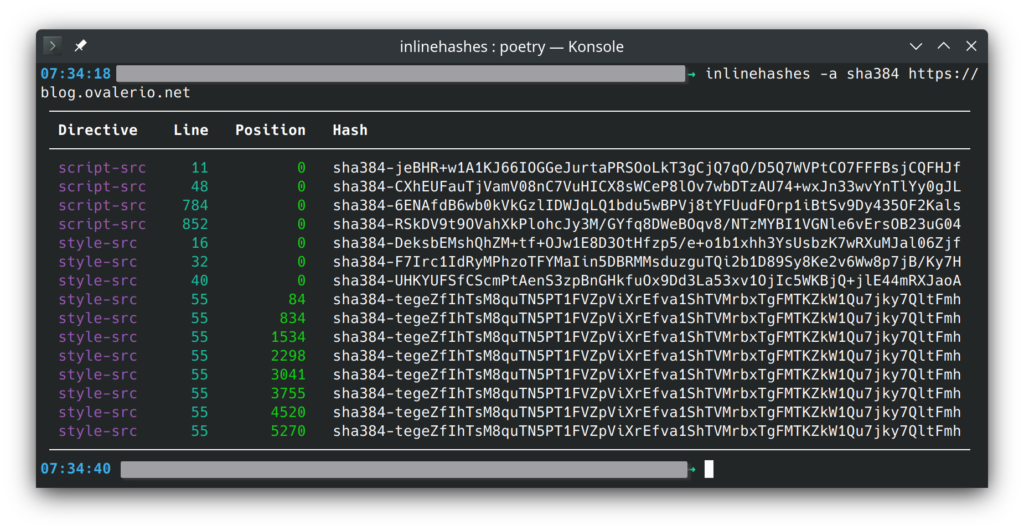
    • inlinehashes – is a small CLI tool that takes an HTML document and produces the hashes of all inline elements that would need to be whitelisted in the Content-Security-Policy. Currently, the project only looks for styles and some places where JavaScript can be used. In the next month it would be good to extend the project’s coverage such as other inline JS possibilities, objects, etc.
    • worker-planet – Is a “Cloudflare Worker” that generates a single web page/feed with content from multiple sources. It is useful for communities where each member publishes content using his own blog/website. During the next month, it would be useful to include a few extra themes (and better ones).
    • worker-ddns – An elementary DDNS solution built on top of Cloudflare Workers and Cloudflare DNS. This project is very stable and could be considered complete, so I’m not expecting any significant changes. However, documentation could be improved, and we could also address systems that don’t support an agent written in python.

    Of course there are other improvements that could be made to all them, but these are my “priorities”.

    If you are participating on Hacktoberfest and still don’t know where to start, please give the above project’s a shot.

  • Shutting Down Webhook-logger

    A few years ago I built a small application to test Django’s websocket support through django-channels. It basically displayed on a web page in real time all the requests made to a given endpoint (you could generate multiple of them) without storing anything. It was fun and it was very useful to quickly debug stuff , so I kept it running since that time.

    If you are interested in more details about the project itself, you can find a complete overview here.

    However today, Heroku, the platform where it was running, announced the end of the free tier. This tier has been a godsend for personal projects and experiments over the last decade and heroku as a platform initially set the bar really high regarding the developer experience of deploying those projects.

    “Webhook-logger” was the only live project I had running on Heroku’s free tier and after some consideration I reached the conclusion it was time to turn it off. Its functionality is not unique and there are better options for this use case, so it is not worth the work required to move it to a new hosting provider.

    The code is still available in case anyone still want to take a look or deploy by their own.

  • Controlling the access to the clipboard contents

    In a previous blog post published earlier this year I explored some security considerations of the well known “clipboard” functionality that most operating systems provide.

    Long story short, in my opinion there is a lot more that could be done to protect the users (and their sensitive data) from many attacks that use of clipboard as a vector to trick the user or extract sensitive material.

    The proof-of-concept I ended up building to demonstrate some of the ideas worked in X11 but didn’t achieve one of the desired goals:

    It seems possible to detect all attempts of accessing the clipboard, but after struggling a bit, it seems that due to the nature of X11 it is not possible to know which running process owns the window that is accessing the clipboard. A shame.

    Myself, last blog post on this topic

    The good news about the above quote, is that it no longer is true. A kind soul contributed a patch that allows “clipboard-watcher” to fetch the required information about the process accessing the clipboard. Now we have all ingredients to make the tool fulfill its initial intended purpose (and it does).

    With this lengthily introduction we are ready to address the real subject of this post, giving the user more control over how the clipboard is used. Notifying the users about an access is just a first step, but restricting the access is what we want.

    On this topic, several comments to the previous post mentioned the strategy used by Qubes OS. It relies on having one clipboard specific to each app and a second clipboard that is shared between apps. The later requires user intervention to be used. While I think this is a good approach, it is not easy to replicate in a regular Linux distribution.

    However as I mentioned in my initial post, I think we can achieve a similar result by asking the user for permission when an app requests the data currently stored on the clipboard. This was the approach Apple implemented on the recent iOS release.

    So in order to check/test how this could work, I tried to adapt my proof-of-concept to ask for permission before sharing any data. Here’s an example:

    Working example of clipboard-watcher requesting permission before letting other apps access the clipboard contents.

    As we can see, it asks of permission before the requesting app is given the data and it kinda works (ignore the clunky interface and UX). Of course that there are many possible improvements to make its usage bearable, such as whitelisting certain apps, “de-duplicate” the content requests (apps can generate a new one for each available content type, which ends up being spammy), etc.

    Overall I’m pleased with the result and in my humble opinion this should be a “must have” security feature for any good clipboard manager on Linux. I say it even taking into account that this approach is not bulletproof, given that a malicious application could continuously fight/race the clipboard manager for the control of the “X selections”.

    Anyhow, the new changes for the proof-of-concept are available here, please give it a try and let me know what you think and if you find any other problems.

  • Django Friday Tips: Less known builtin commands

    Django management commands can be very helpful while developing your application or website, we are very used to runserver, makemigrations, migrate, shell and others. Third party packages often provide extra commands and you can easily add new commands to your own apps.

    Today lets take a look at some less known and yet very useful commands that Django provides out of the box.


    diffsettings

    $ python manage.py diffsettings --default path.to.module --output unified

    Dealing with multiple environments and debugging their differences is not as rare as we would like. In that particular scenario diffsettings can become quite handy.

    Basically, it displays the differences between the current configuration and another settings file. The default settings are used if a module is not provided.

    - DEBUG = False
    + DEBUG = True
    - EMAIL_BACKEND = 'django.core.mail.backends.smtp.EmailBackend'
    + EMAIL_BACKEND = 'django.core.mail.backends.console.EmailBackend'
    - TIME_ZONE = 'America/Chicago'
    + TIME_ZONE = 'UTC'
    + USE_SRI = True
    - USE_TZ = False
    + USE_TZ = True
    ...

    sendtestemail

    $ python manage.py sendtestemail my@address.com

    This one does not require an extensive explanation. It lets you test and debug your email configuration by using it to send the following message:

    Content-Type: text/plain; charset="utf-8"
    MIME-Version: 1.0
    Content-Transfer-Encoding: 7bit
    Subject: Test email from host on 2022-04-28 19:08:56.968492+00:00
    From: webmaster@localhost
    To: my@address.com
    Date: Thu, 28 Apr 2022 19:08:56 -0000
    Message-ID: <165117293696.405310.3477251481753991809@host>
    
    If you're reading this, it was successful.
    -----------------------------------------------------------

    inspectdb

    $ python manage.py inspectdb

    If you are building your project on top of an existing database (managed by other system), inspectdb can look into the schema and generate the respective models for Django’s ORM, making it very easy to start using the data right away. Here’s an example:

    # This is an auto-generated Django model module.
    # You'll have to do the following manually to clean this up:
    #   * Rearrange models' order
    #   * Make sure each model has one field with primary_key=True
    #   * Make sure each ForeignKey and OneToOneField has `on_delete` set to the desired behavior
    #   * Remove `managed = False` lines if you wish to allow Django to create, modify, and delete the table
    # Feel free to rename the models, but don't rename db_table values or field names.
    
    ...
    
    class AuthPermission(models.Model):
        content_type = models.ForeignKey('DjangoContentType', models.DO_NOTHING)
        codename = models.CharField(max_length=100)
        name = models.CharField(max_length=255)
    
        class Meta:
            managed = False
            db_table = 'auth_permission'
            unique_together = (('content_type', 'codename'),)
    ...

    showmigrations

    $ python manage.py showmigrations --verbosity 2

    When you need to inspect the current state of the project’s migrations in a given environment the above command is the easiest way to get that information. It will tell you what migrations exist, which ones were applied and when.

    admin
     [X] 0001_initial (applied at 2021-01-13 19:49:24)
     [X] 0002_logentry_remove_auto_add (applied at 2021-01-13 19:49:24)
     [X] 0003_logentry_add_action_flag_choices (applied at 2021-01-13 19:49:24)
    auth
     [X] 0001_initial (applied at 2021-01-13 19:49:24)
     [X] 0002_alter_permission_name_max_length (applied at 2021-01-13 19:49:24)
     [X] 0003_alter_user_email_max_length (applied at 2021-01-13 19:49:24)
    ...

    There are many other useful management commands that are missing in the base Django package, to fill that gap there are some external packages available such as django-extensions. But I will leave those to a future post.

  • Inlineshashes: a new tool to help you build your CSP

    Content-Security-Policy (CSP) is an important mechanism in today’s web security arsenal. Is a way of defending against Cross-Site Scripting and other attacks.

    It isn’t hard to get started with or to put in place in order to secure your website or web application (I did that exercise in a previous post). However when the systems are complex or when you don’t fully control an underlying “codebase” that frequently changes (like it happens with of-the-shelf software) things can get a bit messier.

    In those cases it is harder to build a strict and simple policy, since there are many moving pieces and/or you don’t control the code development, so you will end up opening exceptions and whitelisting certain pieces of content making the policy more complex. This is specially true for inline elements, making the unsafe-inline source very appealing (its name tells you why you should avoid it).

    Taking WordPress as an example, recommended theme and plugin updates can introduce changes in the included inline elements, which you will have to review in order to update your CSP. The task gets boring very quickly.

    To help with the task of building and maintaining the CSP in the cases described above, I recently started to work on a small tool (and library) to detect, inspect and whitelist new inline changes. You can check it here or download it directly from PyPI.

  • Django Friday Tips: Admin Docs

    While the admin is a well known and very useful app for your projects, Django also includes another admin package that isn’t as popular (at least I never seen it being heavily used) but that can also be quite handy.

    I’m talking about the admindocs app. What it does is to provide documentation for the main components of your project in the Django administration itself.

    It takes the existing documentation provided in the code to developers and exposes it to users that have the is_staff flag enabled.

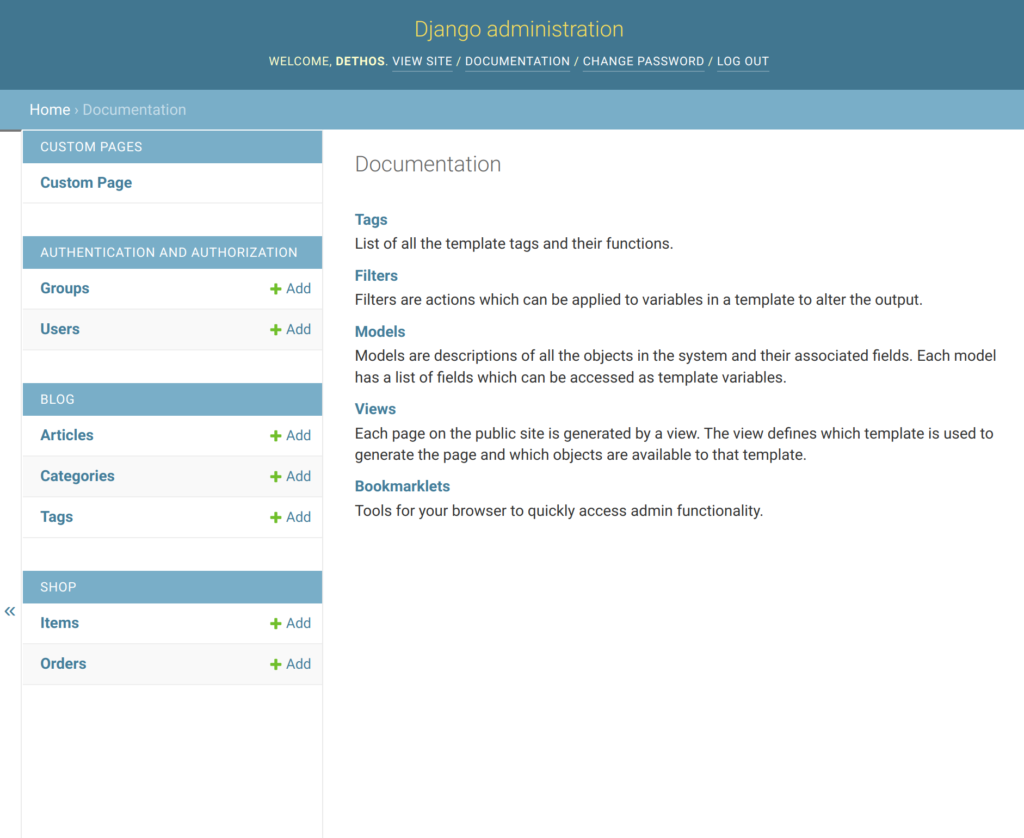
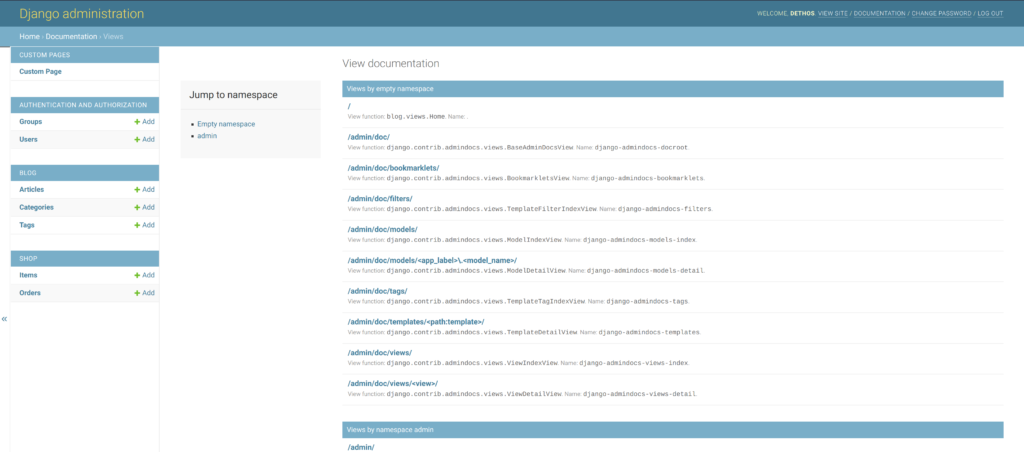
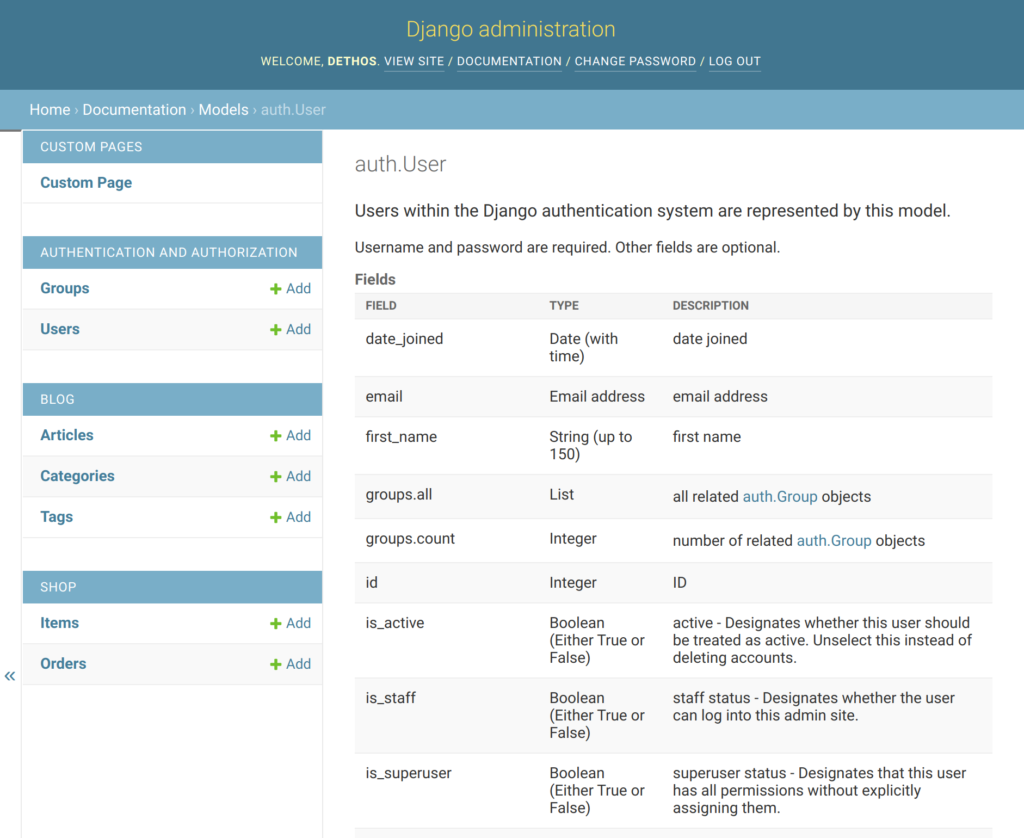
    This is what they see:

    Django admindocs main page.
    A view of the main page of the generated docs.
    Checking documentation for existing views.
    Checking a model reference in the admin documentation.
    Checking a model reference.

    I can see this being very helpful for small websites that are operated by teams of “non-developers” or even for people providing support to customers. At least when a dedicated and more mature solution for documentation is not available.

    To install you just have to:

    • Install the docutils package.
    • Add django.contrib.admindocs to the installed apps.
    • Add path('admin/doc/', include('django.contrib.admindocs.urls')) to the URLs.
    • Document your code with “docstrings” and “help_text” attributes.

    More details documentation can be found here. And for today, this is it.

  • Who keeps an eye on clipboard access?

    If there is any feature that “universally” describes the usage of computers, it is the copy/paste pattern. We are used to it, practically all the common graphical user interfaces have support for it, and it magically works.

    We copy some information from one application and paste into another, and another…

    How does these applications have access to this information? The clipboard must be something that is shared across all of them, right? Right.

    While very useful, this raises a lot of security questions. As far as I can tell, all apps could be grabbing what is available on the clipboard.

    It isn’t uncommon for people to copy sensitive information from one app to another and even if the information is not sensitive, the user generally has a clear target app for the information (the others don’t have anything to do with it).

    These questions started bugging me a long time ago, and the sentiment even got worse when Apple released an iOS feature that notifies users when an app reads the contents of the clipboard. That was brilliant, why didn’t anyone thought of that before?

    The result? Tons of apps caught snooping into the clipboard contents without the user asking for it. The following articles can give you a glimpse of what followed:

    That’s not good, and saying you won’t do it again is not enough. On iOS, apps were caught and users notified, but what about Android? What about other desktop operating systems?

    Accessing the clipboard to check what’s there, then steal passwords, or replace cryptocurrency addresses or just to get a glimpse of what the user is doing is a common pattern of malware.

    I wonder why hasn’t a similar feature been implemented in most operating systems we use nowadays (it doesn’t need to be identical, but at least let us verify how the clipboard is being used). Perhaps there exists tools can help us with this, however I wasn’t able to find any for Linux.

    A couple of weeks ago, I started to look at how this works (on Linux, which is what I’m currently using). What I found is that most libraries just provide a simple interface to put things on the clipboard and to get the current clipboard content. Nothing else.

    After further digging, I finally found some useful and interesting articles on how this feature works on X11 (under the hood of those high level APIs). For example:

    Then, with this bit of knowledge about how the clipboard works in X11, I decided to do a quick experiment in order to check if I can recreate the clipboard access notifications seen in iOS.

    During the small periods I had available in the last few weekends, I tried to build a quick proof of concept, nothing fancy, just a few pieces of code from existing examples stitched together.

    Here’s the current result:

    Demonstration of clipboard-watcher detecting when other apps access the contents

    It seems possible to detect all attempts of accessing the clipboard, but after struggling a bit, it seems that due to the nature of X11 it is not possible to know which running process owns the window that is accessing the clipboard. A shame.

    The information that X11 has about the requesting client must be provided by the client itself, which makes it very hard to know for sure which process it is (most of the time it is not provided at all).

    Nevertheless, I think this could still be a very useful capability for existing clipboard managers (such as Klipper), given the core of this app works just like one.

    Even without knowing the process trying to access the clipboard contents, I can see a few useful features that are possible to implement, such as:

    • Create some stats about the clipboard access patterns.
    • Ask the user for permission, before providing the clipboard contents.

    Anyhow, you can check the proof of concept here and give it a try (improvements are welcome). Let me know what you think and what I’ve missed.

  • Django Friday Tips: Deal with login brute-force attacks

    In the final tips post of the year, lets address a solution to a problem that most websites face once they have been online for a while.

    If you have a back-office or the concept of user accounts, soon you will face the security problem of attackers trying to hack into these private zones of the website.

    These attackers can either be people trying to login as somebody else, or even bots trying to find accounts with common/leaked passwords.

    Unfortunately we cannot rely on users to pick strong and unique passwords. We can help them, as I explained in a previous post, but it isn’t guaranteed that the user will make a good choice.

    Using a slow key derivation function, to slowdown the process and increase the time required to test an high number of possibilities, helps but isn’t enough.

    However we can go even further with this strategy, by controlling the number of attempts and only allowing a “given number of tries per time window”.

    This is very easy to achieve on Django projects by relying on the django-axes package. Here’s an explanation of what it does:

    Axes records login attempts to your Django powered site and prevents attackers from attempting further logins to your site when they exceed the configured attempt limit.

    django-axes documentation

    Basically you end up with record of attempts (that you can see in the admin) and allows you to define how the system will behave after multiple failed tries, by setting the maximum number of failures and cool-off periods.

    You can check the package here, it is very easy to setup and it shouldn’t require many changes to your code. The documentation can be found here and it covers everything you will need so I won’t provide any examples this time.

    I hope this tip ends up being useful and wish you a Merry Christmas. The tips will continue in 2022.

  • worker-planet was awarded a swag box

    If you remember, back in June/July I worked on a small project to make it easy to build small community pages that aggregate content produced from many sources. As I shared in the post, worker-planet was built to run on “Cloudflare Workers” without the need to manage a server yourself.

    A short time afterwards I noticed that Cloudflare was running a challenge for developers to build on top of their tools/services. So I submitted worker-planet, since it already complied with all requirements.

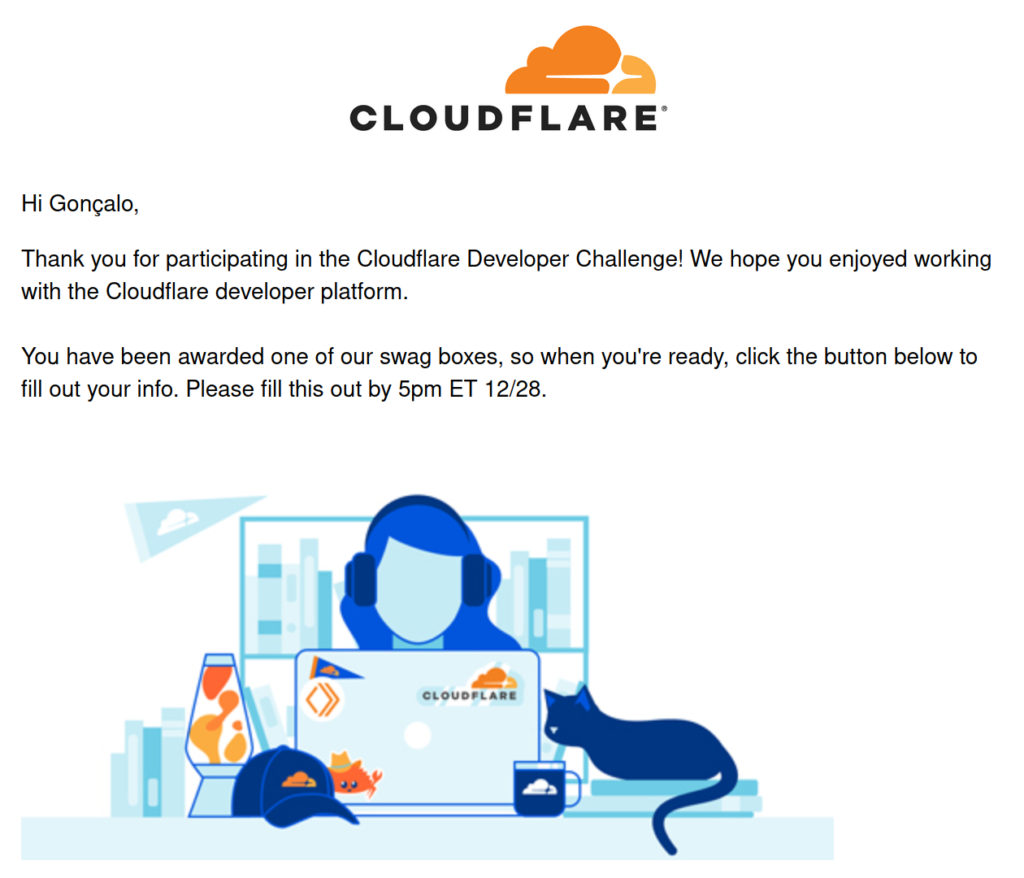
    Email received, informing that one of the swag boxes was awarded.

    Today I found out that it was awarded one of the 300 prizes.

    That’s cool, at least I’m not the only one that finds it useful. Perhaps I should fix some of the existing issues and improve the project (like better instructions and more themes?).

    If you haven’t tried it, please do and let me know what you think. If you are better than me (the bar is very low) at building custom themes, feel free to contribute one, I would appreciate.

    I will try to release a new version early in 2022.

  • Tools I’m thankful for

    In the spirit of thanksgiving, even though it isn’t a tradition here where live, and following the same path as some posts I’ve read today, here’s 5 software tools I’m thankful for.

    (Of course this is not a comprehensive list, but today these are the ones that come to my mind)

    Syncthing

    This tool basically lets us sync files with multiple devices without relying on a central service/server (unlike Dropbox or Google Drive). So we don’t have to rely on a 3rd party service to sync your documents, it is all done in a p2p fashion with high security standards.

    No Internet connection? no worries, it works through the local network as well.

    BorgBackup

    I use Borg for most kinds of backups. Many will argue that there are alternatives that do X and Y better, but Borg has all I need for this task and does its job very well. It is compatible with many services, has a nice CLI and several decent GUIs.

    Backups are critical, so we should rely on a mature tool that we can trust.

    VLC

    I don’t remember the last time I had “hair pulling” struggles when trying to play a video file or disk. VLC is one of the reasons why (perhaps the biggest of them). It’s a light and versatile Swiss army knife for dealing with video content and it handles whatever I am trying to do: watch a stream, open a video with a strange encoding or even convert between file formats.

    uBlock Origin

    Nowadays the mainstream websites are almost unbearable, they are slow, heavy and full of ads (displayed in many formats with all kinds of tricks). Not to mention the huge effort they make to track you “everywhere you go”.

    This “little” browser extension takes care of blocking and removing a big chunk of that annoying content, making the pages faster while helping us avoid being followed online.

    Python

    To finish the list, a programming language and its interpreter. Throughout the last decade I ended up using several programming languages, either on my job and for personal projects, but there is one of them that I always fallback to and is a joy to use.

    Easy to read and to write, available almost everywhere, it might not be the a perfect fit for all tasks but allows you to do a lot and quickly.

  • Django Friday Tips: Custom Admin Pages

    One of the great builtin features of Django is the admin app. It lets you, among other things, execute the usual CRUD operations on your data, search, filter and execute bulk actions on many records.

    However the interface is a bit rigid, by default you have the “dashboard” with the list of models, the page listing your records for each model and the details page for each individual item.

    What if you want to display other information to the admins? Such an overview of the system, aggregate data, some statistics, etc.

    In this post I will address the steps required to add custom pages to the admin and include them in the main menu of the administration.

    The starting point will be the website I used in a previous tip/post:

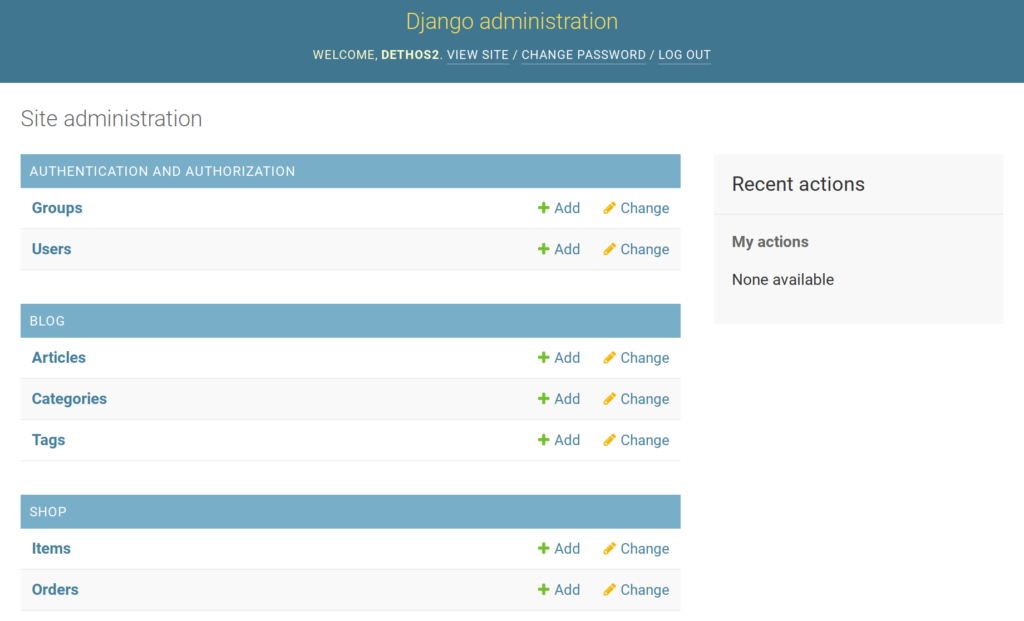
    Regular Django admin dashboard, without any custom page on the menu.
    Admin without any custom pages

    1. Add a custom Admin Site

    The first step is to create a new custom admin website, so we can easily modify its contents and functionality.

    from django.contrib import admin
    
    class YourCustomAdminSite(admin.AdminSite):
        pass

    Now we will have to use this admin site across your project, which means changing your current admin settings to use this “site” (such as your ModelAdmins and your urls.py.

    If the above is too much trouble and requires to many changes, this small “hack” before including the admin URLs will also work:

    # urls.py
    
    admin.site.__class__ = YourCustomAdminSite

    2. Add a new view

    In our new admin site we can now create views as methods, to handle different requests. Like this:

    from django.contrib import admin
    from django.template.response import TemplateResponse
    
    class YourCustomAdminSite(admin.AdminSite):
        def custom_page(self, request):
            context = {"text": "Hello Admin", 
                       "page_name": "Custom Page"}
            return TemplateResponse(request,
                                    "admin/custom_page.html", 
                                    context)

    3. Add a new template

    As you can see in the above python snippet, we are using a template that doesn’t exist yet, so lets create it:

    {# templates/admin/custom_page.html #}
    
    {% extends 'admin/change_list.html' %}
    
    {% block pagination %}{% endblock %}
    {% block filters %}{% endblock filters %}
    {% block object-tools %}{% endblock object-tools %}
    {% block search %}{% endblock %}
    
    {% block breadcrumbs %}
    <div class="breadcrumbs">
      <a href="{% url 'admin:index' %}">Home</a>
      {% if page_name %} &rsaquo; {{ page_name }}{% endif %}
    </div>
    {% endblock %}
    
    {% block result_list %}
    {{text}}
    {% endblock result_list %}

    (I chose to extend admin/change_list.html, but the content of this template is up to you, no restrictions here. If you decide to not extend any existing admin template, the last steps of 5. will not apply to your case)

    4. Extend the admin URLs

    To make this new endpoint accessible, we now have to edit the method that returns all existing URLs of the administration and append our new page.

    from django.urls import path
    ...
    
    class YourCustomAdminSite(admin.AdminSite):
        ...
    
        def get_urls(
            self,
        ):
            return [
                path(
                    "custom_page/",
                    self.admin_view(self.custom_page),
                    name="custom_page",
                ),
            ] + super().get_urls()

    At this point the custom page should be available at /admin/custom_page/, but users will not be able to find it, since no other link or button points to it.

    5. Extend the menu items

    The final step is to include a link to the new page in the existing menu, in order for it to be easily accessible. First we need to replace the current index_template:

    ...
    
    class YourCustomAdminSite(admin.AdminSite):
        index_template = "admin/custom_index.html"
        ...

    And add the following content to your new template:

    {% extends "admin/index.html" %}
    
    {% block content %}
    <div id="content-main">
      {% include "admin/custom_app_list.html" with app_list=app_list show_changelinks=True %}
    </div>
    {% endblock %}

    The included custom_app_list.html should look like this:

    <div id="extra_links_wrapper" class="module">
        <table>
            <caption>
                <a class="section" title="Custom Pages">Custom Pages</a>
            </caption>
            <tr>
                <th scope="row">
                    <a href="{% url 'admin:custom_page' %}">
                        Custom Page
                    </a>
                </th>
                <td></td>
            </tr>
        </table>
    </div>
    
    {% include 'admin/app_list.html' %}

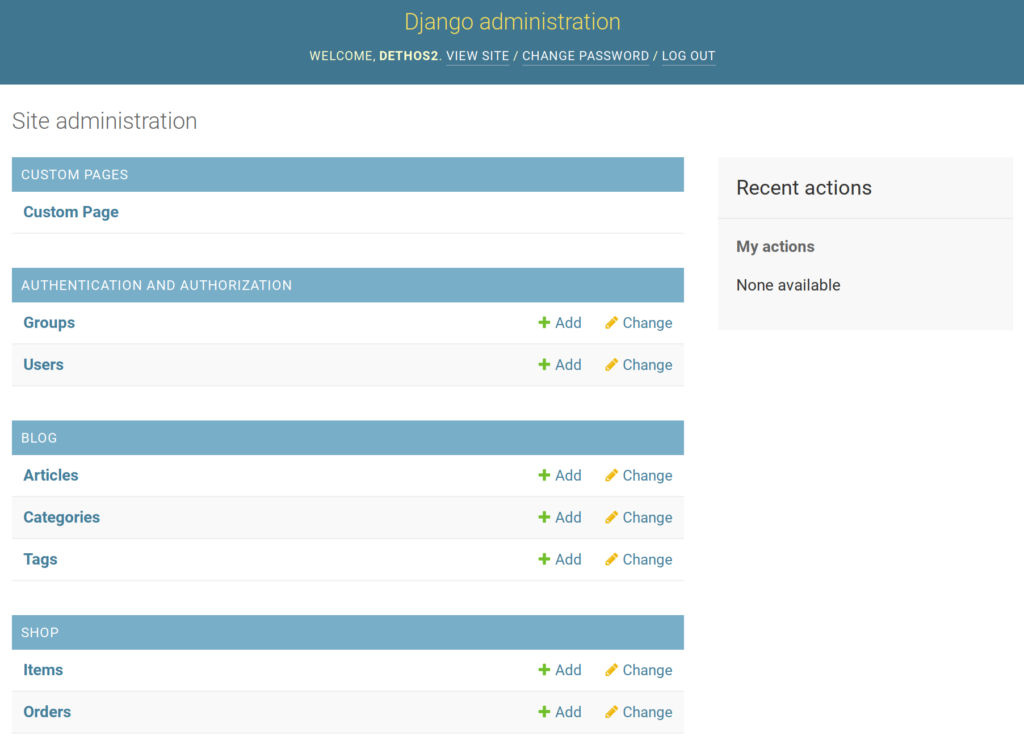
    Basically we added a new section to the list containing a link to our new page.

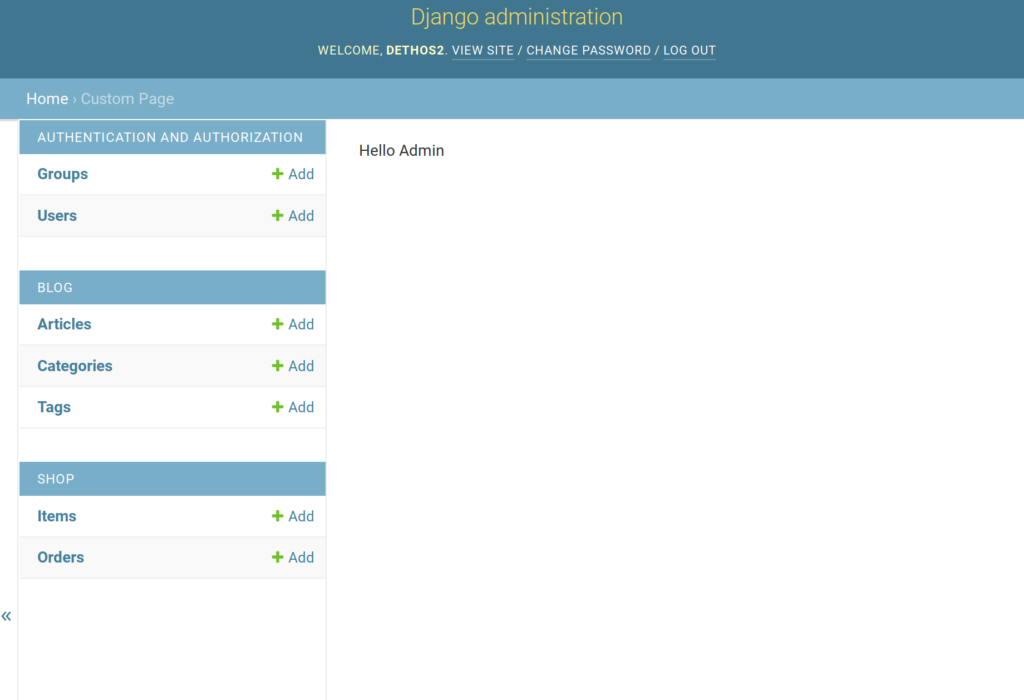
    Screenshot of the index page, with links to the new custom page
    Links were added to the index page
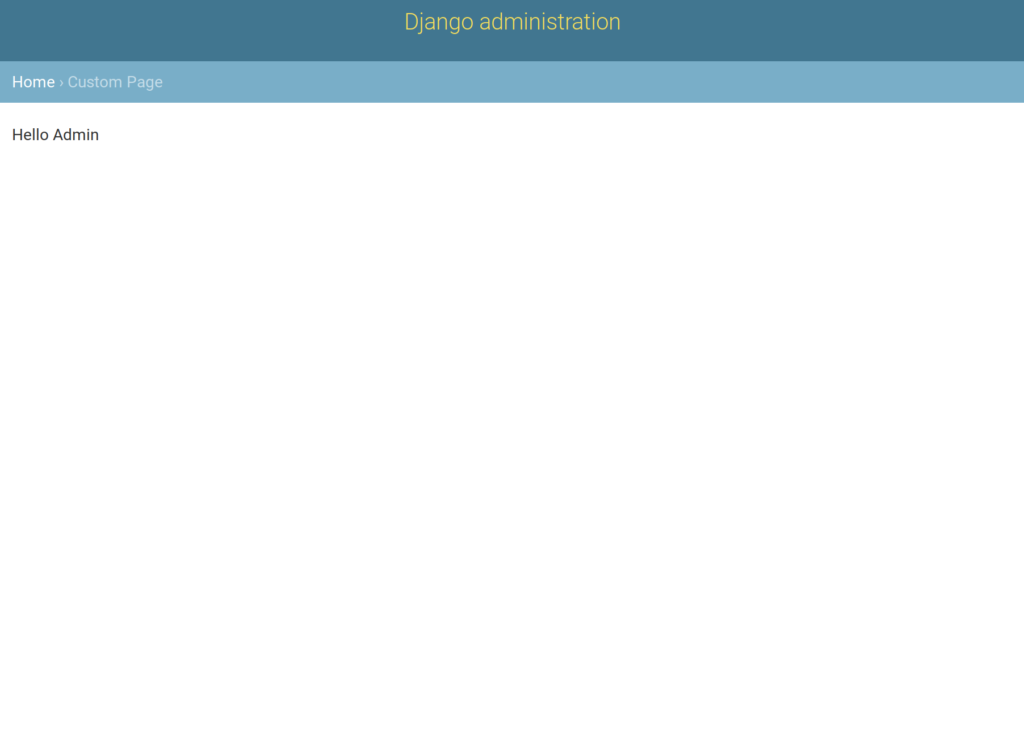
    Screenshot of the custom page that was created.
    The custom page we just created

    Looking good, the page is there with our content and is accessible through the index page. However many traditional elements on the page are missing (side menu, logout button, etc). To add them we just need some small changes to our view:

    ...
    
    class YourCustomAdminSite(admin.AdminSite):
        ...
    
        def custom_page(self, request):
            context = {
                "text": "Hello Admin",
                "page_name": "Custom Page",
                "app_list": self.get_app_list(request),
                **self.each_context(request),
            }
            return TemplateResponse(request, "admin/custom_page.html", context)

    Now it looks a lot better:

    Screenshot of the custom page now with the other standard elements included.

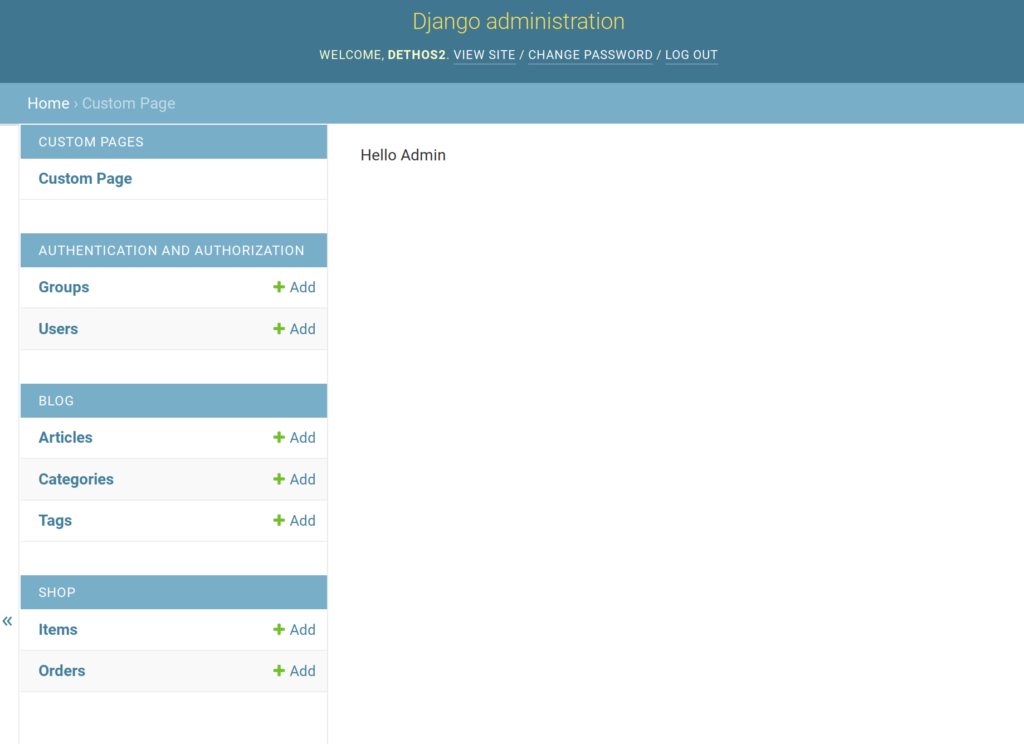
    But something is still missing. Where are the links to our custom pages?

    It seems the standard app_list.html is being used. Lets replace it with our custom one by overriding nav_sidebar.html:

    {# templates/admin/nav_sidebar.html #}
    
    {% load i18n %}
    <button class="sticky toggle-nav-sidebar" id="toggle-nav-sidebar"
      aria-label="{% translate 'Toggle navigation' %}"></button>
    <nav class="sticky" id="nav-sidebar">
      {% include 'admin/custom_app_list.html' with app_list=available_apps show_changelinks=False %}
    </nav>

    Note: The app where you put the above template must be placed before the “admin” app in your “INSTALLED_APPS” list, otherwise the default template will be used anyway.

    Screenshot of the custom page, with all elements and the correct links displayed on the sidebar
    Custom admin page with all the elements

    And for today, this is it. With the above changes you can add as many custom pages to your admin as you need and have full controls over their functionality.

  • worker-planet

    Some time ago I wrote about using “Cloudflare Workers”, first as a way of adding Content-Security-Policy headers to your pages (when you don’t have other easy ways of doing it) and after I even built an easy to deploy DDNS solution on top of them.

    This time I just used this tool to build a “planet” software. You might be wondering about what is a planet, so I will try to explain it in a simple and practical way: A planet is a web page (and RSS feed) that gathers content about a specific topic from multiple other sources and displays them in a chronological order, using the feeds provided by those sources.

    If you prefer, you can check Wikipedia’s entry about it.

    This is specially useful if you want to cover all the content and activity of a given community in an open way (without extra intermediaries or curators). A few examples are:

    There are other software available for this purpose, such as moonmoon, but if you don’t want to manage a server just for this purpose, Cloudflare workers can be very useful.

    So I built worker-planet in order to easily create these community pages without having to worry with managing servers. There are many improvements that can be added, but the base functionality is there, and many configurations and theming options are already supported.

    The project is open-source and free (as in freedom) software, so please test it and use it as you wish.

  • Django Friday Tips: Password validation

    This time I’m gonna address Django’s builtin authentication system, more specifically the ways we can build custom improvements over the already very solid foundations it provides.

    The idea for this post came from reading an article summing up some considerations we should have when dealing with passwords. Most of those considerations are about what controls to implement (what “types” of passwords to accept) and how to securely store those passwords. By default Django does the following:

    • Passwords are stored using PBKDF2. There are also other alternatives such as Argon2 and bcrypt, that can be defined in the setting PASSWORD_HASHERS.
    • Every Django release the “strength”/cost of this algorithm is increased. For example, version 3.1 applied 216000 iterations and the last version (3.2 at the time of writing) applies 260000. The migration from one to another is done automatically once the user logs in.
    • There are a set of validators that control the kinds of passwords allowed to be used in the system, such as enforcing a minimum length. These validators are defined on the setting AUTH_PASSWORD_VALIDATORS.

    By default when we start a new project these are the included validators :

    • UserAttributeSimilarityValidator
    • MinimumLengthValidator
    • CommonPasswordValidator
    • NumericPasswordValidator

    The names are very descriptive and I would say a good starting point. But as the article mentions the next step is to make sure users aren’t reusing previously breached passwords or using passwords that are known to be easily guessed (even when complying with the other rules). CommonPasswordValidator already does part of this job but with a very limited list (20000 entries).

    Improving password validation

    So for the rest of this post I will show you some ideas on how we can make this even better. More precisely, prevent users from using a known weak password.

    1. Use your own list

    The easiest approach, but also the more limited one, is providing your own list to `CommonPasswordValidator`, containing more entries than the ones provided by default. The list must be provided as a file with one entry in lower case per line. It can be set like this:

    {
      "NAME": "django.contrib.auth.password_validation.CommonPasswordValidator",
      "OPTIONS": {"password_list_path": "<path_to_your_file>"}
    }

    2. Use zxcvbn-python

    Another approach is to use an existing and well-known library that evaluates the password, compares it with a list of known passwords (30000) but also takes into account slight variations and common patterns.

    To use zxcvbn-python we need to implement our own validator, something that isn’t hard and can be done this way:

    # <your_app>/validators.py
    
    from django.core.exceptions import ValidationError
    from zxcvbn import zxcvbn
    
    
    class ZxcvbnValidator:
        def __init__(self, min_score=3):
            self.min_score = min_score
    
        def validate(self, password, user=None):
            user_info = []
            if user:
                user_info = [
                    user.email, 
                    user.first_name, 
                    user.last_name, 
                    user.username
                ]
            result = zxcvbn(password, user_inputs=user_info)
    
            if result.get("score") < self.min_score:
                raise ValidationError(
                    "This passoword is too weak",
                    code="not_strong_enough",
                    params={"min_score": self.min_score},
                )
    
        def get_help_text(self):
            return "The password must be long and not obvious"
    

    Then we just need to add to the settings just like the other validators. It’s an improvement but we still can do better.

    3. Use “have i been pwned?”

    As suggested by the article, a good approach is to make use of the biggest source of leaked passwords we have available, haveibeenpwned.com.

    The full list is available for download, but I find it hard to justify a 12GiB dependency on most projects. The alternative is to use their API (documentation available here), but again we must build our own validator.

    # <your_app>/validators.py
    
    from hashlib import sha1
    from io import StringIO
    
    from django.core.exceptions import ValidationError
    
    import requests
    from requests.exceptions import RequestException
    
    class LeakedPasswordValidator:
        def validate(self, password, user=None):
            hasher = sha1(password.encode("utf-8"))
            hash = hasher.hexdigest().upper()
            url = "https://api.pwnedpasswords.com/range/"
    
            try:
                resp = requests.get(f"{url}{hash[:5]}")
                resp.raise_for_status()
            except RequestException:
                raise ValidationError(
                    "Unable to evaluate password.",
                    code="network_failure",
                )
    
            lines = StringIO(resp.text).readlines()
            for line in lines:
                suffix = line.split(":")[0]
    
                if hash == f"{hash[:5]}{suffix}":
                    raise ValidationError(
                        "This password has been leaked before",
                        code="leaked_password",
                    )
    
        def get_help_text(self):
            return "Use a different password"
    

    Then add it to the settings.

    Edit: As suggested by one reader, instead of this custom implementation we could use pwned-passwords-django (which does practically the same thing).

    And for today this is it. If you have any suggestions for other improvements related to this matter, please share them in the comments, I would like to hear about them.

  • My picks on open-source licenses

    Sooner or later everybody that works with computers will have to deal with software licenses. Newcomers usually assume that software is either open-source (aka free stuff) or proprietary, but this is a very simplistic view of the world and wrong most of the time.

    This topic can quickly become complex and small details really matter. You might find yourself using a piece of software in a way that the license does not allow.

    There are many types of open-source licenses with different sets of conditions, while you can use some for basically whatever you want, others might impose some limits and/or duties. If you aren’t familiar with the most common options take look at choosealicense.com.

    This is also a topic that was recently the source of a certain level of drama in the industry, when companies that usually released their software and source code with a very permissive license opted to change it, in order to protect their work from certain behaviors they viewed as abusive.

    In this post I share my current approach regarding the licenses of the computer programs I end up releasing as FOSS (Free and Open Source Software).

    Let’s start with libraries, that is, packages of code containing instructions to solve specific problems, aimed to be used by other software developers in their own apps and programs. On this case, my choice is MIT, a very permissive license which allows it to be used for any purpose without creating any other implications for the end result (app/product/service). In my view this is exactly the aim an open source library should have.

    The next category is “apps and tools”, these are regular computer programs aimed to be installed by the end user in his computer. For this scenario, my choice is GPLv3. So I’m providing a tool with the source code for free, that the user can use and modify as he sees fit. The only thing I ask for is: if you modify it in any way, to make it better or address a different scenario, please share your changes using the same license.

    Finally, the last category is “network applications”, which are computer programs that can be used through the network without having to install them on the local machine. Here I think AGPLv3 is a good compromise, it basically says if the end user modifies the software and let his users access it over the network (so he doesn’t distribute copies of it), he is free to do so, as long as he shares is changes using the same license.

    And this is it. I think this is a good enough approach for now (even though I’m certain it isn’t a perfect fit for every scenario). What do you think?