Another Friday, another Django related post. I guess this blog is becoming a bit monothematic. I promise the next ones will bring the much-needed diversity of contents, but today let’s explore a very useful feature of the Django’s ORM.
Ok… Ok… it’s more of a feature of PostgreSQL that Django supports, and it isn’t available on the other database backends. But let’s dive in any way.
Let’s imagine this incredibly simplistic scenario where you have the following model:
class Player(models.Model):
  team = models.ForeignKey(Team, on_delete=models.CASCADE)
  squad_number = models.PositiveSmallIntegerField()

  class Meta:
    constrains = [
      models.UniqueConstraint(
        name="unique_squad_number",
        fields=["team", "squad_number"],
      )
    ]
So a team has many players and each player has a different squad/shirt number. Only one player can use that number for a given team.
Users, can select their teams and then re-arrange their player’s numbers however they like. To keep it simple, let’s assume it is done through the Django Admin, using a Player Inline on the Team‘s model admin.
We add proper form validation, to ensure that no players in the submitted squad are assigned the same squad_number. Things work great until you start noticing that despite your validation and despite the user’s input not having any players assigned the same number, integrity errors are flying around. What’s happening?
Well, when the system tries to update some player records after being correctly validated, each update/insertion is checked against the constraint (even atomically within a transaction). This means that the order of the updates, or in certain situations all updates with correct data, will “raise” integrity errors, due to conflicts with the data currently stored in the database.
The solution? Deferring the integrity checks to the end of the transaction. Here’s how:
class Player(models.Model):
  team = models.ForeignKey(Team, on_delete=models.CASCADE)
  squad_number = models.PositiveSmallIntegerField()

  class Meta:
    constrains = [
      models.UniqueConstraint(
        name="unique_squad_number",
        fields=["team", "squad_number"],
        deferrable=models.Deferrable.DEFERRED,
      )
    ]
Now, when you save multiple objects within a single transaction, you will no longer see those errors if the input data is valid.
This week, I’ll continue on the same theme of my previous “Django Friday Tips” post. Essentially, we will keep addressing small annoyances that can surface while developing your multilingual project.
The challenge for this article shows up when a given string from a package that is a dependency of your project is either:
Not translated in the language you are targeting.
Translated in a slightly different way than you desire.
As we are all aware, most packages use English by default, then the most popular ones often provide translations for languages that have more active users willing to contribute. But these efforts are laborious and can have differences for distinct regions, even if they use the same base language.
Contributing upstream, might not always be an option.
This means that to maintain the coherence of the interface of your project, you need to adapt these translations locally.
Handling the localization of the code in your repository in Django is obvious and well documented. Django collects the strings and adds the translation files to the locale path (per app or per project).
For the other packages, these strings and translations are located within their directory hierarchy, outside the reach of the makemessages command. Django, on the other hand, goes through all these paths, searching for the first match.
With this in mind, the easiest and most straightforward way I was able to find to achieve this goal was:
Create a file in your project (in an app directory or in a common project directory), let’s call it locale_overrides.py and put there the exact string from your dependency (Django or another) that you which to translate:
from django.utils.translation import gettext_lazy as _

locale_overrides = [
    _("This could sound better."),
    ...
]
Then run manage.py makemessages, translate the new lines in the .po file as you wish, then finally compile your new translations with manage.py compilemessages.
Since your new translations are found first, when your app is looking for them, they will be picked instead of the “original” ones.
For tiny adjustments, this method works great. When the amount of content starts growing too much, a new approach might be more appropriate, but that will be a topic for another time.
Here we go again for another post of this blog’s irregular column, entitled Django’s Friday Tips. Today let’s address a silent issue, that any of you that have formerly worked with internationalization (i18n) almost certainly already faced.
You add a string that must be translated:
from django.utils.translation import gettext_lazy as _

some_variable = _("A key that needs translation")
You then execute the manage.py makemessages --locale pt command, go to the generated django.po file and edit the translation:
msgid "A key that needs translation"
msgstr "Uma chave que precisa de tradução"
You compile (manage.py compilemessages --locale pt), and proceed with your work.
A few moments later, when checking the results of your hard effort… nothing, the text is showing the key (in English).
Time to double-check the code (did I forgot the gettext stuff?), the translation file, the I18n settings, etc. What the hell?
Don’t waste any more time, most likely the translation is marked as fuzzy, like this:
#: myapp/module.py:3
#, fuzzy
#| msgid "Another key that needed translation"
msgid "A key that needs translation"
msgstr "Uma chave que precisa de tradução"
You see, you didn’t notice that #, fuzzy line and kept it there. The command that compiles those translations ignores the messages marked as fuzzy.
So the solution is to remove those extra 2 lines, or to compile with the --use-fuzzy flag. That’s it, compile, and you should be able to proceed with the problem solved.
This week, I’m back at my tremendously irregular Django tips series, where I share small pieces of code and approaches to common themes that developers face when working on their web applications.
The topic of today’s post is how to implement a counter that isn’t vulnerable to race conditions. Counting is everywhere, when handling money, when controlling access limits, when scoring, etc.
One common rookie mistake is to do it like this:
model = MyModel.objects.get(id=id)
model.count += 1
model.save(update_fields=["count"])
An approach that is subject to race conditions, as described below:
Process 1 gets count value (let’s say it is currently 5)
Process 2 gets counts value
Process 1 increments and saves
Process 2 increments and saves
Instead of 7, you end up with 6 in your records.
On a low stakes project or in a situation where precision is not that important, this might do the trick and not become a problem. However, if you need accuracy, you will need to do it differently.
Approach 1
with transaction.atomic():
    model = (
        MyModel.objects.select_for_update()
        .get(id=id)
    )
    model.count += 1
    model.save(update_fields=["count"])
In this approach, when you first fetch the record, you ask for the database to lock it. While you are handling it, no one else can access it.
Since it locks the records, it can create a bottleneck. You will have to evaluate if fits your application’s access patterns. As a rule of thumb, it should be used when you require access to the final value.
Approach 2
from django.db.models import F

model = MyModel.objects.filter(id=id).update(
    count=F("count") + 1
)
In this approach, you don’t lock any values or need to explicitly work inside a transaction. Here, you just tell the database, that it should add 1 to the value that is currently there. The database will take care of atomically incrementing the value.
It should be faster, since multiple processes can access and modify the record “at the same time”. Ideally, you would use it when you don’t need to access the final value.
Approach 3
from django.core.cache import cache

cache.incr(f"mymodel_{id}_count", 1)
If your counter has a limited life-time, and you would rather not pay the cost of a database insertion, using your cache backend could provide you with an even faster method.
The downside, is the level of persistence and the fact that your cache backend needs to support atomic increments. As far as I can tell, you are well served with Redis and Memcached.
For today, this is it. Please let me know if I forgot anything.
However, this message can contain sensitive contents (passwords, credit cards, PII, etc.). So, Django also provides a couple of decorators that allow you to hide/scrub the sensitive stuff that might be stored in variables or in the body of the request itself.
These decorators are called @sensitive_variables() and @sensitive_post_parameters(). The correct usage of both of them is described in more detail here.
With the above information, this article could be done. Just use the decorators correctly and extensively, and you won’t leak user’s sensitive content to your staff or to any entity that handles those error reports.
Unfortunately, it isn’t that simple. Because lately, I don’t remember working in a project that uses Django’s default error reporting. A team usually needs a better way to track and manage these errors, and most teams resort to other tools.
Filtering sensitive content in Sentry
Since Sentry is my go-to tool for handling application errors, in the rest of this post, I will explore how to make sure sensitive data doesn’t reach Sentry’s servers.
Sentry is open-source, so you can run it on your infrastructure, but they also offer a hosted version if you want to avoid having the trouble of running it yourself.
To ensure that sensitive data is not leaked or stored where it shouldn’t, Sentry offers 3 solutions:
Scrub things on the SDK, before sending the event.
Scrub things when the event is received by the server, so it is not stored.
Intercept the event in transit and scrub the sensitive data before forwarding it.
In my humble opinion, only the first approach is acceptable. Perhaps there are scenarios where there is no choice but to use one of the others; however, I will focus on the first.
The first thing that needs to be done is to initiate the SDK, correctly and explicitly:
This will ensure that certain types of personal information are not sent to the server. Furthermore, by default certain stuff is already filtered, as we can see in the following example:
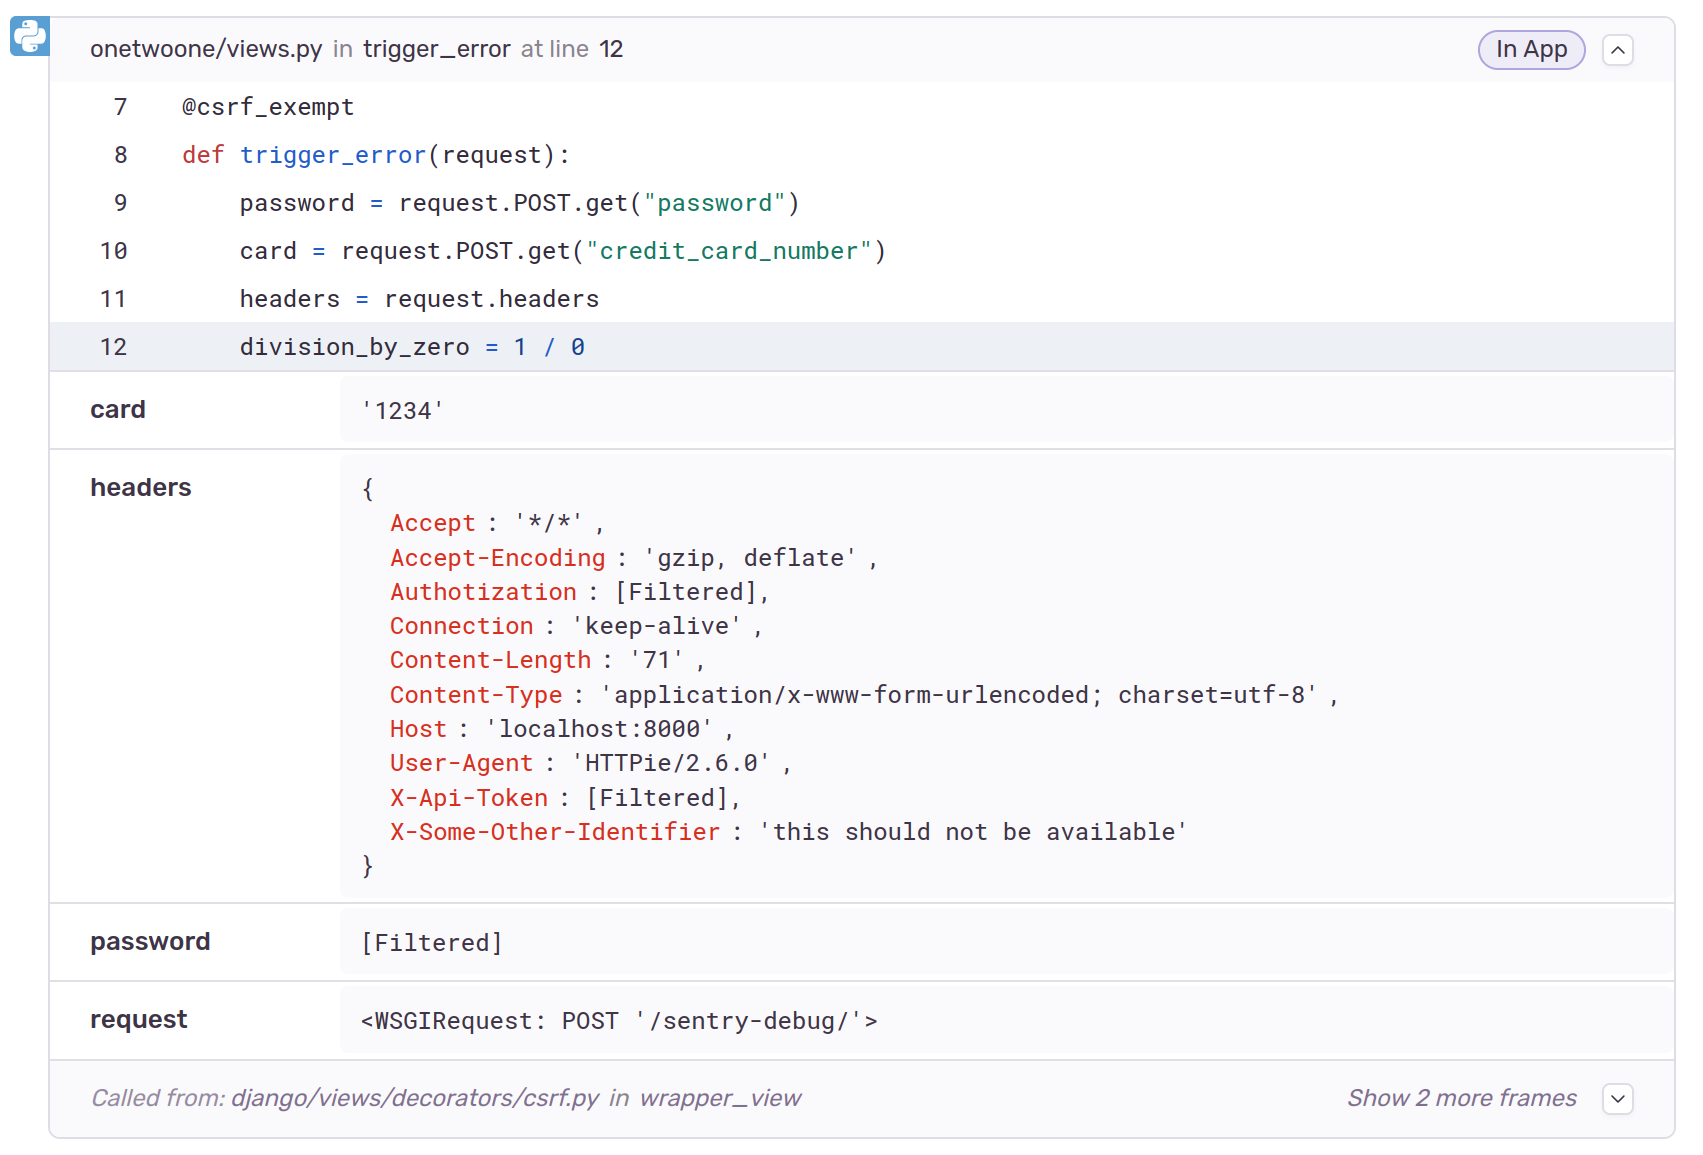
Some sensitive contents of the request such as password, authorization and X-Api-Token are scrubbed from the data, both on local variables and on the shown request data. This is because the SDK’s default deny list checks for the following common items:
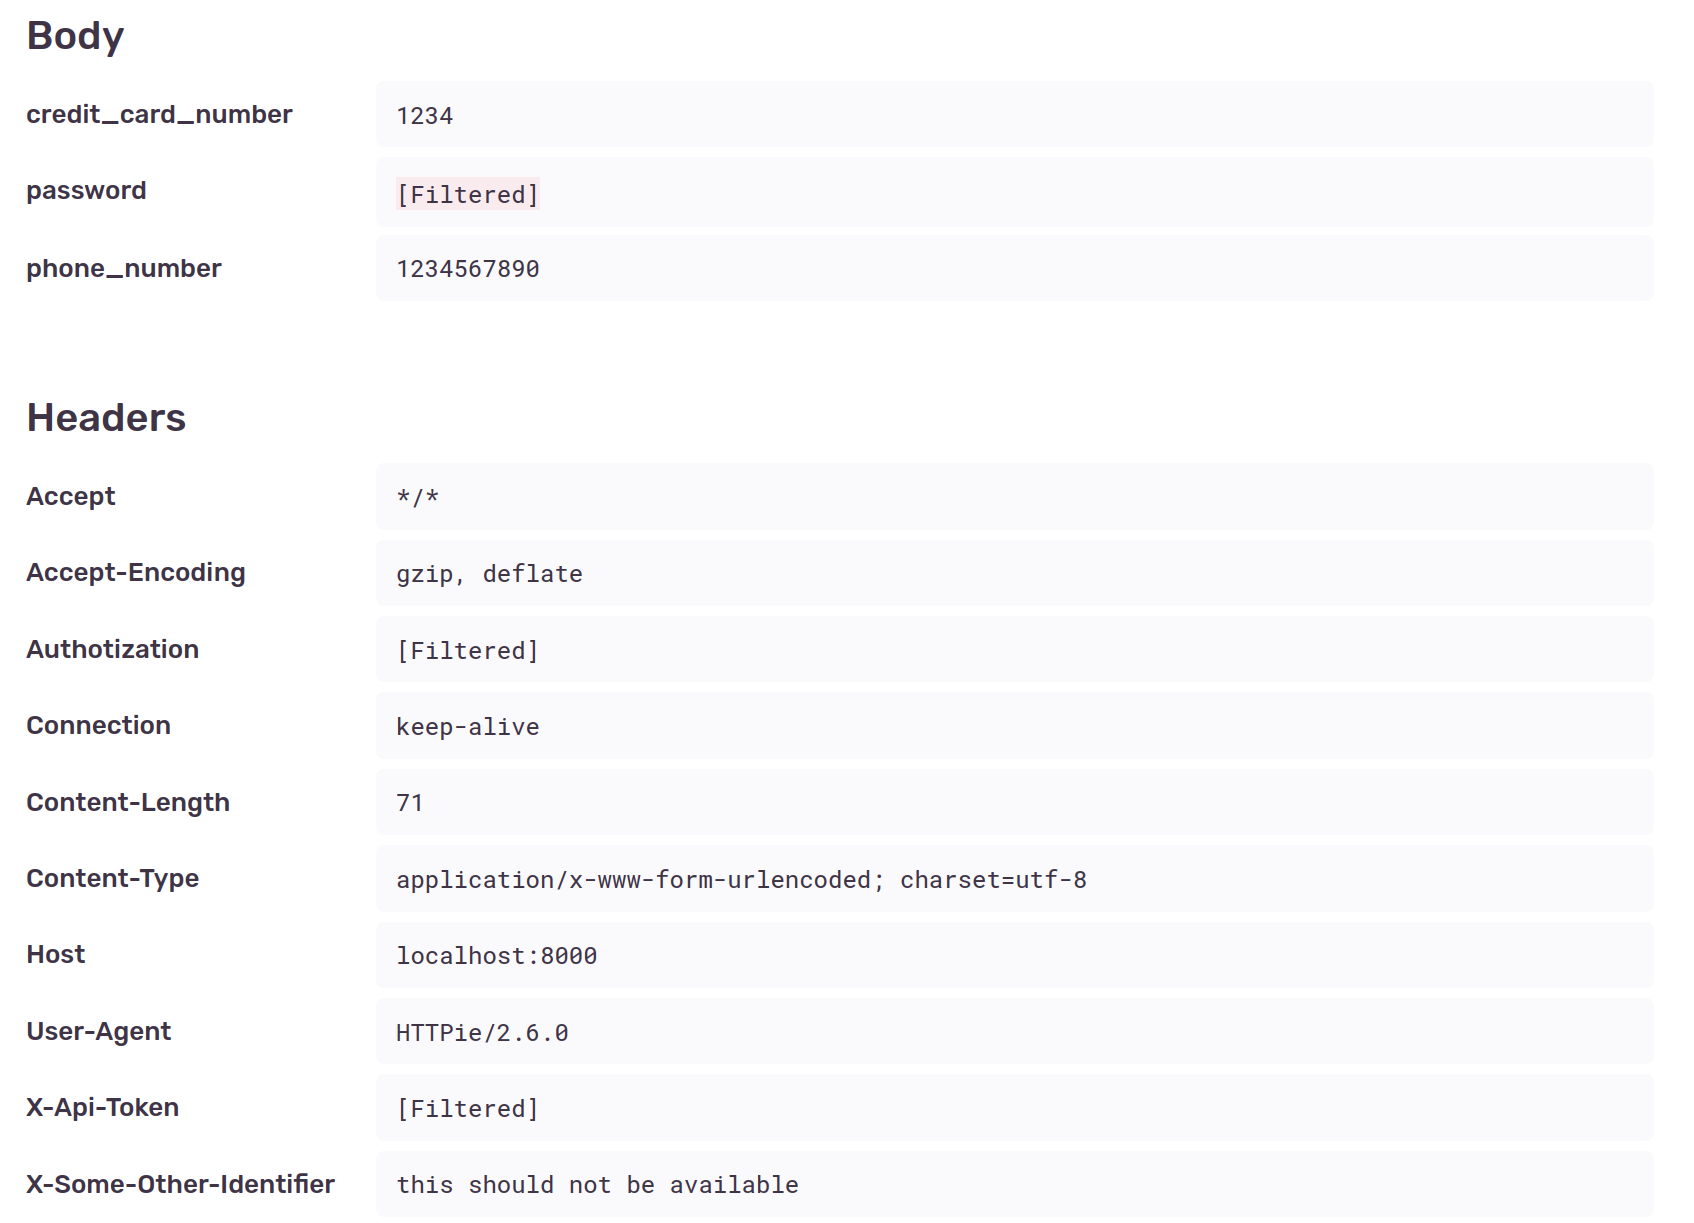
However, other sensitive data is included, such as credit_card_number (assigned to the card variable), phone_number and the X-Some-Other-Identifier header.
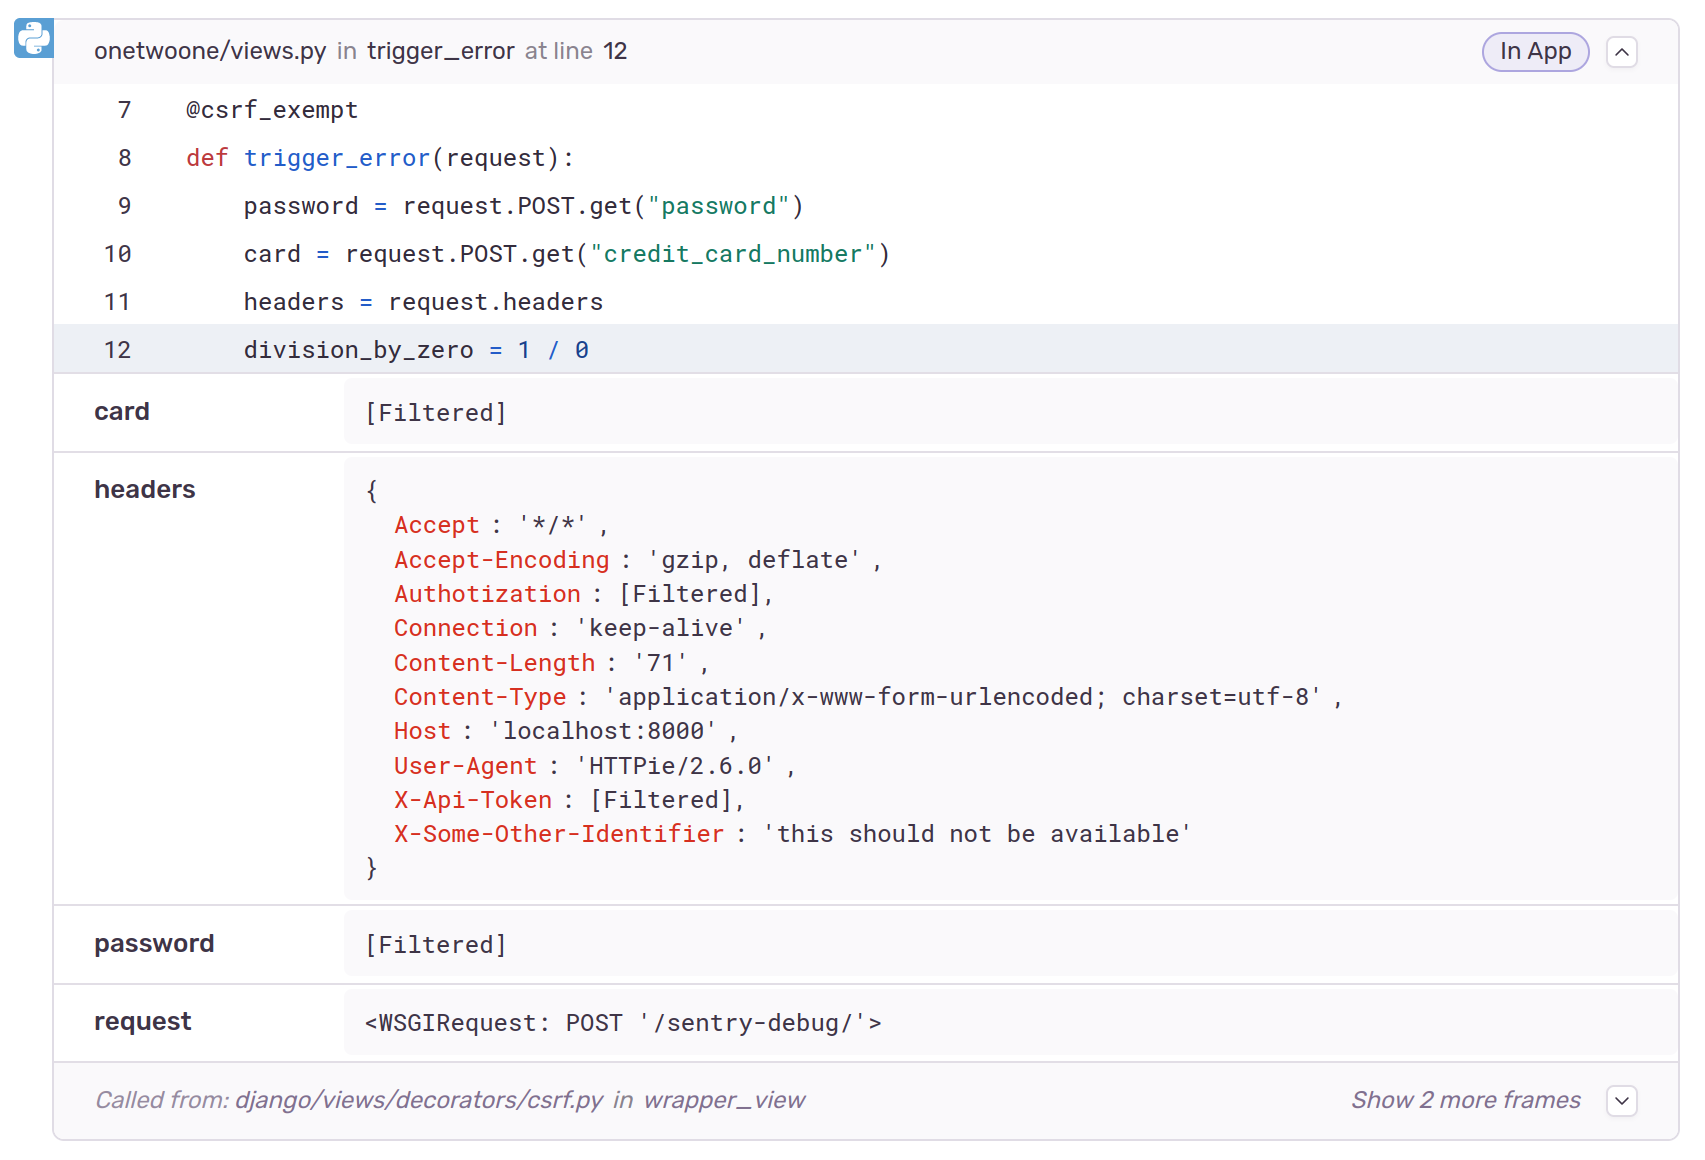
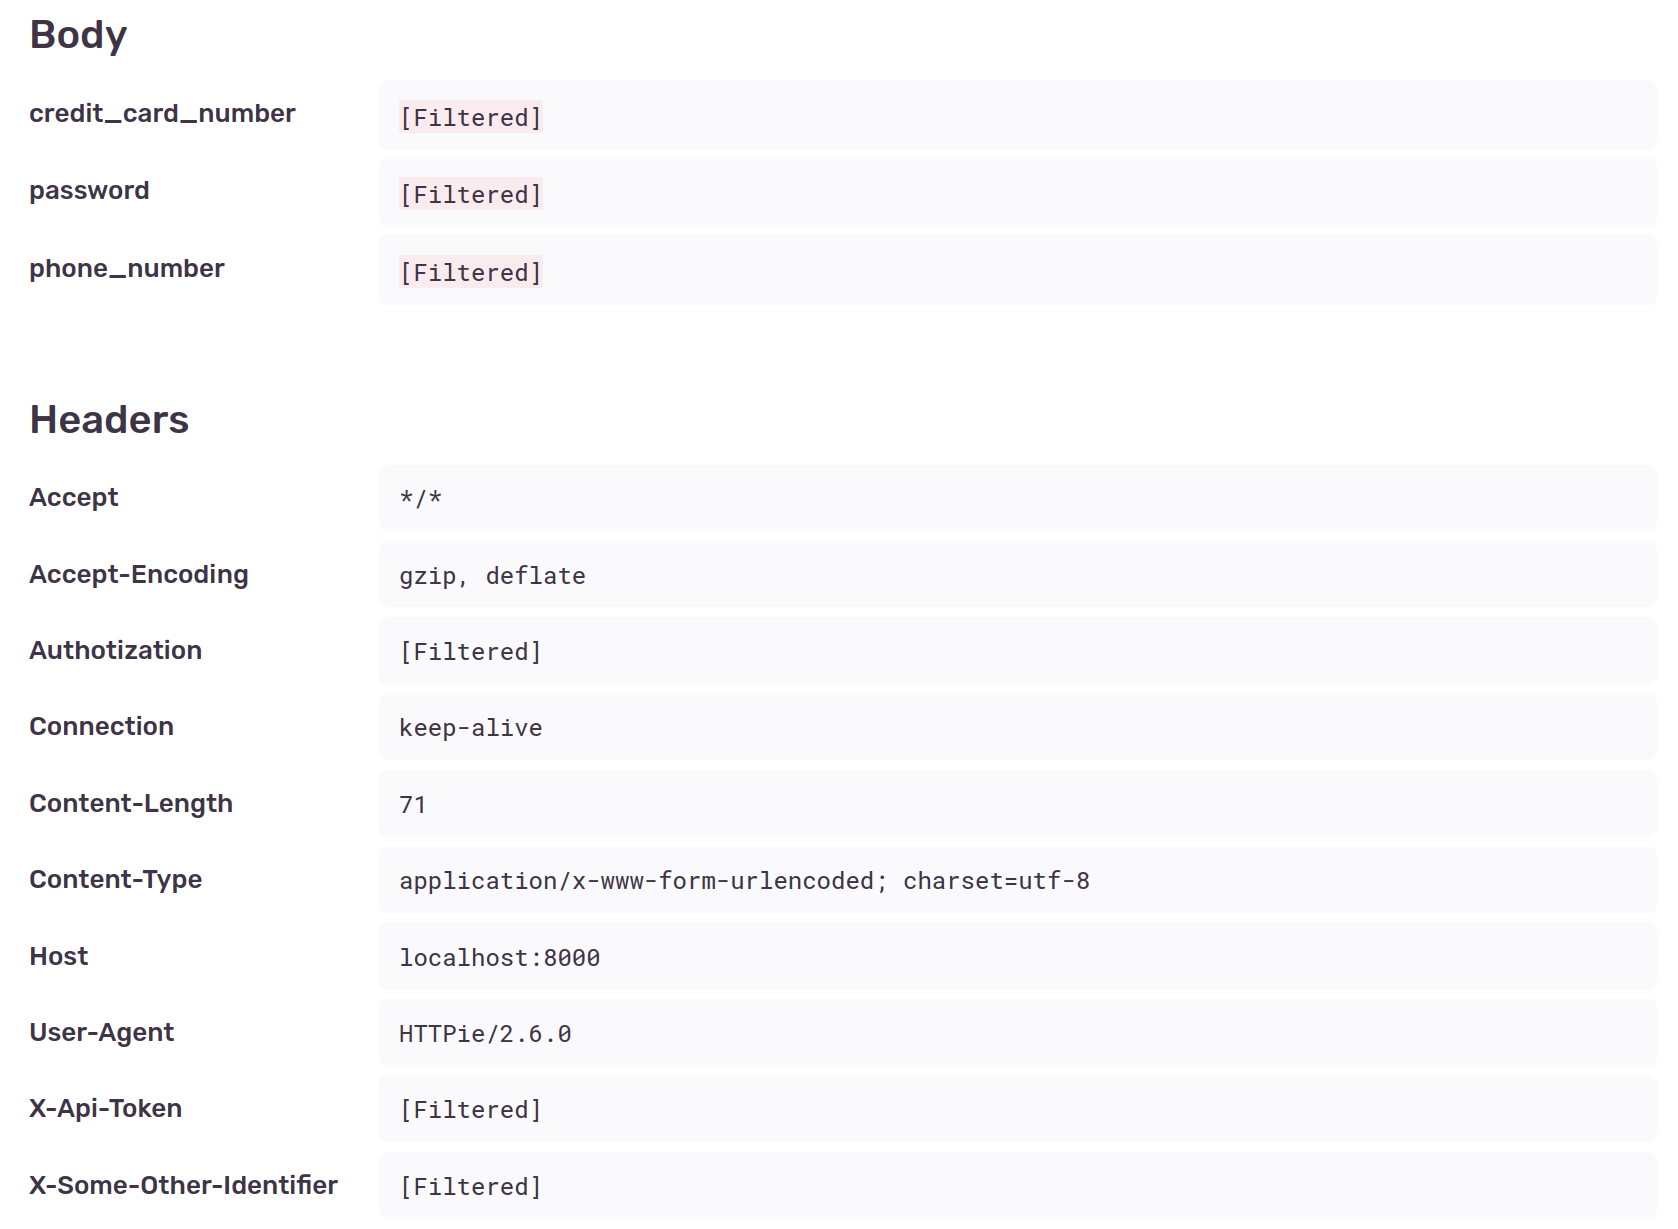
If we check again, the information is not there for new errors:
This way we achieve our initial goal and just like Django’s decorators we can stop certain information from being included in the error reports.
I still think that a deny list defined in the settings is a poorer experience and more prone to leaks, than the decorator approach used by Django error reporting. Nevertheless, both rely on a deny list, and without being careful, this kind of approach will eventually lead to leaks.
As an example, look again at the last two screenshots. Something was “filtered” in one place, but not in the other. If you find it, please let me know in the comments.
Today, let’s go back to the topic of the first post in this series of Django tips.
At the time, I focused on the python manage.py check --deploy command. In this article, I will explore the feature on which it is built and how it can be quite handy for many other scenarios.
So, the System Check Framework, what is it?
The system check framework is a set of static checks for validating Django projects. It detects common problems and provides hints for how to fix them. The framework is extensible so you can easily add your own checks.
We already have linters, formatters, and static analysis tools that we run on the CI of our projects. Many companies also have strict peer review processes before accepting any changes to the code. However, this framework can still very useful for many projects in situations such as:
Detect misconfigurations when someone is setting a complex new development environment, and help them correctly resolve the issues.
Warn developers when project-specific approaches are not being followed.
Ensure everything is well configured and correctly set up before deploying to production. Otherwise, make the deployment fail.
With the framework, the above points are a bit easier to implement, since “system checks” has access to the real state of the app.
During development, checks are executed on commands such as runserver and migrate, and before deployment a call to manage.py check can be executed before starting the app.
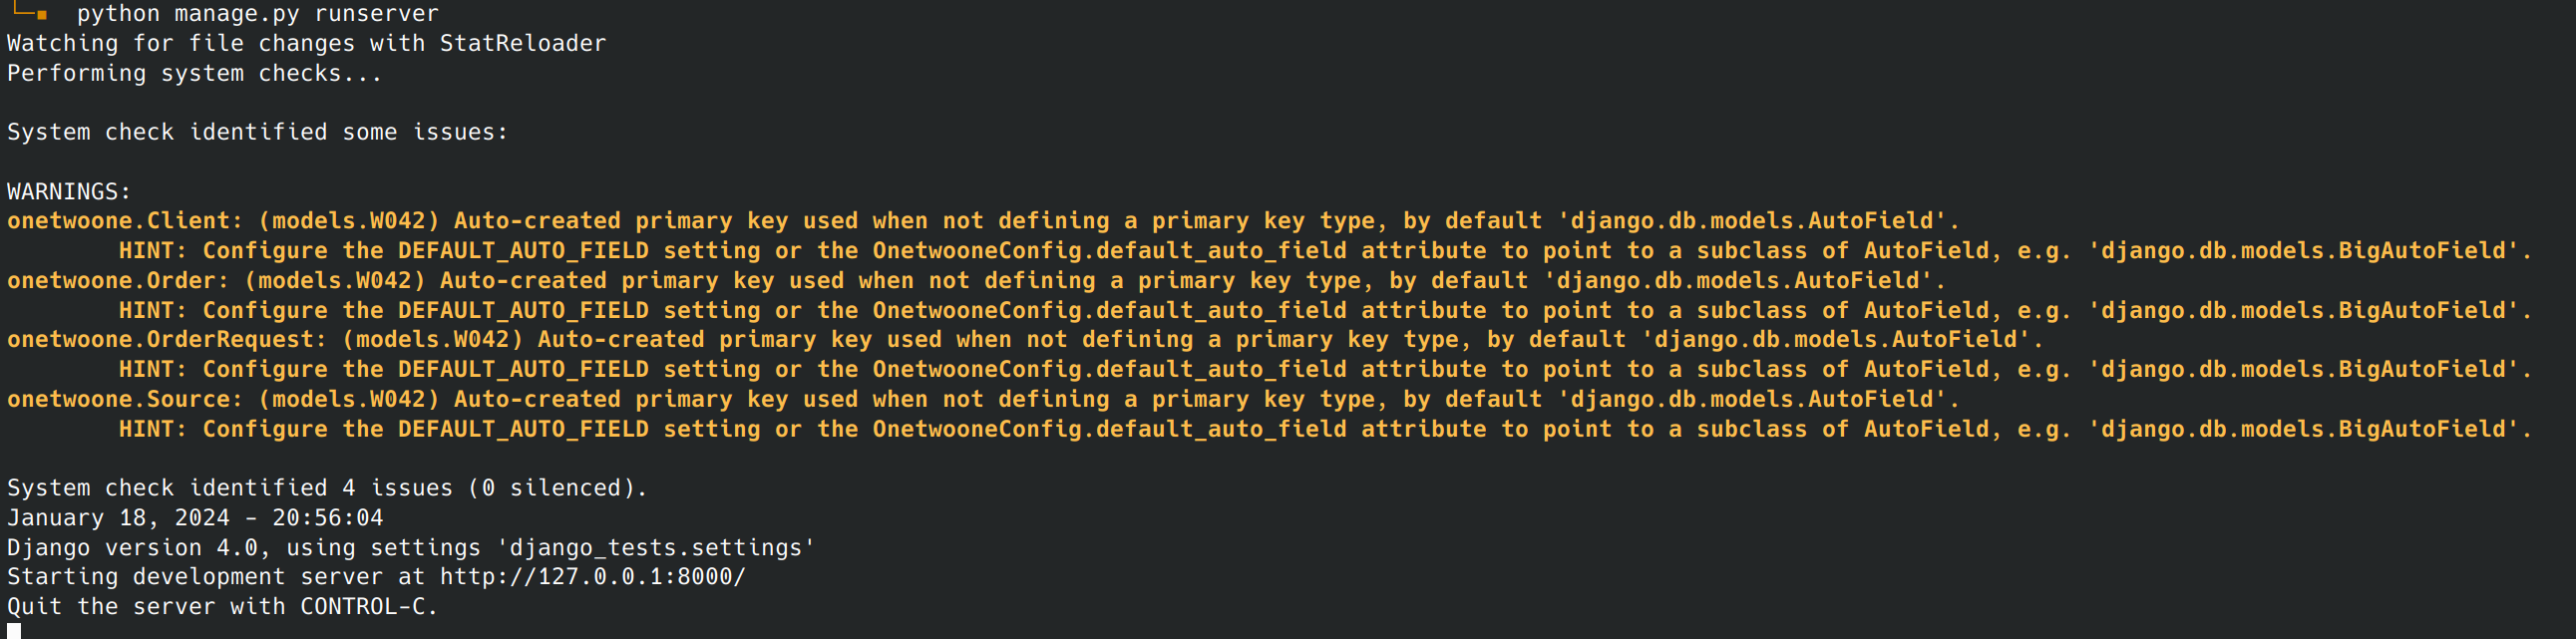
Django itself makes heavy use of this framework. I’m sure you have already seen messages such as the ones shown below, during development.
Recently, I was watching a talk and the speaker mentioned a situation when a project should block Django’s reverse foreign keys, to prevent accidental data leakages. The precise situation is not relevant for this post, given it is a bit more complex, but let’s assume this is the requirement.
The reverse foreign key feature needs to be disabled on every foreign key field. We can implement a system check to ensure we haven’t forgotten any. It would look very similar to this:
# checks.py
from django.apps import apps
from django.core import checks
from django.db.models import ForeignKey


@checks.register(checks.Tags.models)
def check_foreign_keys(app_configs, **kwargs):
    errors = []

    for app in apps.get_app_configs():
        if "site-packages" in app.path:
            continue

        for model in app.get_models():
            fields = model._meta.get_fields()
            for field in fields:
                errors.extend(check_field(model, field))

    return errors


def check_field(model, field):
    if not isinstance(field, ForeignKey):
        return []

    rel_name = getattr(field, "_related_name", None)
    if rel_name and rel_name.endswith("+"):
        return []

    error = checks.CheckMessage(
        checks.ERROR,
        f'FK "{field.name}" reverse lookups enabled',
        'Add "+" at the end of the "related_name".',
        obj=model,
        id="example.E001",
    )
    return [error]
Then ensure the check is active by loading it on apps.py:
# apps.py
from django.apps import AppConfig


class ExampleConfig(AppConfig):
    name = "example"

    def ready(self):
        super().ready()
        from .checks import check_foreign_keys
This would do the trick and produce the following output when trying to run the development server:
$ python manage.py runserver
Watching for file changes with StatReloader
Performing system checks...

...

ERRORS:
example.Order: (example.E001) FK "client" reverse lookups enabled
        HINT: Add "+" at the end of the "related_name".
example.Order: (example.E001) FK "source" reverse lookups enabled
        HINT: Add "+" at the end of the "related_name".
example.OrderRequest: (example.E001) FK "source" reverse lookups enabled
        HINT: Add "+" at the end of the "related_name".
On the other hand, if your test is only important for production, you should use @checks.register(checks.Tags.models, deploy=True). This way, the check will only be executed together with all other security checks when running manage.py check --deploy.
Doing more with the framework
There are also packages on PyPI, such as django-extra-checks, that implement checks for general Django good practices if you wish to enforce them on your project.
To end this post, that is already longer than I initially desired, I will leave a couple of links to other resources if you want to continue exploring:
No matter how much you try to delay and how many reasons you find to postpone, eventually the time comes. You need to update and upgrade your software, your system components, your apps, your dependencies, etc.
This happens to all computer users. On some systems, this is an enjoyable experience, on other systems as painful as it can get.
Most of the time, upgrading Django on our projects falls in the first category, due to its amazing documentation and huge community. Nevertheless, the upgrade path takes work and “now” rarely seems the right time to move forward with it, specially if you are jumping between LTS versions.
So, today’s tip is a mention of 2 packages that can help you reduce the burden of going through your codebase looking for the lines that need to be changed. They are:
Both of them do more or less the same thing, they will automatically detect the code that needs to be changed and then fix it according to the release notes. Attention, this is no excuse to avoid reading the release notes.
django-upgrade is faster and probably the best choice, but django-codemod supports older versions of Python. Overall, it will depend on the situation at hand.
And this is it… I hope these libraries are as helpful to you as they have been to me.
Last week, an article was published with some interesting numbers about the security of PostgreSQL servers publicly exposed to the internet (You can find it here).
But more than the numbers, what really caught my attention was the fact that most clients and libraries used to access and interact with the databases have insecure defaults:
…most popular SQL clients are more than happy to accept unencrypted connections without a warning. We conducted an informal survey of 22 popular SQL clients and found that only two require encrypted connections by default.
The above information can also be provided using a single “URL” such as postgres://USER:PASSWORD@HOST:PORT/NAME, but in this case, you might need some extra parsing logic or to rely on an external dependency.
Now, based on that article psycopg2 by default prefers to use an encrypted connection but doesn’t require it, or even enforces a valid certificate. How can we change that?
By using the field OPTIONS and then set the sslmode:
A few years ago I built a small application to test Django’s websocket support through django-channels. It basically displayed on a web page in real time all the requests made to a given endpoint (you could generate multiple of them) without storing anything. It was fun and it was very useful to quickly debug stuff , so I kept it running since that time.
If you are interested in more details about the project itself, you can find a complete overview here.
However today, Heroku, the platform where it was running, announced the end of the free tier. This tier has been a godsend for personal projects and experiments over the last decade and heroku as a platform initially set the bar really high regarding the developer experience of deploying those projects.
“Webhook-logger” was the only live project I had running on Heroku’s free tier and after some consideration I reached the conclusion it was time to turn it off. Its functionality is not unique and there are better options for this use case, so it is not worth the work required to move it to a new hosting provider.
The code is still available in case anyone still want to take a look or deploy by their own.
Django management commands can be very helpful while developing your application or website, we are very used to runserver, makemigrations, migrate, shell and others. Third party packages often provide extra commands and you can easily add new commands to your own apps.
Today lets take a look at some less known and yet very useful commands that Django provides out of the box.
Dealing with multiple environments and debugging their differences is not as rare as we would like. In that particular scenario diffsettings can become quite handy.
Basically, it displays the differences between the current configuration and another settings file. The default settings are used if a module is not provided.
This one does not require an extensive explanation. It lets you test and debug your email configuration by using it to send the following message:
Content-Type: text/plain; charset="utf-8"
MIME-Version: 1.0
Content-Transfer-Encoding: 7bit
Subject: Test email from host on 2022-04-28 19:08:56.968492+00:00
From: webmaster@localhost
To: my@address.com
Date: Thu, 28 Apr 2022 19:08:56 -0000
Message-ID: <165117293696.405310.3477251481753991809@host>

If you're reading this, it was successful.
-----------------------------------------------------------
inspectdb
$ python manage.py inspectdb
If you are building your project on top of an existing database (managed by other system), inspectdb can look into the schema and generate the respective models for Django’s ORM, making it very easy to start using the data right away. Here’s an example:
# This is an auto-generated Django model module.
# You'll have to do the following manually to clean this up:
#   * Rearrange models' order
#   * Make sure each model has one field with primary_key=True
#   * Make sure each ForeignKey and OneToOneField has `on_delete` set to the desired behavior
#   * Remove `managed = False` lines if you wish to allow Django to create, modify, and delete the table
# Feel free to rename the models, but don't rename db_table values or field names.

...

class AuthPermission(models.Model):
    content_type = models.ForeignKey('DjangoContentType', models.DO_NOTHING)
    codename = models.CharField(max_length=100)
    name = models.CharField(max_length=255)

    class Meta:
        managed = False
        db_table = 'auth_permission'
        unique_together = (('content_type', 'codename'),)
...
showmigrations
$ python manage.py showmigrations --verbosity 2
When you need to inspect the current state of the project’s migrations in a given environment the above command is the easiest way to get that information. It will tell you what migrations exist, which ones were applied and when.
admin
 [X] 0001_initial (applied at 2021-01-13 19:49:24)
 [X] 0002_logentry_remove_auto_add (applied at 2021-01-13 19:49:24)
 [X] 0003_logentry_add_action_flag_choices (applied at 2021-01-13 19:49:24)
auth
 [X] 0001_initial (applied at 2021-01-13 19:49:24)
 [X] 0002_alter_permission_name_max_length (applied at 2021-01-13 19:49:24)
 [X] 0003_alter_user_email_max_length (applied at 2021-01-13 19:49:24)
...
There are many other useful management commands that are missing in the base Django package, to fill that gap there are some external packages available such as django-extensions. But I will leave those to a future post.
While the admin is a well known and very useful app for your projects, Django also includes another admin package that isn’t as popular (at least I never seen it being heavily used) but that can also be quite handy.
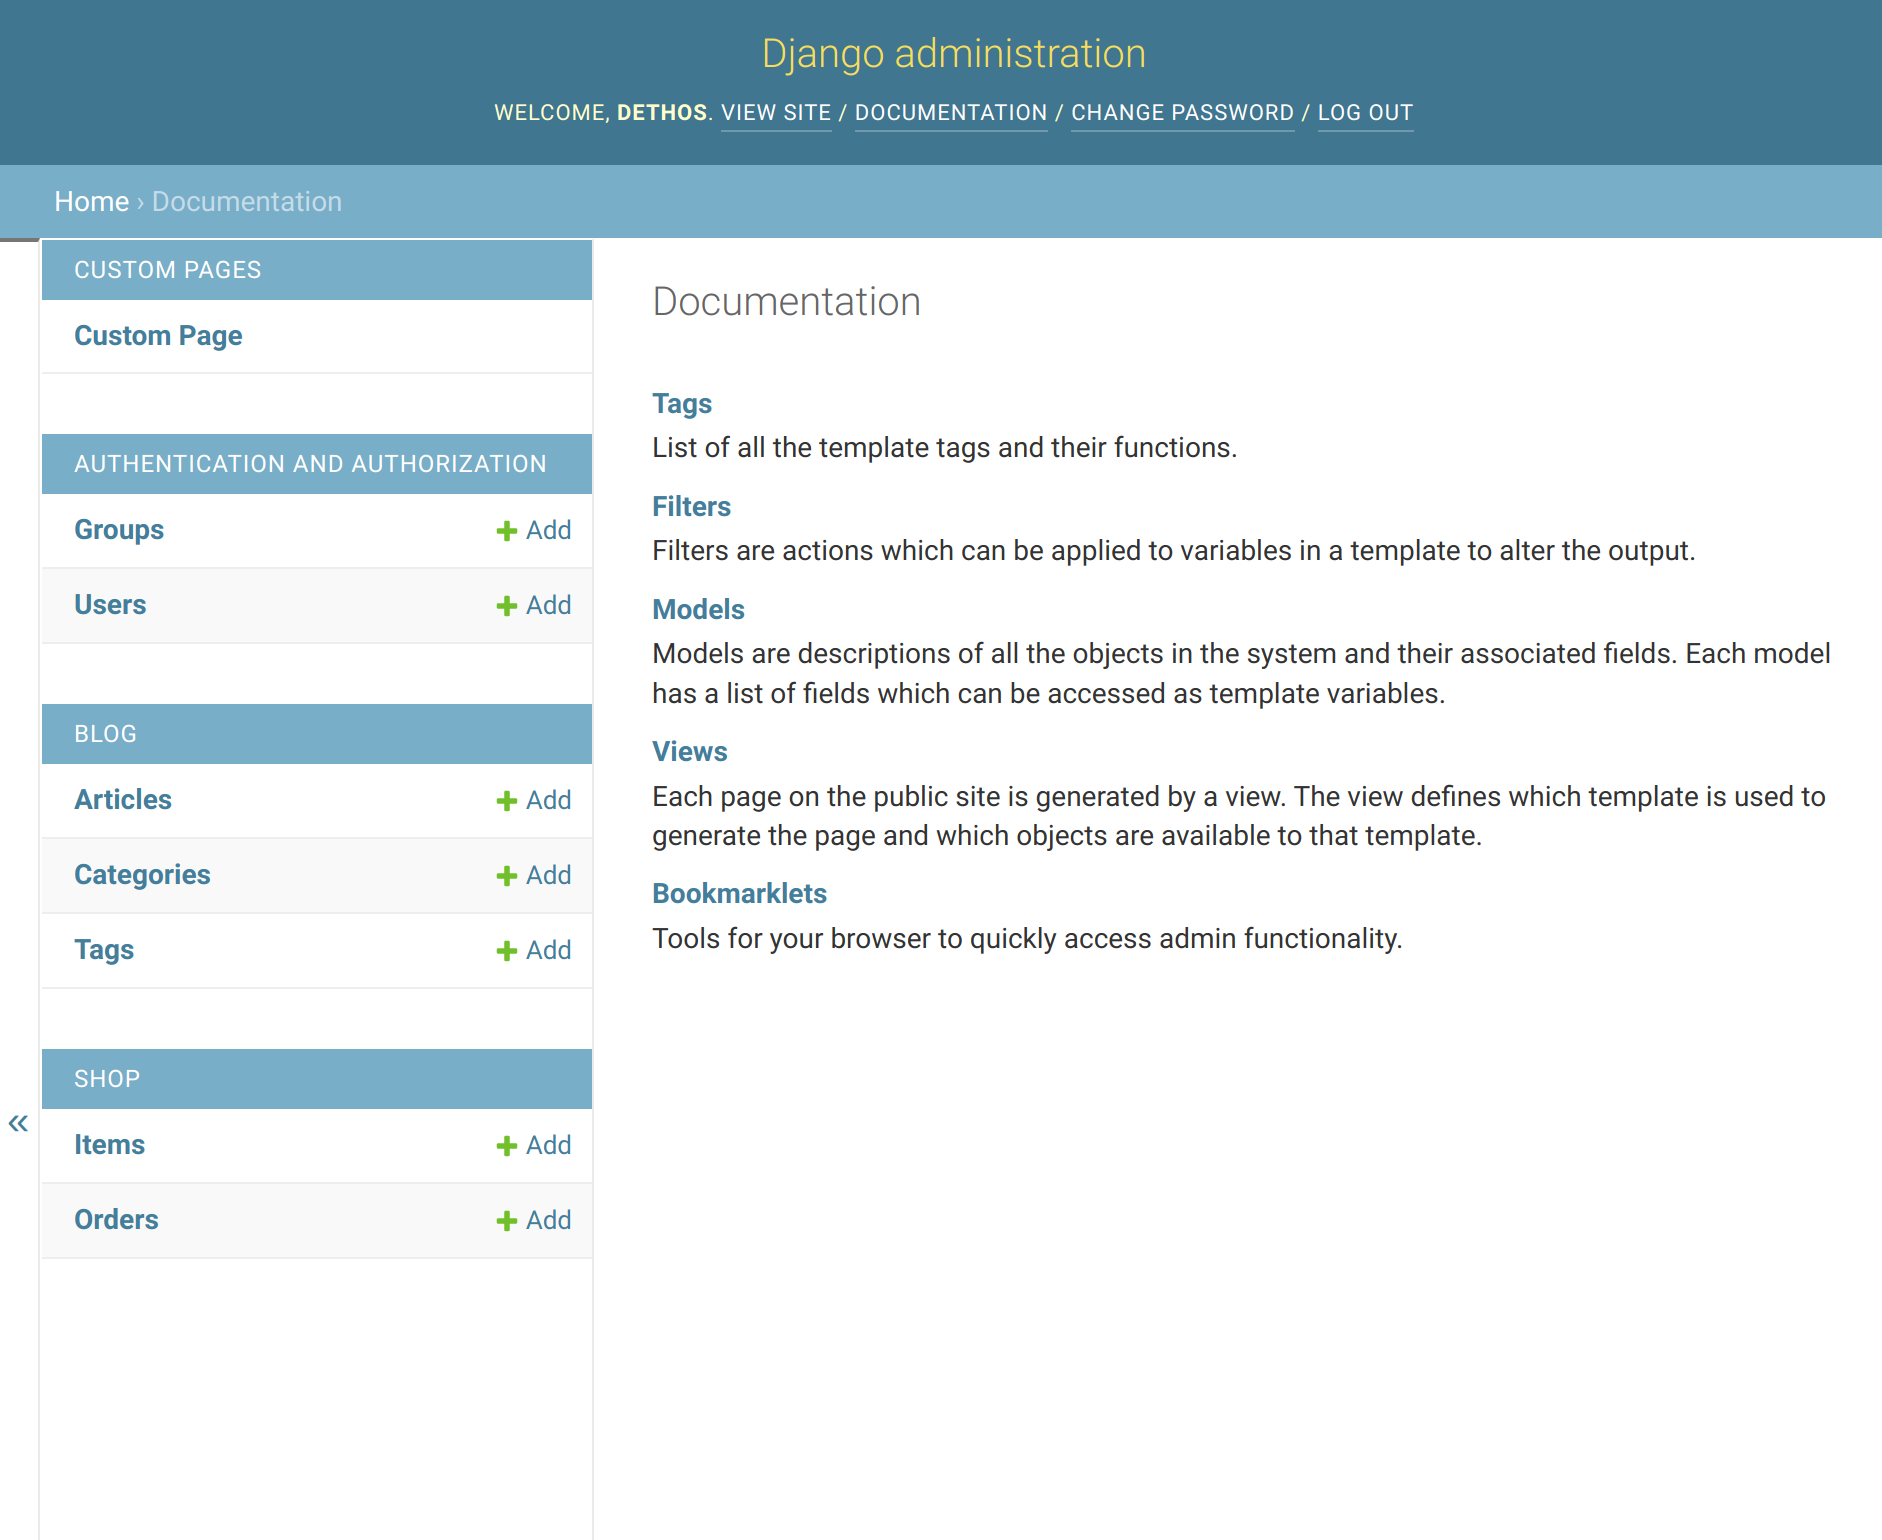
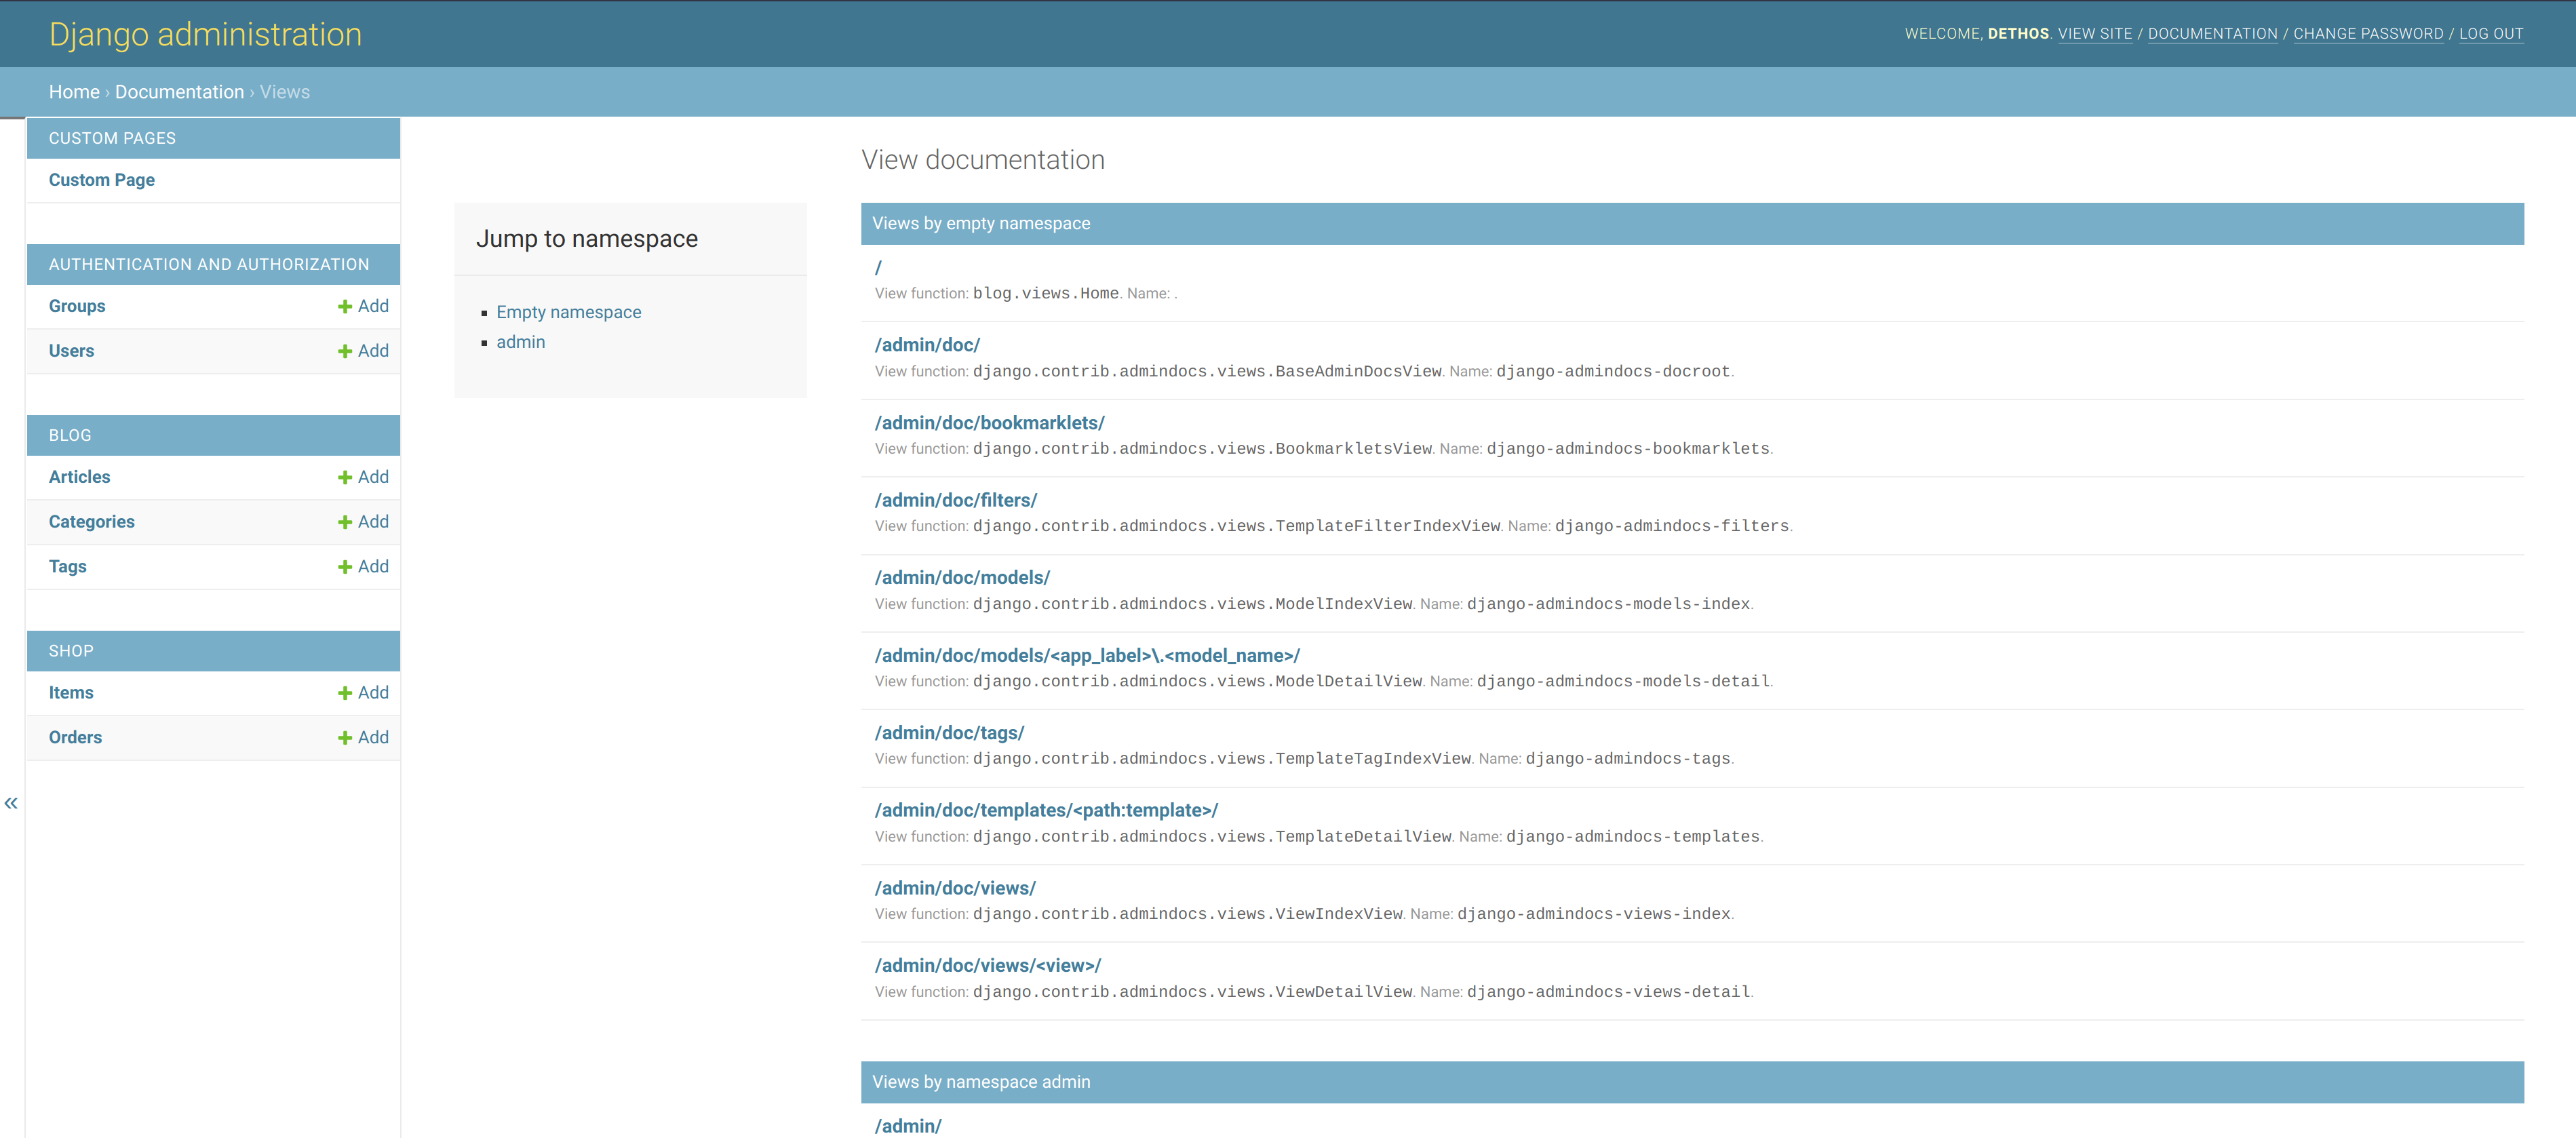
I’m talking about the admindocs app. What it does is to provide documentation for the main components of your project in the Django administration itself.
It takes the existing documentation provided in the code to developers and exposes it to users that have the is_staff flag enabled.
This is what they see:
A view of the main page of the generated docs.Checking documentation for existing views.Checking a model reference.
I can see this being very helpful for small websites that are operated by teams of “non-developers” or even for people providing support to customers. At least when a dedicated and more mature solution for documentation is not available.
In the final tips post of the year, lets address a solution to a problem that most websites face once they have been online for a while.
If you have a back-office or the concept of user accounts, soon you will face the security problem of attackers trying to hack into these private zones of the website.
These attackers can either be people trying to login as somebody else, or even bots trying to find accounts with common/leaked passwords.
Unfortunately we cannot rely on users to pick strong and unique passwords. We can help them, as I explained in a previous post, but it isn’t guaranteed that the user will make a good choice.
Using a slow key derivation function, to slowdown the process and increase the time required to test an high number of possibilities, helps but isn’t enough.
However we can go even further with this strategy, by controlling the number of attempts and only allowing a “given number of tries per time window”.
This is very easy to achieve on Django projects by relying on the django-axes package. Here’s an explanation of what it does:
Axes records login attempts to your Django powered site and prevents attackers from attempting further logins to your site when they exceed the configured attempt limit.
django-axes documentation
Basically you end up with record of attempts (that you can see in the admin) and allows you to define how the system will behave after multiple failed tries, by setting the maximum number of failures and cool-off periods.
You can check the package here, it is very easy to setup and it shouldn’t require many changes to your code. The documentation can be found here and it covers everything you will need so I won’t provide any examples this time.
I hope this tip ends up being useful and wish you a Merry Christmas. The tips will continue in 2022.
One of the great builtin features of Django is the admin app. It lets you, among other things, execute the usual CRUD operations on your data, search, filter and execute bulk actions on many records.
However the interface is a bit rigid, by default you have the “dashboard” with the list of models, the page listing your records for each model and the details page for each individual item.
What if you want to display other information to the admins? Such an overview of the system, aggregate data, some statistics, etc.
In this post I will address the steps required to add custom pages to the admin and include them in the main menu of the administration.
The first step is to create a new custom admin website, so we can easily modify its contents and functionality.
from django.contrib import admin

class YourCustomAdminSite(admin.AdminSite):
    pass
Now we will have to use this admin site across your project, which means changing your current admin settings to use this “site” (such as your ModelAdmins and your urls.py.
If the above is too much trouble and requires to many changes, this small “hack” before including the admin URLs will also work:
(I chose to extend admin/change_list.html, but the content of this template is up to you, no restrictions here. If you decide to not extend any existing admin template, the last steps of 5. will not apply to your case)
4. Extend the admin URLs
To make this new endpoint accessible, we now have to edit the method that returns all existing URLs of the administration and append our new page.
At this point the custom page should be available at /admin/custom_page/, but users will not be able to find it, since no other link or button points to it.
5. Extend the menu items
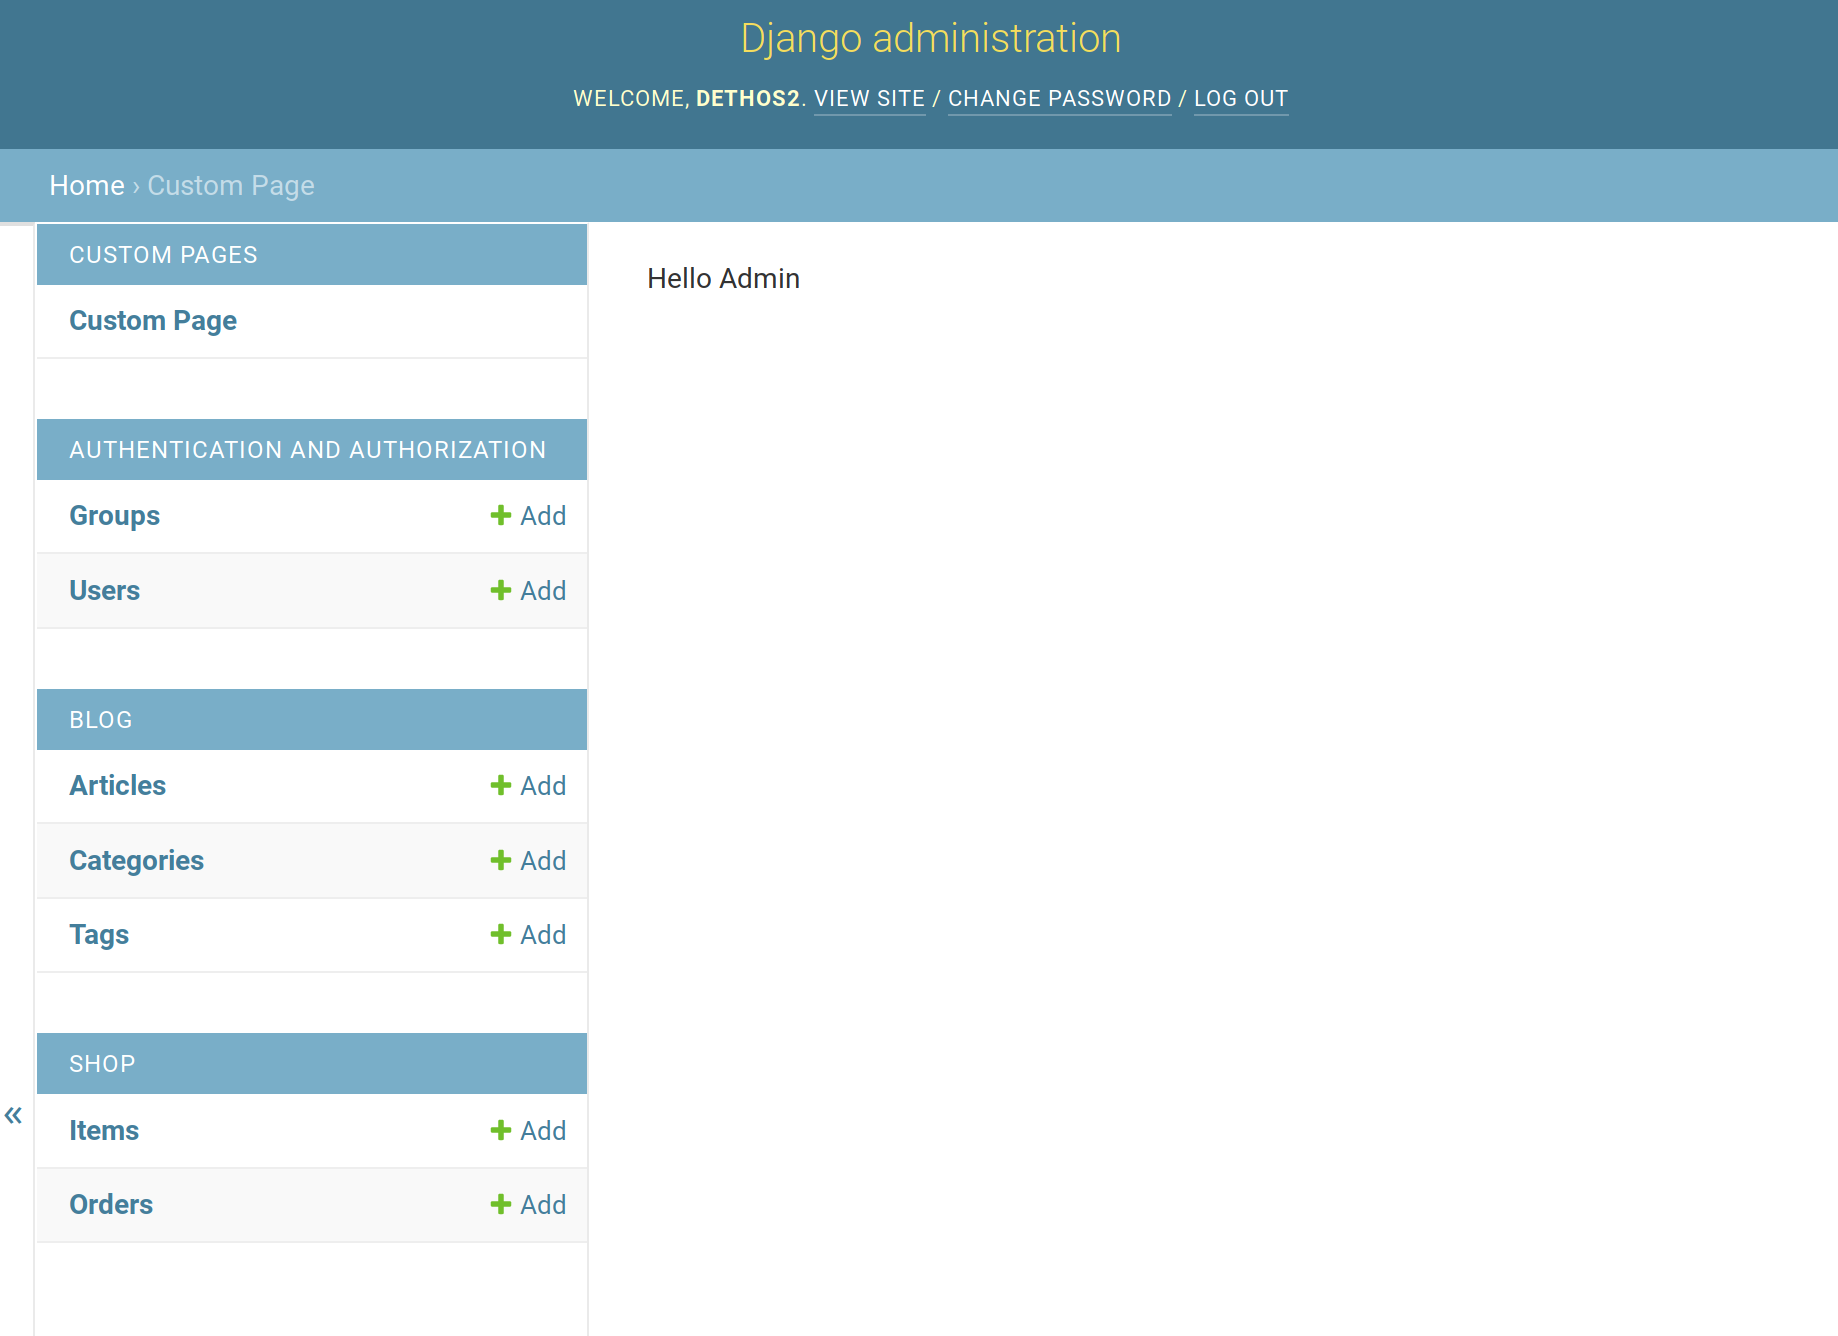
The final step is to include a link to the new page in the existing menu, in order for it to be easily accessible. First we need to replace the current index_template:
...

class YourCustomAdminSite(admin.AdminSite):
    index_template = "admin/custom_index.html"
    ...
And add the following content to your new template:
Basically we added a new section to the list containing a link to our new page.
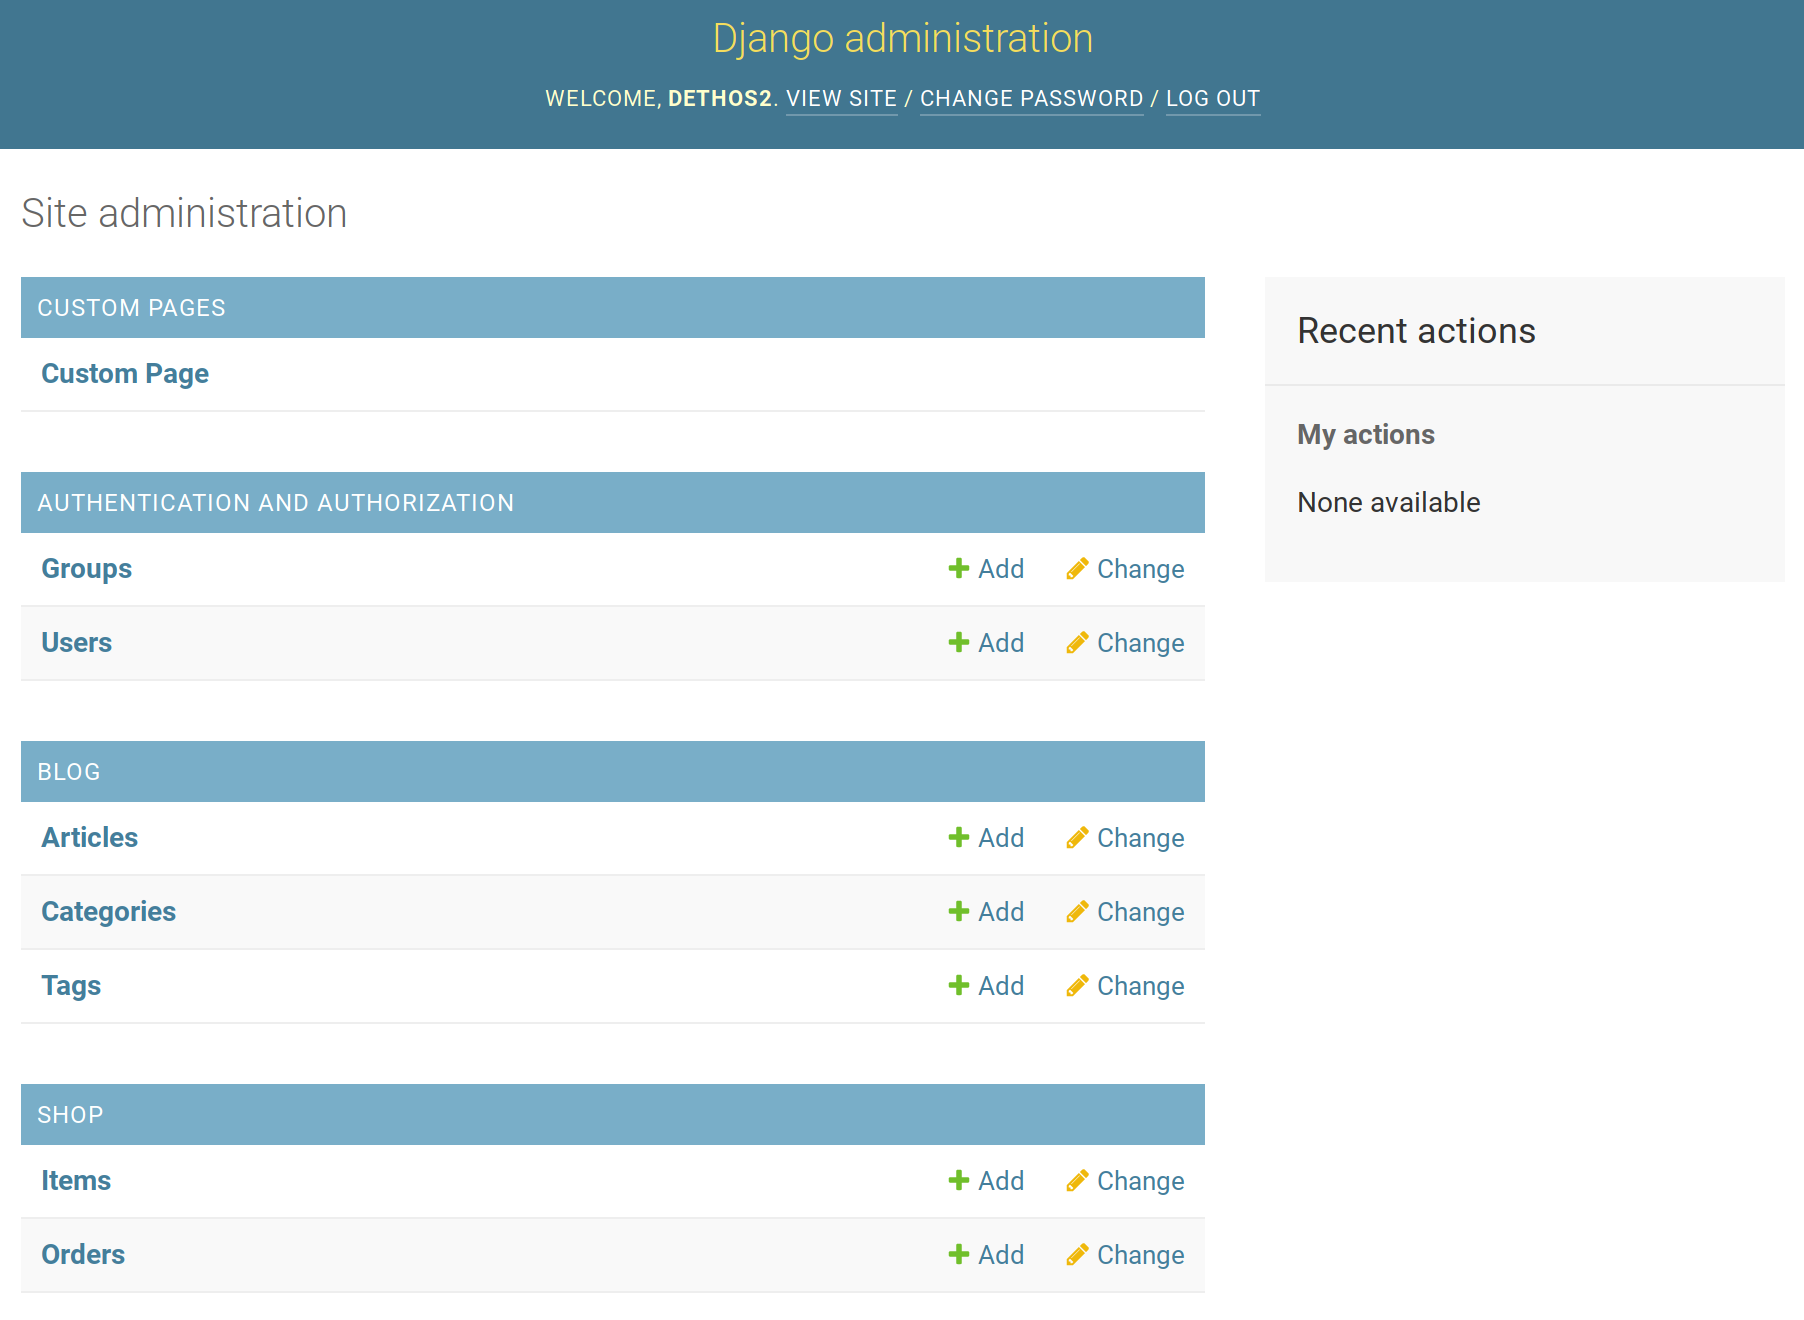
Links were added to the index pageThe custom page we just created
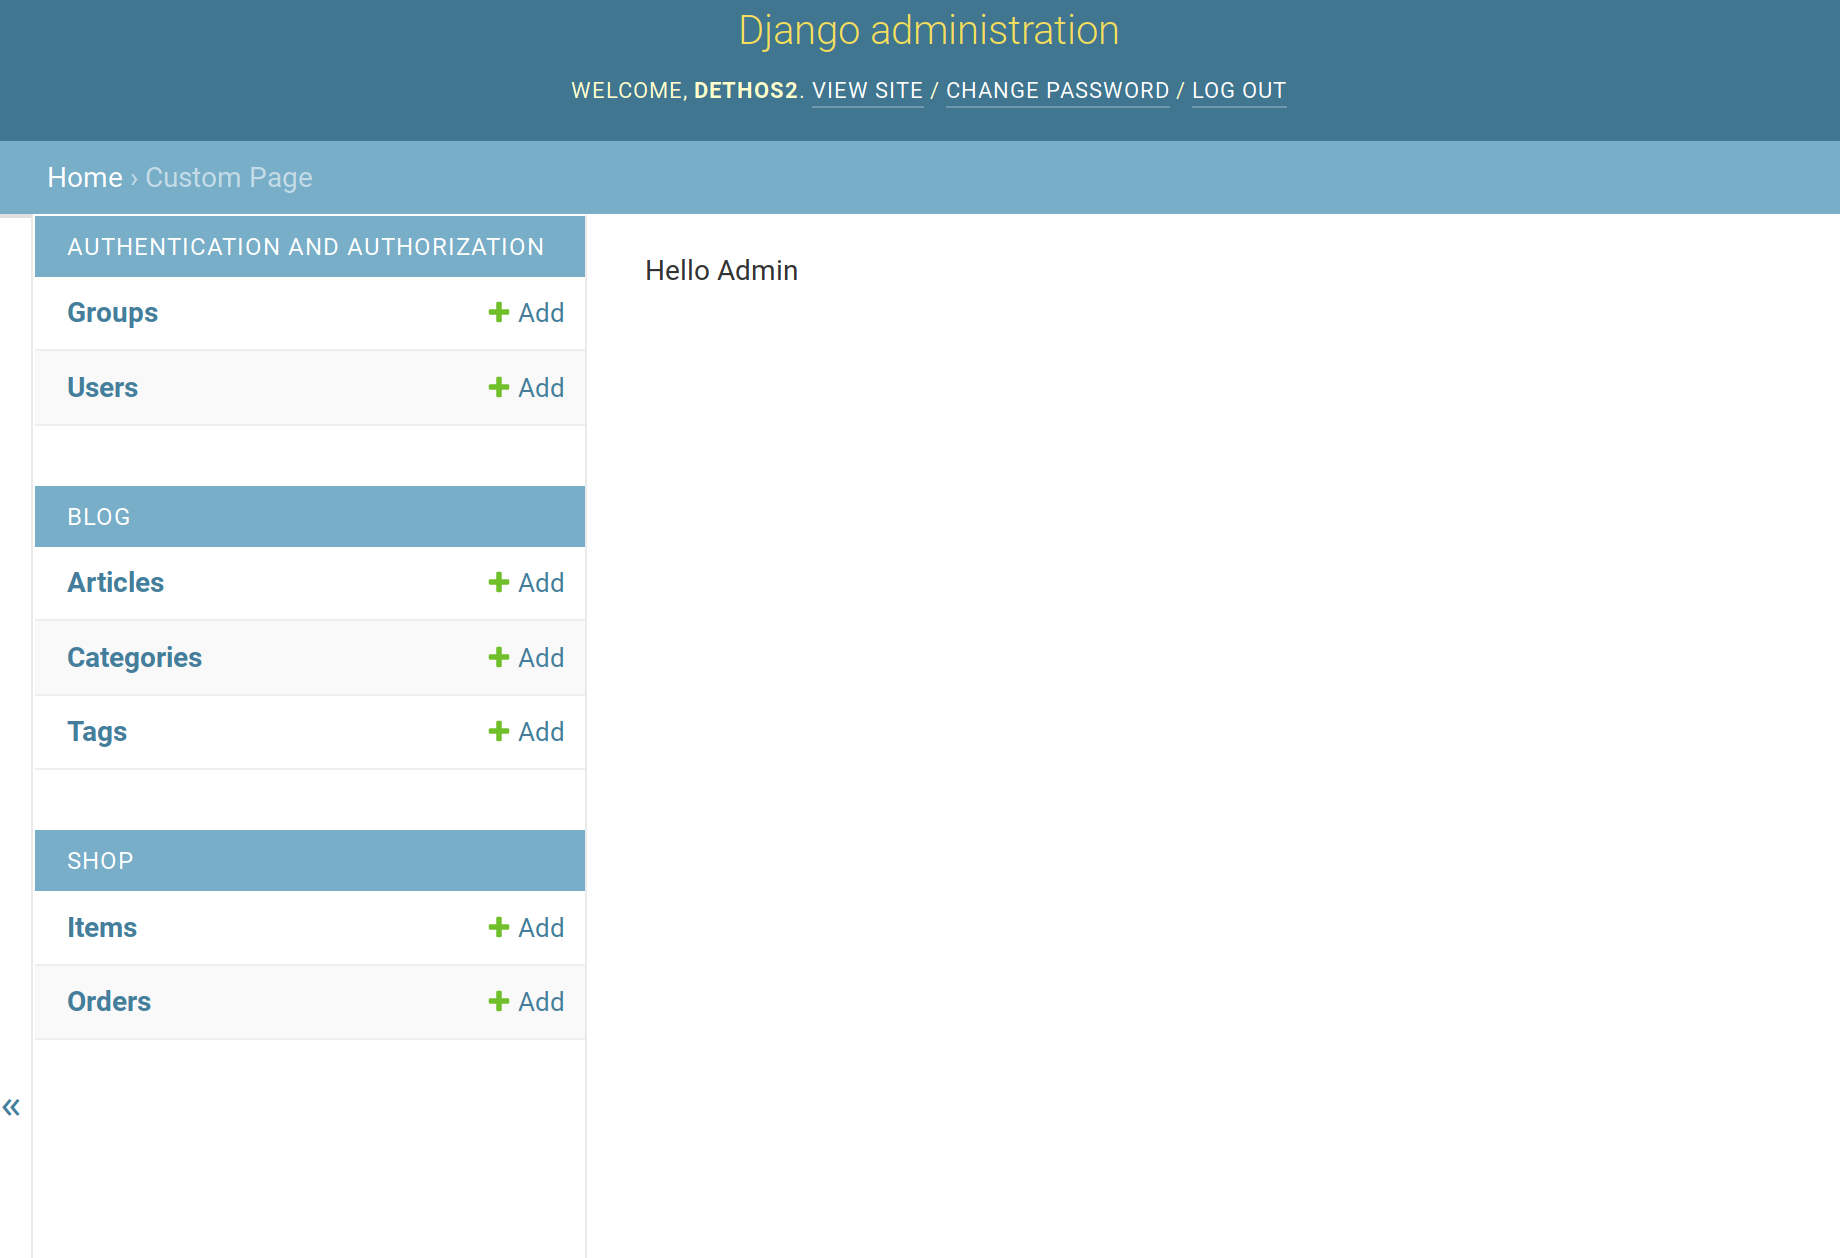
Looking good, the page is there with our content and is accessible through the index page. However many traditional elements on the page are missing (side menu, logout button, etc). To add them we just need some small changes to our view:
Note: The app where you put the above template must be placed before the “admin” app in your “INSTALLED_APPS” list, otherwise the default template will be used anyway.
Custom admin page with all the elements
And for today, this is it. With the above changes you can add as many custom pages to your admin as you need and have full controls over their functionality.
This time I’m gonna address Django’s builtin authentication system, more specifically the ways we can build custom improvements over the already very solid foundations it provides.
The idea for this post came from reading an article summing up some considerations we should have when dealing with passwords. Most of those considerations are about what controls to implement (what “types” of passwords to accept) and how to securely store those passwords. By default Django does the following:
Passwords are stored using PBKDF2. There are also other alternatives such as Argon2 and bcrypt, that can be defined in the setting PASSWORD_HASHERS.
Every Django release the “strength”/cost of this algorithm is increased. For example, version 3.1 applied 216000 iterations and the last version (3.2 at the time of writing) applies 260000. The migration from one to another is done automatically once the user logs in.
There are a set of validators that control the kinds of passwords allowed to be used in the system, such as enforcing a minimum length. These validators are defined on the setting AUTH_PASSWORD_VALIDATORS.
By default when we start a new project these are the included validators :
UserAttributeSimilarityValidator
MinimumLengthValidator
CommonPasswordValidator
NumericPasswordValidator
The names are very descriptive and I would say a good starting point. But as the article mentions the next step is to make sure users aren’t reusing previously breached passwords or using passwords that are known to be easily guessed (even when complying with the other rules). CommonPasswordValidator already does part of this job but with a very limited list (20000 entries).
Improving password validation
So for the rest of this post I will show you some ideas on how we can make this even better. More precisely, prevent users from using a known weak password.
1. Use your own list
The easiest approach, but also the more limited one, is providing your own list to `CommonPasswordValidator`, containing more entries than the ones provided by default. The list must be provided as a file with one entry in lower case per line. It can be set like this:
Another approach is to use an existing and well-known library that evaluates the password, compares it with a list of known passwords (30000) but also takes into account slight variations and common patterns.
To use zxcvbn-python we need to implement our own validator, something that isn’t hard and can be done this way:
# <your_app>/validators.py

from django.core.exceptions import ValidationError
from zxcvbn import zxcvbn


class ZxcvbnValidator:
    def __init__(self, min_score=3):
        self.min_score = min_score

    def validate(self, password, user=None):
        user_info = []
        if user:
            user_info = [
                user.email,
                user.first_name,
                user.last_name,
                user.username
            ]
        result = zxcvbn(password, user_inputs=user_info)

        if result.get("score") < self.min_score:
            raise ValidationError(
                "This passoword is too weak",
                code="not_strong_enough",
                params={"min_score": self.min_score},
            )

    def get_help_text(self):
        return "The password must be long and not obvious"
Then we just need to add to the settings just like the other validators. It’s an improvement but we still can do better.
3. Use “have i been pwned?”
As suggested by the article, a good approach is to make use of the biggest source of leaked passwords we have available, haveibeenpwned.com.
The full list is available for download, but I find it hard to justify a 12GiB dependency on most projects. The alternative is to use their API (documentation available here), but again we must build our own validator.
# <your_app>/validators.py

from hashlib import sha1
from io import StringIO

from django.core.exceptions import ValidationError

import requests
from requests.exceptions import RequestException

class LeakedPasswordValidator:
    def validate(self, password, user=None):
        hasher = sha1(password.encode("utf-8"))
        hash = hasher.hexdigest().upper()
        url = "https://api.pwnedpasswords.com/range/"

        try:
            resp = requests.get(f"{url}{hash[:5]}")
            resp.raise_for_status()
        except RequestException:
            raise ValidationError(
                "Unable to evaluate password.",
                code="network_failure",
            )

        lines = StringIO(resp.text).readlines()
        for line in lines:
            suffix = line.split(":")[0]

            if hash == f"{hash[:5]}{suffix}":
                raise ValidationError(
                    "This password has been leaked before",
                    code="leaked_password",
                )

    def get_help_text(self):
        return "Use a different password"
Then add it to the settings.
Edit: As suggested by one reader, instead of this custom implementation we could use pwned-passwords-django (which does practically the same thing).
And for today this is it. If you have any suggestions for other improvements related to this matter, please share them in the comments, I would like to hear about them.
As you might have guessed from the title, today’s tip is about how to add “Subresource integrity” (SRI) checks to your website’s static assets.
First lets see what SRI is. According to the Mozilla’s Developers Network:
Subresource Integrity (SRI) is a security feature that enables browsers to verify that resources they fetch (for example, from a CDN) are delivered without unexpected manipulation. It works by allowing you to provide a cryptographic hash that a fetched resource must match.
So basically, if you don’t serve all your static assets and rely on any sort of external provider, you can force the browser to check that the delivered contents are exactly the ones you expect.
To trigger that behavior you just need to add the hash of the content to the integrity attribute of the <script> and/or <link> elements in question.
This is all very nice but adding this info manually isn’t that fun or even practical, when your resources might change frequently or are built dynamically on each deployment.
To help with this task I recently found a little tool called django-sri that automates these steps for you (and is compatible with whitenoise if you happen to use it).
After the install, you just need to replace the {% static ... %} tags in your templates with the new one provided by this package ({% sri_static .. %}) and the integrity attribute will be automatically added.