Tag: Django

  • Django Friday Tips: Permissions in the Admin

    In this year’s first issue of my irregular Django quick tips series, lets look at the builtin tools available for managing access control.

    The framework offers a comprehensive authentication and authorization system that is able to handle the common requirements of most websites without even needing any external library.

    Most of the time, simple websites only make use of the “authentication” features, such as registration, login and logout. On more complex systems only authenticating the users is not enough, since different users or even groups of users will have access to distinct sets of features and data records.

    This is when the “authorization” / access control features become handy. As you will see they are very simple to use as soon as you understand the implementation and concepts behind them. Today I’m gonna focus on how to use these permissions on the Admin, perhaps in a future post I can address the usage of permissions on other situations. In any case Django has excellent documentation, so a quick visit to this page will tell you what you need to know.

    Under the hood

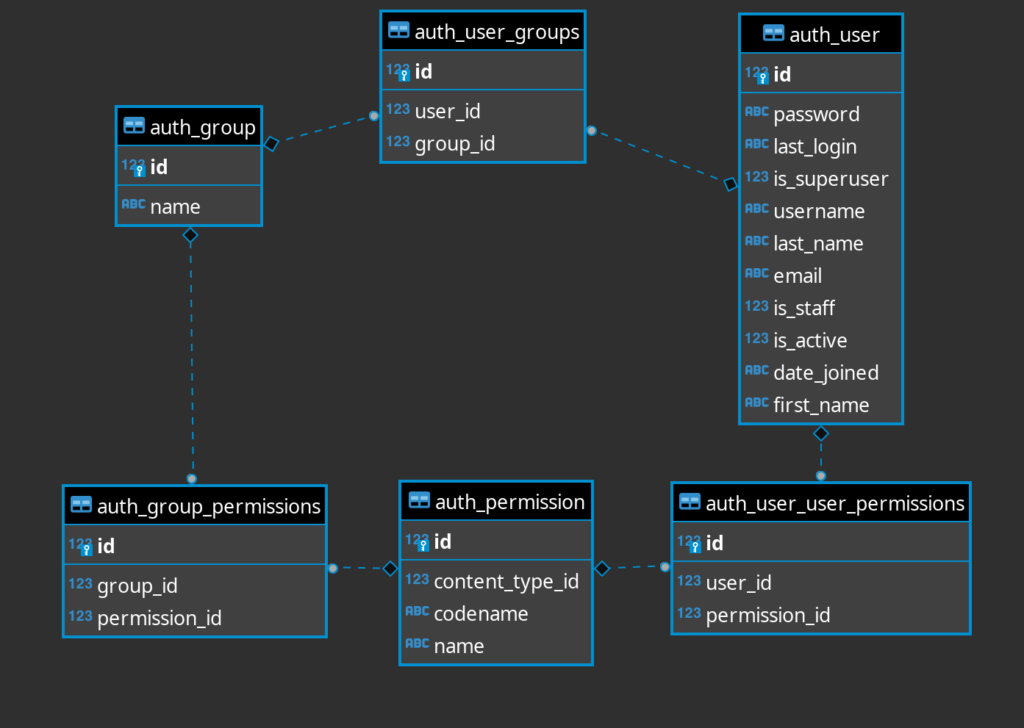
    Simplified Entity-Relationship diagram of Django's authentication and authorization features.
    ER diagram of Django’s “auth” package

    The above picture is a quick illustration of how this feature is laid out in the database. So a User can belong to multiple groups and have multiple permissions, each Group can also have multiple permissions. So a user has a given permission if it is directly associated with him or or if it is associated with a group the user belongs to.

    When a new model is added 4 permissions are created for that particular model, later if we need more we can manually add them. Those permissions are <app>.add_<model>, <app>.view_<model>, <app>.update_<model> and <app>.delete_<model>.

    For demonstration purposes I will start with these to show how the admin behaves and then show how to implement an action that’s only executed if the user has the right permission.

    The scenario

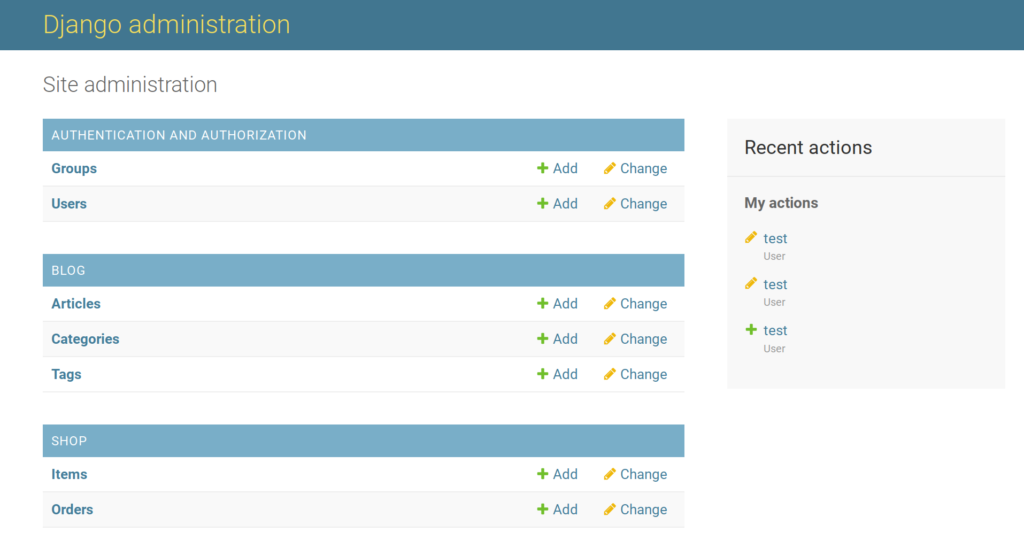
    Lets image we have a “store” with some items being sold and it also has a blog to announce new products and promotions. Here’s what the admin looks like for the “superuser”:

    Admin view, with all models being displayed.
    The admin showing all the available models

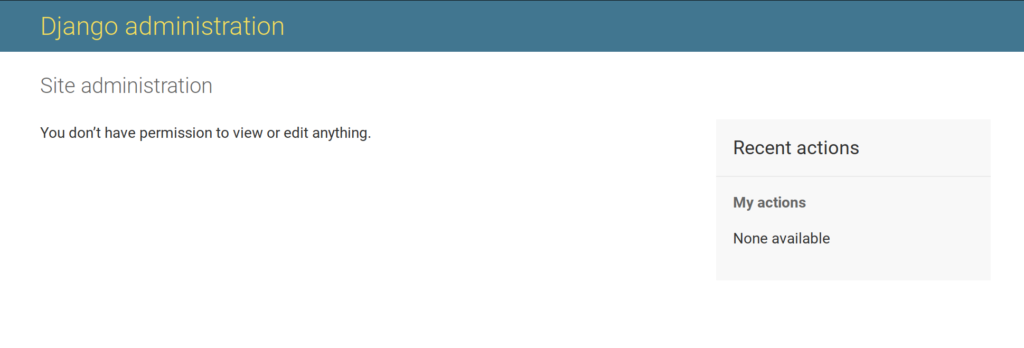
    We have several models for the described functionality and on the right you can see that I added a test user. At the start, this test user is just marked as regular “staff” (is_staff=True), without any permissions. For him the admin looks like this:

    A view of Django admin without any model listed.
    No permissions

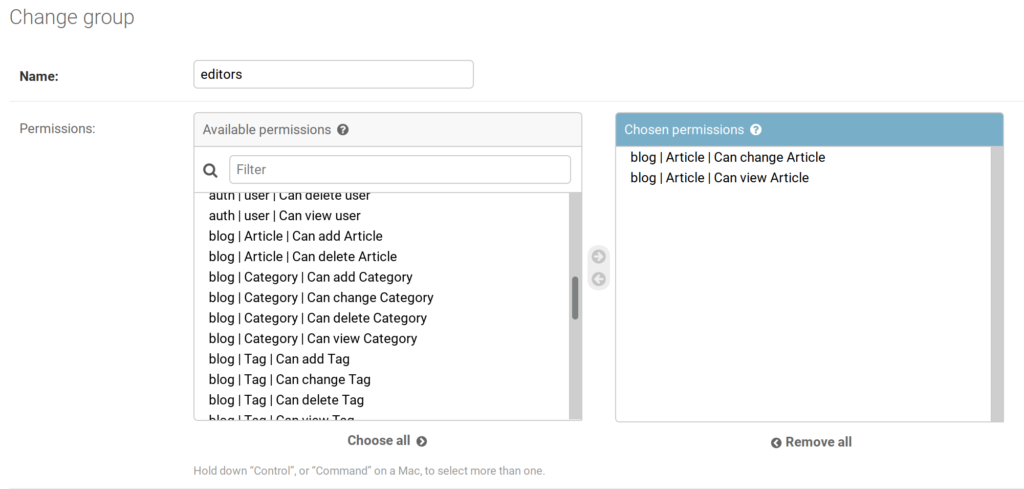
    After logging in, he can’t do anything. The store manager needs the test user to be able to view and edit articles on their blog. Since we expect in the future that multiple users will be able to do this, instead of assigning these permissions directly, lets create a group called “editors” and assign those permissions to that group.

    Only two permissions for this group of users

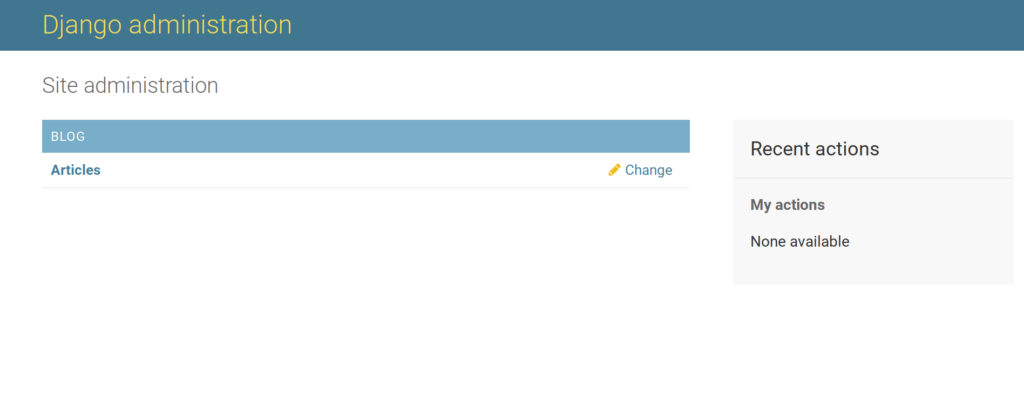
    Afterwards we also add the test user to that group (in the user details page). Then when he checks the admin he can see and edit the articles as desired, but not add or delete them.

    Screenshot of the Django admin, from the perspective of a user with only "view" and "change" permissions.
    No “Add” button there

    The actions

    Down the line, the test user starts doing other kinds of tasks, one of them being “reviewing the orders and then, if everything is correct, mark them as ready for shipment”. In this case, we don’t want him to be able to edit the order details or change anything else, so the existing “update” permissions cannot be used.

    What we need now is to create a custom admin action and a new permission that would let specific users (or groups) execute that action. Lets start with the later:

    class Order(models.Model):
        ...
        class Meta:
            ...
            permissions = [("set_order_ready", "Can mark the order as ready for shipment")]

    What we are doing above, is telling Django there is one more permission that should be created for this model, a permission that we will use ourselves.

    Once this is done (you need to run manage.py migrate), we can now create the action and ensure we check that the user executing it has the newly created permission:

    class OrderAdmin(admin.ModelAdmin):
        ...
        actions = ["mark_as_ready"]
    
        def mark_as_ready(self, request, queryset):
            if request.user.has_perm("shop.set_order_ready"):
                queryset.update(ready=True)
                self.message_user(
                    request, "Selected orders marked as ready", messages.SUCCESS
                )
            else:
                self.message_user(
                    request, "You are not allowed to execute this action", messages.ERROR
                )
    
        mark_as_ready.short_description = "Mark selected orders as ready"

    As you can see, we first check the user as the right permission, using has_perm and the newly defined permission name before proceeding with the changes.

    And boom .. now we have this new feature that only lets certain users mark the orders as ready for shipment. If we try to execute this action with the test user (that does not have yet the required permission):

    No permission assigned, no action for you sir

    Finally we just add the permission to the user and it’s done. For today this is it, I hope you find it useful.

  • Django Friday Tips: Inspecting ORM queries

    Today lets look at the tools Django provides out of the box to debug the queries made to the database using the ORM.

    This isn’t an uncommon task. Almost everyone who works on a non-trivial Django application faces situations where the ORM does not return the correct data or a particular operation as taking too long.

    The best way to understand what is happening behind the scenes when you build database queries using your defined models, managers and querysets, is to look at the resulting SQL.

    The standard way of doing this is to set the logging configuration to print all queries done by the ORM to the console. This way when you browse your website you can check them in real time. Here is an example config:

    LOGGING = {
        ...
        'handlers': {
            'console': {
                'level': 'DEBUG',
                'filters': ['require_debug_true'],
                'class': 'logging.StreamHandler',
            },
            ...
        },
        'loggers': {
            ...
            'django.db.backends': {
                'level': 'DEBUG',
                'handlers': ['console', ],
            },
        }
    }

    The result will be something like this:

    ...
    web_1     | (0.001) SELECT MAX("axes_accessattempt"."failures_since_start") AS "failures_since_start__max" FROM "axes_accessattempt" WHERE ("axes_accessattempt"."ip_address" = '172.18.0.1'::inet AND "axes_accessattempt"."attempt_time" >= '2020-09-18T17:43:19.844650+00:00'::timestamptz); args=(Inet('172.18.0.1'), datetime.datetime(2020, 9, 18, 17, 43, 19, 844650, tzinfo=<UTC>))
    web_1     | (0.001) SELECT MAX("axes_accessattempt"."failures_since_start") AS "failures_since_start__max" FROM "axes_accessattempt" WHERE ("axes_accessattempt"."ip_address" = '172.18.0.1'::inet AND "axes_accessattempt"."attempt_time" >= '2020-09-18T17:43:19.844650+00:00'::timestamptz); args=(Inet('172.18.0.1'), datetime.datetime(2020, 9, 18, 17, 43, 19, 844650, tzinfo=<UTC>))
    web_1     | Bad Request: /users/login/
    web_1     | [18/Sep/2020 18:43:20] "POST /users/login/ HTTP/1.1" 400 2687

    Note: The console output will get a bit noisy

    Now lets suppose this logging config is turned off by default (for example, in a staging server). You are manually debugging your app using the Django shell and doing some queries to inspect the resulting data. In this case str(queryset.query) is very helpful to check if the query you have built is the one you intended to. Here’s an example:

    >>> box_qs = Box.objects.filter(expires_at__gt=timezone.now()).exclude(owner_id=10)
    >>> str(box_qs.query)
    'SELECT "boxes_box"."id", "boxes_box"."name", "boxes_box"."description", "boxes_box"."uuid", "boxes_box"."owner_id", "boxes_box"."created_at", "boxes_box"."updated_at", "boxes_box"."expires_at", "boxes_box"."status", "boxes_box"."max_messages", "boxes_box"."last_sent_at" FROM "boxes_box" WHERE ("boxes_box"."expires_at" > 2020-09-18 18:06:25.535802+00:00 AND NOT ("boxes_box"."owner_id" = 10))'

    If the problem is related to performance, you can check the query plan to see if it hits the right indexes using the .explain() method, like you would normally do in SQL.

    >>> print(box_qs.explain(verbose=True))
    Seq Scan on public.boxes_box  (cost=0.00..13.00 rows=66 width=370)
      Output: id, name, description, uuid, owner_id, created_at, updated_at, expires_at, status, max_messages, last_sent_at
      Filter: ((boxes_box.expires_at > '2020-09-18 18:06:25.535802+00'::timestamp with time zone) AND (boxes_box.owner_id <> 10))

    This is it, I hope you find it useful.

  • Django Friday Tips: Feature Flags

    This time, as you can deduce from the title, I will address the topic of how to use feature flags on Django websites and applications. This is an incredible functionality to have, specially if you need to continuously roll new code to production environments that might not be ready to be released.

    But first what are Feature Flags? The Wikipedia tells us this:

    A feature toggle (also feature switch, feature flag, …) is a technique in software development that attempts to provide an alternative to maintaining multiple branches in source code (known as feature branches), such that a software feature can be tested even before it is completed and ready for release. Feature toggle is used to hide, enable or disable the feature during runtime.

    Wikipedia

    It seems a pretty clear explanation and it gives us a glimpse of the potential of having this capability in a given project. Exploring the concept a bit more it uncovers a nice set of possibilities and use cases, such as:

    • Canary Releases
    • Instant Rollbacks
    • AB Testing
    • Testing features with production data

    To dive further into the concept I recommend starting by reading this article, that gives you a very detailed explanation of the overall idea.

    In the rest of the post I will describe how this kind of functionality can easily be included in a standard Django application. Overtime many packages were built to solve this problem however most aren’t maintained anymore, so for this post I picked django-waffle given it’s one of the few that are still in active development.

    As an example scenario lets image a company that provides a suite of online office tools and is currently in the process of introducing a new product while redoing the main website’s design. The team wants some trusted users and the developers to have access to the unfinished product in production and a small group of random users to view the new design.

    With the above scenario in mind, we start by install the package and adding it to our project by following the instructions present on the official documentation.

    Now picking the /products page that is supposed to displays the list of existing products, we can implement it this way:

    # views.py
    from django.shortcuts import render
    
    from waffle import flag_is_active
    
    
    def products(request):
        if flag_is_active(request, "new-design"):
            return render(request, "new-design/product_list.html")
        else:
            return render(request, "product_list.html")
    # templates/products.html
    {% load waffle_tags %}
    
    <!DOCTYPE html>
    <html>
    <head>
        <title>Available Products</title>
    </head>
    <body>
        <ul>
            <li><a href="/spreadsheets">Spreadsheet</a></li>
            <li><a href="/presentations">Presentation</a></li>
            <li><a href="/chat">Chat</a></li>
            <li><a href="/emails">Marketing emails</a></li>
            {% flag "document-manager" %}
                <li><a href="/documents"></a>Document manager</li>
            {% endflag %}
        </ul>
    </body>
    </html>

    You can see above that 2 conditions are checked while processing a given request. These conditions are the flags, which are models on the database with certain criteria that will be evaluated against the provided request in order to determine if they are active or not.

    Now on the database we can config the behavior of this code by editing the flag objects. Here are the two objects that I created (retrieved using the dumpdata command):

      {
        "model": "waffle.flag",
        "pk": 1,
        "fields": {
          "name": "new-design",
          "everyone": null,
          "percent": "2.0",
          "testing": false,
          "superusers": false,
          "staff": false,
          "authenticated": false,
          "languages": "",
          "rollout": false,
          "note": "",
          "created": "2020-04-17T18:41:31Z",
          "modified": "2020-04-17T18:51:10.383Z",
          "groups": [],
          "users": []
        }
      },
      {
        "model": "waffle.flag",
        "pk": 2,
        "fields": {
          "name": "document-manager",
          "everyone": null,
          "percent": null,
          "testing": false,
          "superusers": true,
          "staff": false,
          "authenticated": false,
          "languages": "",
          "rollout": false,
          "note": "",
          "created": "2020-04-17T18:43:27Z",
          "modified": "2020-04-17T19:02:31.762Z",
          "groups": [
            1,  # Dev Team
            2   # Beta Customers
          ],
          "users": []
        }
      }

    So in this case new-design is available to 2% of the users and document-manager only for the Dev Team and Beta Customers user groups.

    And for today this is it.

  • Django Friday Tips: Testing emails

    I haven’t written one of these supposedly weekly posts with small Django tips for a while, but at least I always post them on Fridays.

    This time I gonna address how we can test emails with the tools that Django provides and more precisely how to check the attachments of those emails.

    The testing behavior of emails is very well documented (Django’s documentation is one of the best I’ve seen) and can be found here.

    Summing it up, if you want to test some business logic that sends an email, Django replaces the EMAIL_BACKEND setting with a testing backend during the execution of your test suite and makes the outbox available through django.core.mail.outbox.

    But what about attachments? Since each item on the testing outbox is an instance of the EmailMessage class, it contains an attribute named “attachments” (surprise!) that is list of tuples with all the relevant information:

    ("<filename>", "<contents>", "<mime type>")

    Here is an example:

    # utils.py
    from django.core.mail import EmailMessage
    
    
    def some_function_that_sends_emails():
        msg = EmailMessage(
            subject="Example email",
            body="This is the content of the email",
            from_email="some@email.address",
            to=["destination@email.address"],
        )
        msg.attach("sometext.txt", "The content of the file", "text/plain")
        msg.send()
    
    
    # tests.py
    from django.test import TestCase
    from django.core import mail
    
    from .utils import some_function_that_sends_emails
    
    
    class ExampleEmailTest(TestCase):
        def test_example_function(self):
            some_function_that_sends_emails()
    
            self.assertEqual(len(mail.outbox), 1)
    
            email_message = mail.outbox[0]
            self.assertEqual(email_message.subject, "Example email")
            self.assertEqual(email_message.body, "This is the content of the email")
            self.assertEqual(len(email_message.attachments), 1)
    
            file_name, content, mimetype = email_message.attachments[0]
            self.assertEqual(file_name, "sometext.txt")
            self.assertEqual(content, "The content of the file")
            self.assertEqual(mimetype, "text/plain")

    If you are using pytest-django the same can be achieved with the mailoutbox fixture:

    import pytest
    
    from .utils import some_function_that_sends_emails
    
    
    def test_example_function(mailoutbox):
        some_function_that_sends_emails()
    
        assert len(mailoutbox) == 1
    
        email_message = mailoutbox[0]
        assert email_message.subject == "Example email"
        assert email_message.body == "This is the content of the email"
        assert len(email_message.attachments) == 1
    
        file_name, content, mimetype = email_message.attachments[0]
        assert file_name == "sometext.txt"
        assert content == "The content of the file"
        assert mimetype == "text/plain"

    And this is it for today.

  • 8 useful dev dependencies for django projects

    In this post I’m gonna list some very useful tools I often use when developing a Django project. These packages help me improve the development speed, write better code and also find/debug problems faster.

    So lets start:

    Black

    This one is to avoid useless discussions about preferences and taste related to code formatting. Now I just simply install black and let it care of these matters, it doesn’t have any configurations (with one or two exceptions) and if your code does not have any syntax errors it will be automatically formatted according to a “style” that is reasonable.

    Note: Many editors can be configured to automatically run black on every file save.

    https://github.com/python/black

    PyLint

    Using a code linter (a kind of static analysis tool) is also very easy, can be integrated with your editor and allows you to catch many issues without even running your code, such as, missing imports, unused variables, missing parenthesis and other programming errors, etc. There are a few other In this case pylint does the job well and I never bothered to switch.

    https://www.pylint.org/

    Pytest

    Python has a unit testing framework included in its standard library (unittest) that works great, however I found out that there is an external package that makes me more productive and my tests much more clear.

    That package is pytest and once you learn the concepts it is a joy to work with. A nice extra is that it recognizes your older unittest tests and is able to execute them anyway, so no need to refactor the test suite to start using it.

    https://docs.pytest.org/en/latest/

    Pytest-django

    This package, as the name indicates, adds the required support and some useful utilities to test your Django projects using pytest. With it instead of python manage.py test, you will execute just pytest like any other python project.

    https://pytest-django.readthedocs.io

    Django-debug-toolbar

    Debug toolbar is a web panel added to your pages that lets you inspect your requests content, database queries, template generation, etc. It provides lots of useful information in order for the viewer to understand how the whole page rendering is behaving.

    It can also be extended with other plugin that provide more specific information such as flamegraphs, HTML validators and other profilers.

    https://django-debug-toolbar.readthedocs.io

    Django-silk

    If you are developing an API without any HTML pages rendered by Django, django-debug-toobar won’t provide much help, this is where django-silk shines in my humble opinion, it provides many of the same metrics and information on a separate page that can be inspected to debug problems and find performance bottlenecks.

    https://github.com/jazzband/django-silk

    Django-extensions

    This package is kind of a collection of small scripts that provide common functionality that is frequently needed. It contains a set of management commands, such as shell_plus and runserver_plus that are improved versions of the default ones, database visualization tools, debugger tags for the templates, abstract model classes, etc.

    https://django-extensions.readthedocs.io

    Django-mail-panel

    Finally, this one is an email panel for the django-debug-toolbar, that lets you inspect the sent emails while developing your website/webapp, this way you don’t have to configure another service to catch the emails or even read the messages on terminal with django.core.mail.backends.console.EmailBackend, which is not very useful if you are working with HTML templates.

    https://github.com/scuml/django-mail-panel

  • Channels and Webhooks

    Django is an awesome web framework for python and does a really good job, either for building websites or web APIs using Rest Framework. One area where it usually fell short was dealing asynchronous functionality, it wasn’t its original purpose and wasn’t even a thing on the web at the time of its creation.

    The world moved on, web-sockets became a thing and suddenly there was a need to handle persistent connections and to deal with other flows “instead of” (or along with) the traditional request-response scheme.

    In the last few years there has been several cumbersome solutions to integrate web-sockets with Django, some people even moved to other python solutions (losing many of the goodies) in order to be able to support this real-time functionality. It is not just web-sockets, it can be any other kind of persistent connection and/or asynchronous protocol in a microservice architecture for example.

    Of all alternatives the most developer friendly seems to be django-channels, since it lets you keep using familiar django design patterns and integrates in a way that seems it really is part of the framework itself. Last year django-channels saw the release of it second iteration, with a completely different internal design and seems to be stable enough to start building cool things with it, so that is what we will do in this post.

    Webhook logger

    In this blog post I’m gonna explore the version 2 of the package and evaluate how difficult it can be to implement a simple flow using websockets.

    Most of the tutorials I find on the web about this subject try to demonstrate the capabilities of “channels” by implementing a simple real-time chat solution. For this blog post I will try something different and perhaps more useful, at least for developers.

    I will build a simple service to test and debug webhooks (in reality any type of HTTP request). The functionality is minimal and can be described like this:

    • The user visits the website and is given a unique callback URL
    • All requests sent to that callback URL are displayed on the user browser in real-time, with all the information about that request.
    • The user can use that URL in any service that sends requests/webhooks as asynchronous notifications.
    • Many people can have the page open and receive at the same time the information about the incoming requests.
    • No data is stored, if the user reloads the page it can only see new requests.

    In the end the implementation will not differ much from those chat versions, but at least we will end up with something that can be quite handy.

    Note: The final result can be checked on Github, if you prefer to explore while reading the rest of the article.

    Setting up the Django project

    The basic setup is identical to any other Django project, we just create a new one using django_admin startproject webhook_logger and then create a new app using python manage.py startapp callbacks (in this case I just named the app callbacks).

    Since we will not store any information we can remove all database related stuff and even any other extra functionality that will not be used, such as authentication related middleware. I did this on my repository, but it is completely optional and not in the scope of this small post.

    Installing “django-channels”

    After the project is set up we can add the missing piece, the django-channels package, running pip install channels==2.1.6. Then we need to add it to the installed apps:

    INSTALLED_APPS = [
        "django.contrib.staticfiles", 
        "channels", 
    ]

    For this project we will use Redis as a backend for the channel layer, so we need to also install the channels-redis package and add the required configuration:

    CHANNEL_LAYERS = {
        "default": {
            "BACKEND": "channels_redis.core.RedisChannelLayer",
            "CONFIG": {"hosts": [(os.environ.get("REDIS_URL", "127.0.0.1"), 6379)]},
        }
    }

    The above snippet assumes you are running a Redis server instance on your machine, but you can configure it using a environment variable.

    Add websocket’s functionality

    When using “django channels” our code will not differ much from a standard django app, we will still have our views, our models, our templates, etc. For the asynchronous interactions and protocols outside the standard HTTP request-response style, we will use a new concept that is the Consumer with its own routing file outside of default urls.py file.

    So lets add these new files and configurations to our app. First inside our app lets create a consumer.py with the following contents:

    # callbacks/consumers.py
    from channels.generic.websocket import WebsocketConsumer
    from asgiref.sync import async_to_sync
    import json
    
    
    class WebhookConsumer(WebsocketConsumer):
        def connect(self):
            self.callback = self.scope["url_route"]["kwargs"]["uuid"]
            async_to_sync(self.channel_layer.group_add)(self.callback, self.channel_name)
            self.accept()
    
        def disconnect(self, close_code):
            async_to_sync(self.channel_layer.group_discard)(
                self.callback, self.channel_name
            )
    
        def receive(self, text_data):
            # Discard all received data
            pass
    
        def new_request(self, event):
            self.send(text_data=json.dumps(event["data"]))

    Basically we extend the standard WebsocketConsumer and override the standard methods. A consumer instance will be created for each websocket connection that is made to the server. Let me explain a little bit what is going on the above snippet:

    • connect – When a new websocket connection is made, we check which callback it desires to receive information and attach the consumer to the related group ( a group is a way to broadcast a message to several consumers)
    • disconnect – As the name suggests, when we lose a connection we remove the “consumer” from the group.
    • receive – This is a standard method for receiving any data sent by the other end of the connection (in this case the browser). Since we do not want to receive any data, lets just discard it.
    • new_request – This is a custom method for handling data about a given request/webhook received by the system. These messages are submitted to the group with the type new_request.

    You might also be a little confused with that async_to_sync function that is imported and used to call channel_layer methods, but the explanation is simple, since those methods are asynchronous and our consumer is standard synchronous code we have to execute them synchronously. That function and sync_to_async are two very helpful utilities to deal with these scenarios, for details about how they work please check this blog post.

    Now that we have a working consumer, we need to take care of the routing so it is accessible to the outside world. Lets add an app level routing.py file:

    # callbacks/routing.py
    from django.conf.urls import url
    
    from .consumers import WebhookConsumer
    
    websocket_urlpatterns = [url(r"^ws/callback/(?P<uuid>[^/]+)/$", WebhookConsumer)]

    Here we use a very similar pattern (like the well known url_patterns) to link our consumer class to connections of certain url. In this case our users could connect to an URL that contains the id (uuid) of the callback that they want to be notified about new events/requests.

    Finally for our consumer to be available to the public we will need to create a root routing file for our project. It looks like this:

    # <project_name>/routing.py
    from channels.routing import ProtocolTypeRouter, URLRouter
    from callbacks.routing import websocket_urlpatterns
    
    application = ProtocolTypeRouter({"websocket": URLRouter(websocket_urlpatterns)})

    Here we use the ProtocolTypeRouter as the main entry point, so what is does is:

    It lets you dispatch to one of a number of other ASGI applications based on the type value present in the scope. Protocols will define a fixed type value that their scope contains, so you can use this to distinguish between incoming connection types.

    Django Channels Documentation

    We just defined the websocket protocol and used the URLRouter to point to our previous defined websocket urls.

    The rest of the app

    At this moment we are able to receive new websocket connections and send to those clients live data using the new_request method on the client. However at the moment we do not have information to send, since we haven’t yet created the endpoints that will receive the requests and forward their data to our consumer.

    For this purpose lets create a simple class based view, it will receive any type of HTTP request (including the webhooks we want to inspect) and forward them to the consumers that are listening of that specific uuid:

    # callbacks/views.py
    
    class CallbackView(View):
        def dispatch(self, request, *args, **kwargs):
            channel_layer = get_channel_layer()
            async_to_sync(channel_layer.group_send)(
                kwargs["uuid"], {"type": "new_request", "data": self._request_data(request)}
            )
            return HttpResponse()

    In the above snippet, we get the channel layer, send the request data to the group and return a successful response to calling entity (lets ignore what the self._request_data(request) call does and assume it returns all the relevant information we need).

    One important piece of information is that the value of the type key on the data that is used for the group_send call, is the method that will be called on the websocket’s consumer we defined earlier.

    Now we just need to expose this on our urls.py file and the core of our system is done.

    # <project_name>/urls.py
    
    from django.urls import path
    from callbacks.views import CallbackView
    
    urlpatterns = [
        path("<uuid>", CallbackView.as_view(), name="callback-submit"),
    ]

    The rest of our application is just standard Django web app development, that part I will not cover in this blog post. You will need to create a page and use JavaScript in order to connect the websocket. You can check a working example of this system in the following URL :

    http://webhook-logger.ovalerio.net

    For more details just check the code repository on Github.

    Deploying

    I not going to explore the details about the topic of deployments but someone else wrote a pretty straightforward blog post on how to do it for production projects that use Django channels. You can check it here.

    Final thoughts

    With django-channels building real-time web apps or projects that deal with other protocols other than HTTP becomes really simple. I do think it is a great addition to the current ecosystem, it certainly is an option I will consider from now on for these tasks.

    Have you ever used it? do you any strong opinion about it? let me know on the comments section.

    Final Note: It seems based on recent messages on the mailing list that the project might suspend its developments in its future if it doesn’t find new maintainers. It would definitely be a shame, since it has a lot of potential. Lets see how it goes.
  • Django Friday Tips: Links that maintain the current query params

    Basically when you are building a simple page that displays a list of items that contain a few filters you might want to maintain them while navigating, for example while browser through the pages of results.

    Nowadays many of this kind of pages are rendered client-side using libraries such as vue and react, so this doesn’t pose much of a problem since the state is easily managed and requests are generated according to that state.

    But what if you are building a simple page/website using traditional server-side rendered pages (that for many purposes is totally appropriate)? Generating the pagination this way while maintaining the current selected filters (and other query params) might give you more work and trouble than it should.

    So today I’m going to present you a quick solution in the form of a template tag that can help you easily handle that situation. With a quick search on the Internet you will almost for sure find the following answer:

    @register.simple_tag
    def url_replace(request, field, value):
        dict_ = request.GET.copy()
        dict_[field] = value
        return dict_.urlencode()
    

    Which is great and work for almost scenario that comes to mind, but I think it can be improved a little bit, so like one of lower ranked answers suggests, we can change it to handle more than one query parameter while maintaining the others:

    @register.simple_tag(takes_context=True)
    def updated_params(context, **kwargs):
        dict_ = context['request'].GET.copy()
        for k, v in kwargs.items():
            dict_[k] = v
        return dict_.urlencode()

    As you can see, with takes_context we no longer have to repeatedly pass the request object to the template tag and we can give it any number of parameters.

    The main difference for the suggestion on “Stack Overflow” it that this version allows for repeating query params, because we don’t convert the QueryDict to a dict.  Now you just need to use it in your templates like this:

    https://example.ovalerio.net?{% updated_params page=2 something='else' %}
  • Django Friday Tips: Adding RSS feeds

    Following my previous posts about RSS and its importance for an open web, this week I will try to show how can we add syndication to our websites and other apps built with Django.

    This post will be divided in two parts. The first one covers the basics:

    • Build an RSS feed based on a given model.
    • Publish the feed.
    • Attach that RSS feed to a given webpage.

    The second part will contain more advanced concepts, that will allow subscribers of our page/feed to receive real-time updates without the need to continuously check our feed. It will cover:

    • Adding a Websub / Pubsubhubbub hub to our feed
    • Publishing the new changes/additions to the hub, so they can be sent to subscribers

    So lets go.

    Part one: Creating the Feed

    The framework already includes tools to handle this stuff, all of them well documented here. Nevertheless I will do a quick recap and leave here a base example, that can be reused for the second part of this post.

    So lets supose we have the following models:

    class Author(models.Model):
    
        name = models.CharField(max_length=150)
        created_at = models.DateTimeField(auto_now_add=True)
    
        class Meta:
            verbose_name = "Author"
            verbose_name_plural = "Authors"
    
        def __str__(self):
            return self.name
    
    
    class Article(models.Model):
    
        title = models.CharField(max_length=150)
        author = models.ForeignKey(Author, on_delete=models.CASCADE)
    
        created_at = models.DateTimeField(auto_now_add=True)
        updated_at = models.DateTimeField(auto_now=True)
    
        short_description = models.CharField(max_length=250)
        content = models.TextField()
    
        class Meta:
            verbose_name = "Article"
            verbose_name_plural = "Articles"
    
        def __str__(self):
            return self.title
    

    As you can see, this is for a simple “news” page where certain authors publish articles.

    According to the Django documentation about feeds, generating a RSS feed for that page would require adding the following Feedclass to the views.py (even tough it can be placed anywhere, this file sounds appropriate):

    from django.urls import reverse_lazy
    from django.contrib.syndication.views import Feed
    from django.utils.feedgenerator import Atom1Feed
    
    from .models import Article
    
    
    class ArticlesFeed(Feed):
        title = "All articles feed"
        link = reverse_lazy("articles-list")
        description = "Feed of the last articles published on site X."
    
        def items(self):
            return Article.objects.select_related().order_by("-created_at")[:25]
    
        def item_title(self, item):
            return item.title
    
        def item_author_name(self, item):
            return item.author.name
    
        def item_description(self, item):
            return item.short_description
    
        def item_link(self, item):
            return reverse_lazy('article-details', kwargs={"id": item.pk})
    
    
    class ArticlesAtomFeed(ArticlesFeed):
        feed_type = Atom1Feed
        subtitle = ArticlesFeed.description
    

    On the above snippet, we set some of the feed’s global properties (title, link, description), we define on the items() method which entries will be placed on the feed and finally we add the methods to retrieve the contents of each entry.

    So far so good, so what is the other class? Other than standard RSS feed, with Django we can also generate an equivalent Atom feed, since many people like to provide both that is what we do there.

    Next step is to add these feeds to our URLs, which is also straight forward:

    urlpatterns = [
        ...
        path('articles/rss', ArticlesFeed(), name="articles-rss"),
        path('articles/atom', ArticlesAtomFeed(), name="articles-atom"),
        ...
    ]
    

    At this moment, if you try to visit one of those URLs, an XML response will be returned containing the feed contents.

    So, how can the users find out that we have these feeds, that they can use to get the new contents of our website/app using their reader software?

    That is the final step of this first part. Either we provide the link to the user or we include them in the respective HTML page, using specific tags in the head element, like this:

    <link rel="alternate" type="application/rss+xml" title="{{ rss_feed_title }}" href="{% url 'articles-rss' %}" />
    <link rel="alternate" type="application/atom+xml" title="{{ atom_feed_title }}" href="{% url 'articles-atom' %}" />
    

    And that’s it, this first part is over. We currently have a feed and a mechanism for auto-discovery, things that other programs can use to fetch information about the data that was published.

    Part Two: Real-time Updates

    The feed works great, however the readers need continuously check it for new updates and this isn’t the ideal scenario. Neither for them, because if they forget to regularly check they will not be aware of the new content, neither for your server, since it will have to handle all of this extra workload.

    Fortunately there is the WebSub protocol (previously known as Pubsubhubbub), that is a “standard” that has been used to deliver a notification to subscribers when there is new content.

    It works by your server notifying an external hub (that handles the subscriptions) of the new content, the hub will then notify all of your subscribers.

    Since this is a common standard, as you might expect there are already some Django packages that might help you with this task. Today we are going to use django-push with https://pubsubhubbub.appspot.com/ as the hub, to keep things simple (but you could/should use another one).

    The first step, as always, is to install the new package:

    $ pip install django-push
    

    And then add the package’s Feed class to our views.py (and use it on our Atom feed):

    from django_push.publisher.feeds import Feed as HubFeed
    
    ...
    
    class ArticlesAtomFeed(ArticlesFeed, HubFeed):
        subtitle = ArticlesFeed.description
    

    The reason I’m only applying this change to the Atom feed, is because this package only works with this type of feed as it is explained in the documentation:

    … however its type is forced to be an Atom feed. While some hubs may be compatible with RSS and Atom feeds, the PubSubHubbub specifications encourages the use of Atom feeds.

    This no longer seems to be true for the more recent protocol specifications, however for this post I will continue only with this type of feed.

    The next step is to setup which hub we will use. On the  settings.py file lets add the following line:

    PUSH_HUB = 'https://pubsubhubbub.appspot.com'
    

    With this done, if you make a request for your Atom feed, you will notice the following root element was added to the XML response:

    <link href="https://pubsubhubbub.appspot.com" rel="hub"></link>

    Subscribers will use that information to subscribe for notifications on the hub. The last thing we need to do is to tell the hub when new entries/changes are available.

    For that purpose we can use the ping_hub function. On this example the easiest way to accomplish this task is to override the Article  model save() method on the models.py file:

    from django_push.publisher import ping_hub
    
    ...
    
    class Article(models.Model):
        ...
        def save(self, *args, **kwargs):
            super().save(*args, **kwargs)
            ping_hub(f"https://{settings.DOMAIN}{reverse_lazy('articles-atom')}")
    

    And that’s it. Our subscribers can now be notified in real-time when there is new content on our website.

  • Django Friday Tips: Timezone per user

    Adding support for time zones in your website, in order to allow its users to work using their own timezone is a “must” nowadays. So in this post I’m gonna try to show you how to implement a simple version of it. Even though Django’s documentation is very good and complete, the only example given is how to store the timezone in the users session after detecting (somehow) the user timezone.

    What if the user wants to store his timezone in the settings and used it from there on every time he visits the website? To solve this I’m gonna pick the example given in the documentation and together with the simple django-timezone-field package/app implement this feature.

    First we need to install the dependency:

     $ pip install django-timezone-field==2.0rc1

    Add to the INSTALLED_APPS of your project:

    INSTALLED_APPS = [
        ...,
        'timezone_field',
        ...
    ]

    Then add a new field to the user model:

    class User(AbstractUser):
        timezone = TimeZoneField(default='UTC'

    Handle the migrations:

     $python manage.py makemigration && python manage.py migrate

    Now we will need to use this information, based on the Django’s documentation example we can add a middleware class, that will get this information on every request and set the desired timezone. It should look like this:

    from django.utils import timezone
    
    
    class TimezoneMiddleware():
        def process_request(self, request):
            if request.user.is_authenticated():
                timezone.activate(request.user.timezone)
            else:
                timezone.deactivate()

    Add the new class to the project middleware:

    MIDDLEWARE_CLASSES = [
        ...,
        'your.module.middleware.TimezoneMiddleware',
        ...
    ]

    Now it should be ready to use, all your forms will convert the received input (in that timeone) to UTC, and templates will convert from UTC to the user’s timezone when rendered. For different conversions and more complex implementations check the available methods.

  • Django Friday Tips: Secret Key

    One thing that is always generated for you when you start a new django project is the SECRET_KEY string. This value is described in the documentation as:

    A secret key for a particular Django installation. This is used to provide cryptographic signing, and should be set to a unique, unpredictable value.

    The rule book mandates that this value should not be shared or made public, since this will defeat its purpose and many securing features used by the framework. Given that on any modern web development process we have multiple environments such as production and staging, or in the cases where we might deploy the same codebase different times for different purposes, we will need to generate and have distinct versions of this variable so we can’t rely solely on the one that was generated when the project was started.

    There is no official way to generate new values for the secret key, but with a basic search on the Internet, you can find several sources and code snippets for this task. So which one to use? The django implementation has a length of 50 characters, chosen randomly from an alphabet with size 50 as well, so we might start with this as a requirement. Better yet, why not call the same function that django-admin.py uses itself?

    So for a new project, the first thing to do is to replace this:

    SECRET_KEY = "uN-pR3d_IcT4~ble!_Str1Ng..."

    With this:

    SECRET_KEY = os.environ.get("SECRET_KEY", None)

    Then for each deployment we can generate a distinct value for it using a simple script like this one:

    from django.utils.crypto import get_random_string
    
    chars = 'abcdefghijklmnopqrstuvwxyz0123456789!@#$%^&*(-_=+)'
    print("SECRET_KEY={}".format(get_random_string(50, chars)))

    Usage:

    $ python script_name.py >> .env

    Some people think the default function is not random enough and proposed a different alternative (that also works), if you feel the same way check this script.

  • Django Friday Tips: Security Checklist

    Security is one of those areas where it is very hard to know if everything is taken care of. So you have been working on this project for a while and you want to deploy it into a production server, there are several settings on this new environment that should differ from your development one.

    Since this is very common situation and there are many examples of misconfigurations that later turned to security issues, django has a security checklist (since version 1.8) to remind you of some basic aspects (mostly on/off switches) that you should make sure that are set correctly.

    To run it on your project you simply have to execute the following command:

    $python manage.py check --deploy

    After the verification you will be presented with warnings like this one:

    (security.W016) You have 'django.middleware.csrf.CsrfViewMiddleware' in your MIDDLEWARE_CLASSES, but you have not set CSRF_COOKIE_SECURE to True. Using a secure-only CSRF cookie makes it more difficult for network traffic sniffers to steal the CSRF token.

    More information can be found in the documentation, since it uses the check framework, that has several interesting use cases.

    Interested in more information about security in django? Check this video from the last edition of “Django Under the Hood“.

  • Django Friday Tips: Managing Dependencies

    This one is not specific of django but it is very common during the development of any python project. Managing the contents of the requirements.txt file, that sometimes grows uncontrollably can be a mess. One of the root causes is the common work-flow of using virtualenv, install with pip all the required libraries and then do something like:

    $pip freeze > requirements.txt

    At the beginning this might work great, however soon you will need to change things and remove libraries. At this point, things start to get a little trickier, since you do not know which lines are a direct dependency of your project or if they were installed because a library you already removed needed them. This leads to some tedious work in order to maintain the dependency list clean.

    To solve this problem we might use pip-tools, which will help you declare the dependencies in a simple way and automatically generate the final requirements.txt. As it is shown in the project readme, we can declare the following requirements.in file:

    django
    requests
    pillow
    celery

    Then we generate our “official” requirements.txt with the pip-compile command, that will product the following output:

    #
    # This file is autogenerated by pip-compile
    # Make changes in requirements.in, then run this to update:
    #
    #    pip-compile requirements.in
    #
    amqp==1.4.8               # via kombu
    anyjson==0.3.3            # via kombu
    billiard==3.3.0.22        # via celery
    celery==3.1.19
    django==1.9
    kombu==3.0.30             # via celery
    pillow==3.0.0
    pytz==2015.7              # via celery
    requests==2.8.1
    

    Now you can keep track of where all those libraries came from. Need to add or remove packages? Just run pip-compile again.

  • Django friday tips: Switch the user model

    In the most recent versions of django, you’re no longer attached to the default user model. So unlike what happened some time ago, when you had two models (User and Profile) “linked” together through an one-to-one relationship, nowadays you can extend or substitute the base user model.

    It is as simples as adding the following line to your settings.py:

    AUTH_USER_MODEL = 'djangoapp.UserModel'

    If you only want to extend it and avoid having to implement some boilerplate, you should sub class the AbstractUserModel like this:

    from django.contrib.auth.models import AbstractUser
    
    
    class User(AbstractUser):
        ...
    

    This way you will be able to use all th predefined features, and even use the admin settings of the default user model by doing the following in your admin.py file:

    from django.contrib.auth.admin import UserAdmin as DefaultUserAdmin
    
    @admin.register(User)
    class UserAdmin(DefaultUserAdmin):
        ...
    

    If you are starting out I hope this information was useful.

  • Newsletters for Python web developers

    The amount of new information that is added each day to the web is overwhelming, trying to keep up daily with everything about a given topic can be a time consuming process. One good way I found to tackle this problem and to avoid wasting a good chunk of my day searching and filtering through lots of new content in order to know what’s going on, was to subscribe to good resources that curate this material and send to my email box at the end of each week/month.

    Over time I found that the following 4 sources have continuously provided me with selection of good and up to date content summing up what I might have missed in the previous week/month related to Python and web development in general.

    Pycoders weekly

    This weekly newsletter is not focused on the web but address what’s going on on the python community, suggests good articles so you can level up your python skills and showcases interesting projects or libraries.

    Url: http://pycoders.com/

    Django Round-Up

    This one is comes less frequently but I found the quality of the content to be high. As its name shows, Django round-up focus exclusively on contents related to the web framework.

    Url: https://lincolnloop.com/django-round-up/

    HTML5 Weekley

    The first two were about the server side, with this one we move to the browser. HTML5 Weekly focuses on what can be done in the browser and were these technologies are heading to.

    Url: http://html5weekly.com/

    Javascript Weekly

    Being a web development post we can’t leave JavaScript behind, at least for now. This newsletter gives you the latest news and tools related to this programming language.

    Url: http://javascriptweekly.com/

    I hope you like it. If you find them useful you might also want to follow my Django Collection bundle (which I described in this old post), where I collect useful material related with the Django web framework.

  • Django Resources

    As I said in earlier posts in this blog, when i build websites or webapps where there are no technology impositions, i usually choose to do it in Python and in most of the cases, that’s the equivalent to say i choose to do it in Django.

    Over the last year, since i started using Bundlr,  I’ve been aggregating some resources like blog entries, tutorials and videos that i found useful and that could become handy in the future.

    Today I’m sharing the collection here, since it might helpful to someone else. I hope you like it and if you know more references that should be included in the list, please share it in the comments or send me an email.

    The list can be found here.

    Edit July 2016: Since I removed my account, the list is not longer available on Bundlr. Check recent posts, it will be published again soon.