Tag: web

  • Is it “/.well-known/”?

    Ironically, according to my experience, the .well-known directory doesn’t do justice to its name. Even in use cases that would fit nicely in its original purpose. 

    But I’m getting a bit ahead of myself. Let’s first start with what it is, then move to discuss where it’s used. But we’ll do this rapidly, otherwise this post will get boring really fast.

    Let’s look at what the RFC has to say:

    Some applications on the Web require the discovery of information about an origin before making a request.

    … designate a “well-known location” for data or services related to the origin overall, so that it can be easily located.

    … this memo reserves a path prefix in HTTP, HTTPS, WebSocket (WS), and Secure WebSocket (WSS) URIs for these “well-known locations”, “/.well-known/”. Future specifications that need to define a resource for such metadata can register their use to avoid collisions and minimise impingement upon origins’ URI space.

    So, briefly, it is a standard place or set of standard URIs, that can be used by people or automated processes to obtain (meta)data about resources of the domain in question. The purpose of the requests and the content of the responses doesn’t even need to be related to the web.

    The RFC introduces the need for this “place”, by providing the example of the “Robots Exclusion Protocol” (robots.txt), which is a good example… that paradoxically doesn’t use the well-known path.

    Now that the idea is more or less settled, here are other examples of cool and useful protocols that actually make use of it.


    ACME HTTP Challenge

    The use-case, here, is that an external entity needs to verify you own the domain. So to prove it, you place a unique/secret “token” in a certain path, in order for this entity to make a request and check that is true.

    Many Let’s Encrypt tools, make use of this approach.

    Security.txt

    This one is a bit obvious, and I already addressed it in previous posts (here and here). It is just a standard place to put your security contacts, so that researchers can easily find all the data they need to alert you about any of their findings.

    Web Key Directory (PGP)

    Traditionally, OpenPGP relied on “key servers” and the web of trust, for people to fetch the correct public keys for a given email address. With the “Web Key Directory”, domain owners can expose the correct and up-to-date public keys to associated addresses in a well-known path. Then, email clients can quickly fetch just by knowing the address itself.

    Lightning Address / LN URL Pay

    Sending on-chain Bitcoin to pay for a beer at the bar, or to send a small tip, is not that useful or practical at all (time and long addresses will get in the way).

    For small payments in Bitcoin, the lightning network is what you should use. While instantaneous, this approach requires a small dance between both wallets (showing QR code, etc.)

    Using a lightning address (which is essentially the same as an email address), solves this problem. You type the address and send the funds, done. Your wallet takes care of figuring the rest. To accomplish that, it fetches all the information from a standard place in the /.well-known/ path.

    I wrote about it before, and if you wish, you can buy me a beer by sending a few “sats” to my “email” address.

    • Suffix: lnurlp
    • Details 1 / 2

    Password-Change

    This feature allows password managers to know where the form to change the password of a given website is located. Allows users to go straight to that place from the password manager’s UI.

    Digital Asset Link

    Have you ever touched on a link while using your Android smartphone and received a suggestion to open it in a certain app instead of the predefined web browser?

    Me too, now you know how it is done.


    The whole list of recognized well-known URI’s can be found here. But I guess there are way more suffixes in use, since 2 of the 6 mentioned above are not there but are widely used within their ecosystems.

    That’s it, looking at the list above gives us a glimpse of how certain things are implemented and a few good ideas of things we could add to our domains/websites.
  • Improving your online privacy: An update

    Ten years ago, after it became clear to almost everyone that all our online activity was being tracked and stored, I wrote a blog post about simple steps a person could take to improve their privacy online.

    Essentially, it contains a few recommendations that everyone could follow to reduce their fingerprint without much effort. It wasn’t meant to be exhaustive, and it wasn’t meant to make you invisible online. If your personal situation needs more, you have a lot more ground to cover, which was totally out of the scope of that post.

    The target audience was the average Joe, that doesn’t like to be spied on. Specially by commercial companies that just want to show you ads, sell you stuff or use your habits against you.

    Many things have changed in the last 10 years, while others remained the same. With this in mind, I think it is time for an update to my suggestions, keeping in mind that no specialized knowledge should be required and the maximum amount of effort should not surpass 30 minutes.

    1. Pick an ethical browser

    For regular users on any computer or operating system, the main window to the outside world is the browser. Nowadays, this app is of the utmost importance.

    My initial suggestion remains valid these days, you should install and use Firefox.

    There are other browsers that could also do the trick, such as Brave or Safari, but my preference still goes to Mozilla’s browser.

    No matter your choice, you should avoid Chrome and Edge. If you want a more detailed comparison, you can check this website.

    Expected effort: 5 minutes

    2. Install important extensions

    Unfortunately, the default configuration of a good browser is not enough, even considering it already includes many protections enabled from the start.

    For a minimal setup, I consider 2 extensions indispensable:

    These will ensure that most spyware, included in a huge number of websites, isn’t loaded and does not leak your private information to third-parties. They will also block ads and other junk that make the web slow and waste your bandwidth.

    Expected effort: 2 minutes

    3. Opt out of any data collection

    This topic is specially problematic for Microsoft Windows users. However, it is becoming an increase prevalent practice in all software vendors.

    They will tell you they are collecting anonymous data to improve their products and services, while often the data is not that anonymous and/or the purposes are far wider than the ones they make you believe initially.

    Nowadays, Windows is an enormous data collection machine, so to minimize the damage, you should disable as much of this as possible. If this is your operating system, you can find a step-by-step tutorial of the main things to disable here (note: you should evaluate if the last 3 steps make sense for your case).

    If you use a different operating system, you should do a small research about what data the vendor collects.

    The next action is to do the same on your browser. In this case, in Firefox you should paste about:preferences#privacy in the URL bar, look for Firefox Data Collection and Use and then disable all options.

    Expected effort: 2–8 minutes

    4. Use a better DNS resolver

    This suggestion is a bit more technical, but important enough that I decided to include it in this guide that only covers the basics.

    With the new configuration that we set up on points 2 and 3, in theory, we are well protected against these forms of tracking. However, there are 2 big holes:

    • Are you sure the operating system settings are being respected?
    • Trackers on the browser are being blocked, but what about the other installed applications? Are they spying on you?

    To address the 2 points above, you can change your default DNS server to one that blocks any queries to sites tracking your activity. Two examples are Mullvad DNS and Next DNS, but there are others.

    Changing your DNS server can also help you block tracking on other devices you have less control, such as your phone or TV.

    The links contain detailed guides on how to proceed.

    Expected effort: 4–10 minutes

    5. Segregate your activity

    This step is more related to your behavior and browsing habits than to any tools that you need to install and configure.

    The goal here is to clean any data websites leave behind to track you across visits and websites through time.

    You should configure your browser to delete all cookies and website related data at the end of each session, and by this, I mean when you close your browser.

    In Firefox, you should again to about:preferences#privacy search for “Cookies and Site Data” and check the option: “Delete cookies and site data when Firefox is closed“.

    Sometimes this is impractical because it will force you to login into websites and apps all the time. A good compromise is to use “Multi-Account Containers“, they allow you to segregate your activity into multiple isolated containers, so you can limit any tracking capabilities.

    Expected effort: 3 minutes

    6. Prefer privacy preserving tools and services

    Most online services that common folk use, go to huge lengths to track your activities. For most of them, this is their business model.

    Luckily, there are drop-in replacements for common tools that will provide you with similar or better service:

    The above are just a few examples, these choices will depend on your own needs. At first, you might find them strange, but experience tells me that soon enough you will get used to them and discover they are superior in many ways.

    Expected effort: 3–5 minutes

    7. Adopt better habits

    I’m already a few minutes over budget, but hey, privacy is hard to achieve nowadays.

    For this last point, the lesson is that you must be careful with the information you share and make use of GDPR to control when someone is overstepping.

    Here are a few tips, just for you to get an idea:

    • Don’t provide your personal data just because they ask (input random data if you think it will not be necessary).
    • Always reject cookies and disable data collection when websites show those annoying pop-ups. Look for the “reject all” button, they usually hide it.
    • Even if websites don’t prompt you about privacy settings, go to your account preferences and disable all data collection.
    • Use fake profiles / identities.
    • When too much information is needed, and you don’t see the point, search for other alternatives.

    The main message is: Be cautious and strict with all the information you share online.

    Concluding

    If you followed up to this point, you already made some good progress. However, this is the bare minimum and I only covered what to do on your personal computer, even though some of these suggestions will also work on your other devices (phone, tablet, etc.).

    I avoided suggesting tools, services and practices that would imply monetary costs for the reader, but depending on your needs they might be necessary.

    Nowadays, it is very hard not to be followed around by a “thousand companies and other entities”, specially when we carry a tracking device in our pockets, attached to our wrists, or move around inside one of them.

    In case you want to dig deeper, there are a many sources online with more detailed guides on how to go a few steps further. As an example, you can check “Privacy Guides“.

    Now, to end my post with a question (so I could also learn something new), what would you recommend differently? Would you add, remove or replace any of these suggestions? Don’t forget about the 30-minute rule.

  • Django Friday Tips: Subresource Integrity

    As you might have guessed from the title, today’s tip is about how to add “Subresource integrity” (SRI) checks to your website’s static assets.

    First lets see what SRI is. According to the Mozilla’s Developers Network:

    Subresource Integrity (SRI) is a security feature that enables browsers to verify that resources they fetch (for example, from a CDN) are delivered without unexpected manipulation. It works by allowing you to provide a cryptographic hash that a fetched resource must match.

    Source: MDN

    So basically, if you don’t serve all your static assets and rely on any sort of external provider, you can force the browser to check that the delivered contents are exactly the ones you expect.

    To trigger that behavior you just need to add the hash of the content to the integrity attribute of the <script> and/or <link> elements in question.

    Something like this:

    <script src="https://cdn.jsdelivr.net/npm/vue@2.6.12/dist/vue.min.js" integrity="sha256-KSlsysqp7TXtFo/FHjb1T9b425x3hrvzjMWaJyKbpcI=" crossorigin="anonymous"></script>

    Using SRI in a Django project

    This is all very nice but adding this info manually isn’t that fun or even practical, when your resources might change frequently or are built dynamically on each deployment.

    To help with this task I recently found a little tool called django-sri that automates these steps for you (and is compatible with whitenoise if you happen to use it).

    After the install, you just need to replace the {% static ... %} tags in your templates with the new one provided by this package ({% sri_static .. %}) and the integrity attribute will be automatically added.

  • Security.txt

    Some days ago while scrolling my mastodon‘s feed (for those who don’t know it is like Tweeter but instead of being a single website, the whole network is composed by many different entities that interact with each other), I found the following message:

    To server admins:

    It is a good practice to provide contact details, so others can contact you in case of security vulnerabilities or questions regarding your privacy policy.

    One upcoming but already widespread format is the security.txt file at https://your-server/.well-known/security.txt.

    See https://securitytxt.org/ and https://infosec-handbook.eu/.well-known/security.txt.

    @infosechandbook@chaos.social

    It caught my attention because my personal domain didn’t had one at the time. I’ve added it to other projects in the past, but do I need one for a personal domain?

    After some thought, I couldn’t find any reason why I shouldn’t add one in this particular case. So as you might already have guessed, this post is about the steps I took to add it to my domain.

    What is it?

    A small text file, just like robots.txt, placed in a well known location, containing details about procedures, contacts and other key information required for security professionals to properly disclose their findings.

    Or in other words: Contact details in a text file.

    security.txt isn’t yet an official standard (still a draft) but it addresses a common issue that security researches encounter during their day to day activity: sometimes it’s harder to report a problem than it is to find it. I always remember the case of a Portuguese citizen, who spent ~5 months trying to contact someone that could fix some serious vulnerabilities in a governmental website.

    Even though it isn’t an accepted standard yet, it’s already being used in the wild:

    Need more examples? A small search finds it for you very quickly or you can also read here a small analysis of the current status on Alexa’s top 1000 websites.

    Implementation

    So to help the cause I added one for this domain. It can be found at https://ovalerio.net/.well-known/security.txt

    Below are the steps I took:

    1. Go to https://securitytxt.org/ and fill the required fields of the form present on that website.
    2. Fill the extra fields if they apply.
    3. Generate the text document.
    4. Sign the content using your PGP key
      gpg --clear-sign security.txt
    5. Publish the signed file on your domain under https://<domain>/.well-known/security.txt

    As you can see, this is a very low effort task and it can generate very high returns, if it leads to a disclosure of a serious vulnerability that otherwise would have gone unreported.

  • CSP headers using Cloudflare Workers

    Last January I made a small post about setting up a “Content-Security-Policy” header for this blog. On that post I described the steps I took to reach a final result, that I thought was good enough given the “threats” this website faces.

    This process usually isn’t hard If you develop the website’s software and have an high level of control over the development decisions, the end result ends up being a simple yet very strict policy. However if you do not have that degree of control over the code (and do not want to break the functionality) the policy can end up more complex and lax than you were initially hoping for. That’s what happened in my case, since I currently use a standard installation of WordPress for the blog.

    The end result was a different security policy for different routes and sections (this part was not included on the blog post), that made the web-server configuration quite messy.

    (With this intro, you might have already noticed that I’m just making excuses to redo the initial and working implementation, in order to test some sort of new technology)

    Given the blog is behind the Cloudflare CDN and they introduced their “serverless” product called “Workers” a while ago, I decided that I could try to manage the policy dynamically on their servers.

    Browser <--> CF Edge Server <--> Web Server <--> App

    The above line describes the current setup, so instead of adding the CSP header on the “App” or the “Web Server” stages, the header is now added to the response on the last stage before reaching the browser. Let me describe how I’ve done it.

    Cloudflare Workers

    First a very small introduction to Workers, later you can find more detailed information on Workers.dev.

    So, first Cloudflare added the v8 engine to all edge servers that route the traffic of their clients, then more recently they started letting these users write small programs that can run on those servers inside the v8 sandbox.

    The programs are built very similarly to how you would build a service worker (they use the same API), the main difference being where the code runs (browser vs edge server).

    These “serverless” scripts can then be called directly through a specific endpoint provided by Cloudflare. In this case they should create and return a response to the requests.

    Or you can instruct Cloudflare to execute them on specific routes of your website, this means that the worker can generate the response, execute any action before the request reaches your website or change the response that is returned.

    This service is charged based on the number of requests handled by the “workers”.

    The implementation

    Going back to the original problem and based on the above description, we can dynamically introduce or modify the “Content-Security-Policy” for each request that goes through the worker which give us an high degree of flexibility.

    So for my case a simple script like the one below, did the job just fine.

    addEventListener('fetch', event => {
      event.respondWith(handleRequest(event.request))
    })
    
    /**
     * Forward the request and swap the response's CSP header
     * @param {Request} request
     */
    async function handleRequest(request) {
      let policy = "<your-custom-policy-here>"
      let originalResponse = await fetch(request)
      response = new Response(originalResponse.body, originalResponse)
      response.headers.set('Content-Security-Policy', policy)
      return response
    }

    The script just listens for the request, passes it to a handler function (lines 1-3), forwards to the origin server (line 12), grabs the response (line 13), replaced the CSP header with the defined policy (line 14) and then returns the response.

    If I needed something more complex, like making slight changes to the policy depending on the User-Agent to make sure different browsers behave as expected given the different implementations or compatibility issues, it would also be easy. This is something that would be harder to achieve in the config file of a regular web server (nginx, apache, etc).

    Enabling the worker

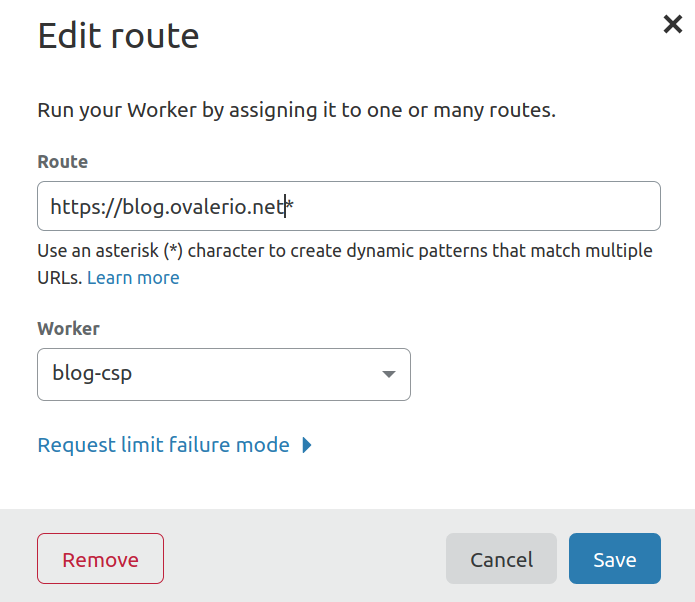
    Now that the script is done and the worker deployed, in order to make it run on certain requests to my blog, I just had to go to the Cloudflare’s dashboard of my domain, click on the “workers” section and add the routes I want it to be executed:

    cloudflare workers routes modal
    Configuring the routes that will use the worker

    The settings displayed on the above picture will run the worker on all requests to this blog, but is can be made more specific and I can even have multiple workers for different routes.

    Some sort of conclusion

    Despite the use-case described in this post being very simple, there is potential in this new “serverless” offering from Cloudflare. It definitely helped me solve the problem of having different policies for different sections of the website without much trouble.

    In the future I might comeback to it, to explore other user-cases or implementation details.

  • Setting up a Content-Security-Policy

    A couple of weeks ago, I gave a small talk on the Madeira Tech Meetup about a set of HTTP headers that could help website owners protect their assets and their users. The slides are available here, just in case you want to take a look.

    The content of the talk is basically a small review about what exists, what each header tries to achieve and how could you use it.

    After the talk I remembered that I didn’t review the heades of this blog for quite sometime. So a quick visit to Mozilla Observatory, a tool that lets you have a quick look of some of the security configurations of your website, gave me an idea of what I needed to improve. This was the result:

    The Content-Security-Header was missing

    So what is a Content Security Policy? On the MDN documentation we can find the following description:

    The HTTP Content-Security-Policy response header allows web site administrators to control resources the user agent is allowed to load for a given page.

    Mozilla Developer Network

    Summing up, in this header we describe with a certain level of detail the sources from where each type of content can be fetched in order to be allowed and included on a given page/app. The main goal of this type of policy is to mitigate Cross-Site Scripting attacks.

    In order to start building a CSP for this blog a good approach, in my humble opinion, is to start with the more basic and restrictive policy and then proceed evaluating the need for exceptions and only add them when strictly necessary. So here is my first attempt:

    default-src 'self'; object-src 'none'; report-uri https://ovalerio.report-uri.com/r/d/csp/reportOnly

    Lets interpret what it says:

    • default-src: This is the default value for all non-mentioned directives. self means “only things that come from this domain”.
    • object-src: No <object>, <embed> or <applet> here.
    • report-uri: All policy violations should be reported by the browser to this URL.

    The idea was that all styles, scripts and images should be served by this domain, anything external should be blocked. This will also block inline scripts, styles and data images, which are considered unsafe. If for some reason I need to allow this on the blog I could use unsafe-inline, eval and data: on the directive’s definition but in my opinion they should be avoided.

    Now a good way to find out how this policy will affect the website and to understand how it needs to be tuned (or the website changed) we can activate it using the “report only mode:

    Content-Security-Policy-Report-Only: <policy>

    This mode will generate some reports when you (and other users) navigate through the website, they will be printed on the browser’s console and sent to the defined report-uri, but the resources will be loaded anyway.

    Here are some results:

    CSP violations logs on the browser console
    Example of the CSP violations on the browser console

    As an example below is a raw report from one of those violations:

    {
        "csp-report": {
            "blocked-uri": "inline",
            "document-uri": "https://blog.ovalerio.net/",
            "original-policy": "default-src 'self'; object-src 'none'; report-uri https://ovalerio.report-uri.com/r/d/csp/reportOnly",
            "violated-directive": "default-src"
        }
    }

    After a while I found that:

    • The theme used on this blog used some data: fonts
    • Several inline scripts were being loaded
    • Many inline styles were also being used
    • I have some demos that load content from asciinema.org
    • I often share some videos from Youtube, so I need to allow iframes from that domain
    • Some older posts also embeded from other websites (such as soundcloud)

    So for the blog to work fine with the CSP being enforced, I either had to include some exceptions or fix errors. After evaluating the attack surface and the work required to make the changes I ended up with the following policy:

    Content-Security-Policy-Report-Only: default-src 'self'; script-src 'self' https://asciinema.org 'sha256-A+5+D7+YGeNGrYcTyNB4LNGYdWr35XshEdH/tqROujM=' 'sha256-2N2eS+4Cy0nFISF8T0QGez36fUJfaY+o6QBWxTUYiHc=' 'sha256-AJyUt7CSSRW+BeuiusXDXezlE1Wv2tkQgT5pCnpoL+w=' 'sha256-n3qH1zzzTNXXbWAKXOMmrBzjKgIQZ7G7UFh/pIixNEQ='; style-src 'self' 'sha256-MyyabzyHEWp8TS5S1nthEJ4uLnqD1s3X+OTsB8jcaas=' 'sha256-OyKg6OHgnmapAcgq002yGA58wB21FOR7EcTwPWSs54E='; font-src 'self' data:; img-src 'self' https://secure.gravatar.com; frame-src 'self' https://www.youtube.com https://asciinema.org; object-src 'none'; report-uri https://ovalerio.report-uri.com/r/d/csp/reportOnly

    A lot more complex than I initially expected it to be, but it’s one of the drawbacks of using a “pre-built” theme on a platform that I didn’t develop. I was able (in the available time) to fix some stuff but fixing everything would take a lot more work.

    All those sha-256 hashes were added to only allow certain inline scripts and styles without allowing everything using unsafe-inline.

    Perhaps in the future I will be able to change to a saner theme/platform, but for the time being this Content-Security-Policy will do the job.

    I started enforcing it (by changing Content-Security-Policy-Report-Only to Content-Security-Policy) just before publishing this blog post, so if anything is broken please let me know.

    I hope this post has been helpful to you and if you didn’t yet implement this header you should give it a try, it might take some effort (depending on the use case) but in the long run I believe it is totally worth it.