Category: Software Development

  • Django: Overriding translations from dependencies

    This week, I’ll continue on the same theme of my previous “Django Friday Tips” post. Essentially, we will keep addressing small annoyances that can surface while developing your multilingual project.

    The challenge for this article shows up when a given string from a package that is a dependency of your project is either:

    • Not translated in the language you are targeting.
    • Translated in a slightly different way than you desire.

    As we are all aware, most packages use English by default, then the most popular ones often provide translations for languages that have more active users willing to contribute. But these efforts are laborious and can have differences for distinct regions, even if they use the same base language.

    Contributing upstream, might not always be an option.

    This means that to maintain the coherence of the interface of your project, you need to adapt these translations locally.

    Handling the localization of the code in your repository in Django is obvious and well documented. Django collects the strings and adds the translation files to the locale path (per app or per project).

    For the other packages, these strings and translations are located within their directory hierarchy, outside the reach of the makemessages command. Django, on the other hand, goes through all these paths, searching for the first match.

    With this in mind, the easiest and most straightforward way I was able to find to achieve this goal was:

    Create a file in your project (in an app directory or in a common project directory), let’s call it locale_overrides.py and put there the exact string from your dependency (Django or another) that you which to translate:

    from django.utils.translation import gettext_lazy as _
    
    locale_overrides = [
        _("This could sound better."),
        ...
    ]

    Then run manage.py makemessages, translate the new lines in the .po file as you wish, then finally compile your new translations with manage.py compilemessages.

    Since your new translations are found first, when your app is looking for them, they will be picked instead of the “original” ones.

    For tiny adjustments, this method works great. When the amount of content starts growing too much, a new approach might be more appropriate, but that will be a topic for another time.
  • Filter sensitive contents from Django’s error reports

    Reporting application errors to a (small) list of admins is a feature that already comes built in and ready to use in Django.

    You just need to configure the ADMINS setting and have the application ready to send emails. All application errors (status 500 and above) will trigger a new message containing all the details, including a traceback.

    However, this message can contain sensitive contents (passwords, credit cards, PII, etc.). So, Django also provides a couple of decorators that allow you to hide/scrub the sensitive stuff that might be stored in variables or in the body of the request itself.

    These decorators are called @sensitive_variables() and @sensitive_post_parameters(). The correct usage of both of them is described in more detail here.

    With the above information, this article could be done. Just use the decorators correctly and extensively, and you won’t leak user’s sensitive content to your staff or to any entity that handles those error reports.

    Unfortunately, it isn’t that simple. Because lately, I don’t remember working in a project that uses Django’s default error reporting. A team usually needs a better way to track and manage these errors, and most teams resort to other tools.

    Filtering sensitive content in Sentry

    Since Sentry is my go-to tool for handling application errors, in the rest of this post, I will explore how to make sure sensitive data doesn’t reach Sentry’s servers.

    Sentry is open-source, so you can run it on your infrastructure, but they also offer a hosted version if you want to avoid having the trouble of running it yourself.

    To ensure that sensitive data is not leaked or stored where it shouldn’t, Sentry offers 3 solutions:

    • Scrub things on the SDK, before sending the event.
    • Scrub things when the event is received by the server, so it is not stored.
    • Intercept the event in transit and scrub the sensitive data before forwarding it.

    In my humble opinion, only the first approach is acceptable. Perhaps there are scenarios where there is no choice but to use one of the others; however, I will focus on the first.

    The first thing that needs to be done is to initiate the SDK, correctly and explicitly:

    sentry_sdk.init(
        dsn="<your dsn here>",
        send_default_pii=False
    )

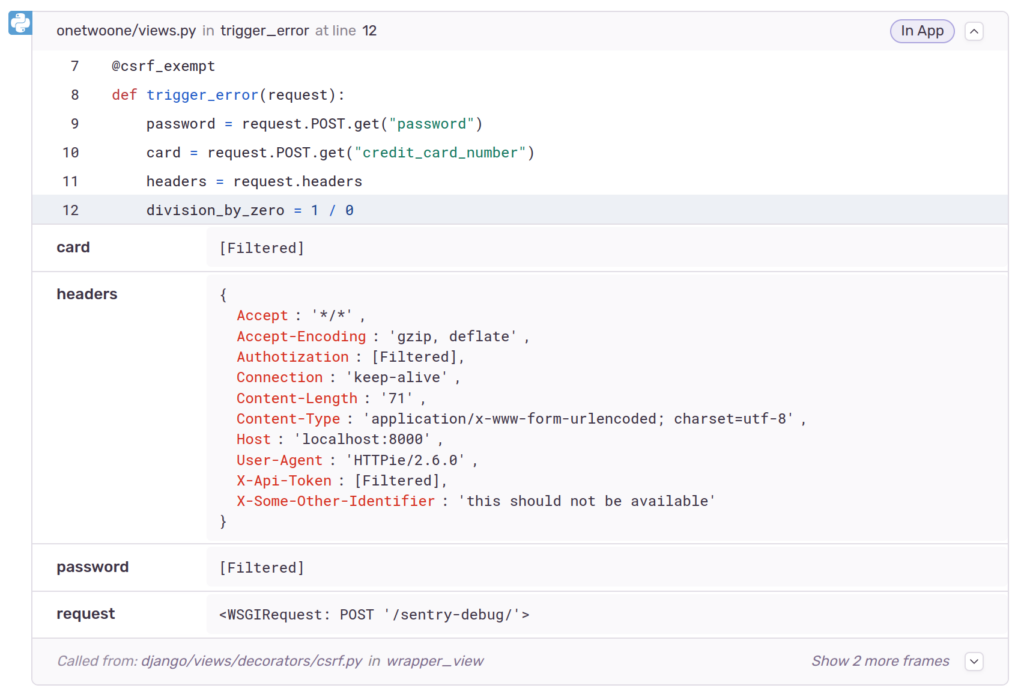
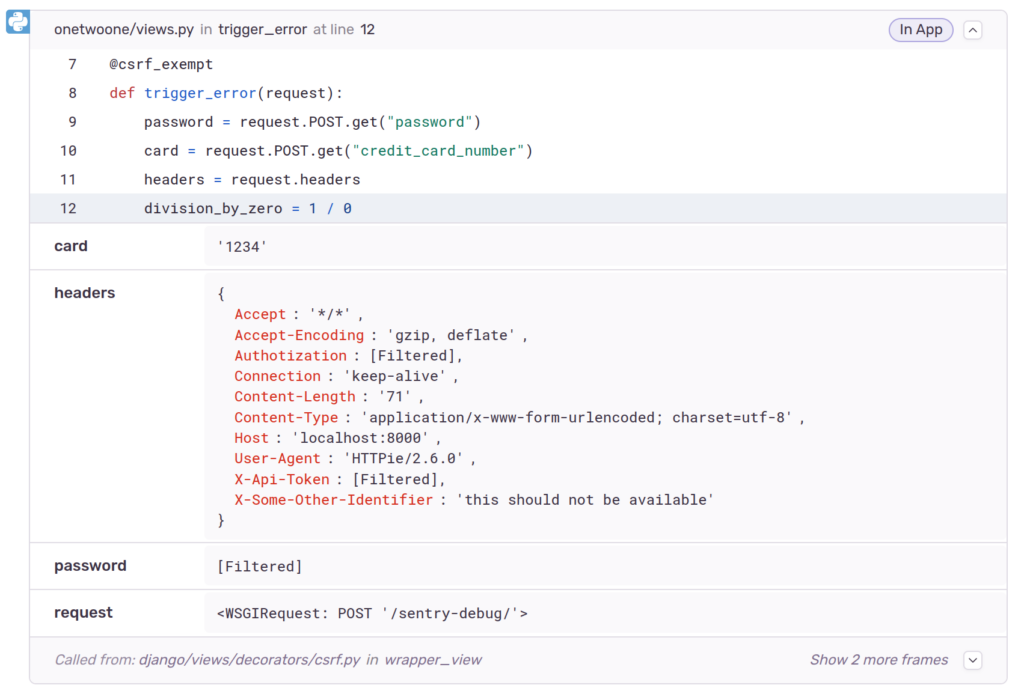
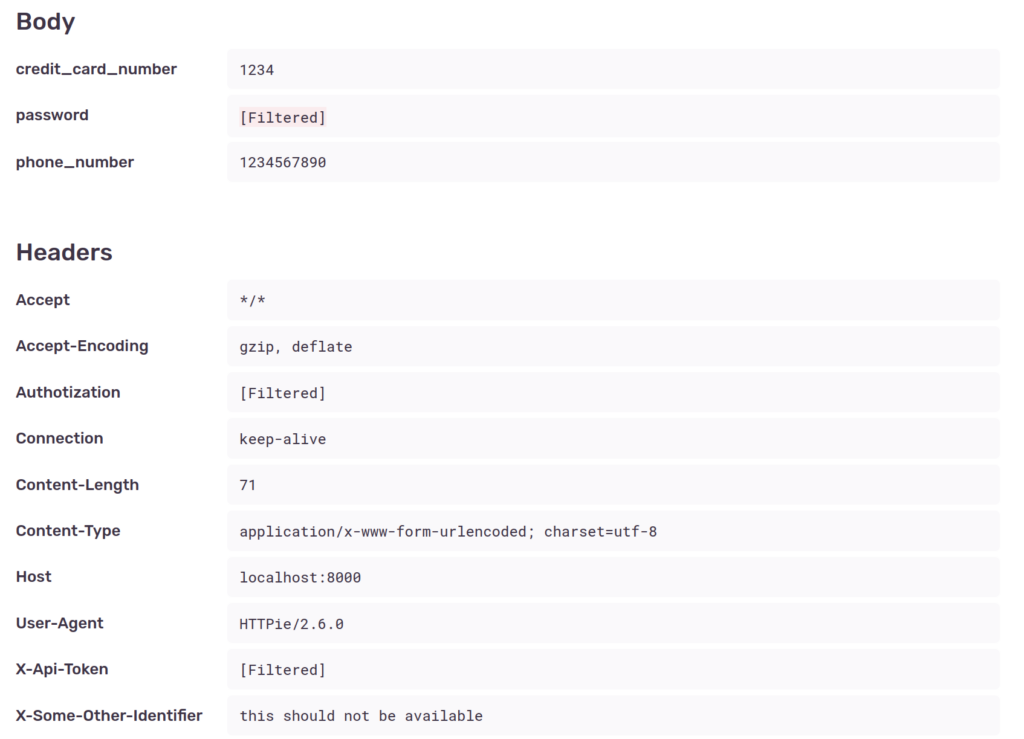
    This will ensure that certain types of personal information are not sent to the server. Furthermore, by default certain stuff is already filtered, as we can see in the following example:

    Screenshot of Sentry's error page, focusing on the section that shows the code that caused the error and the local variables. Variables are not filtered.
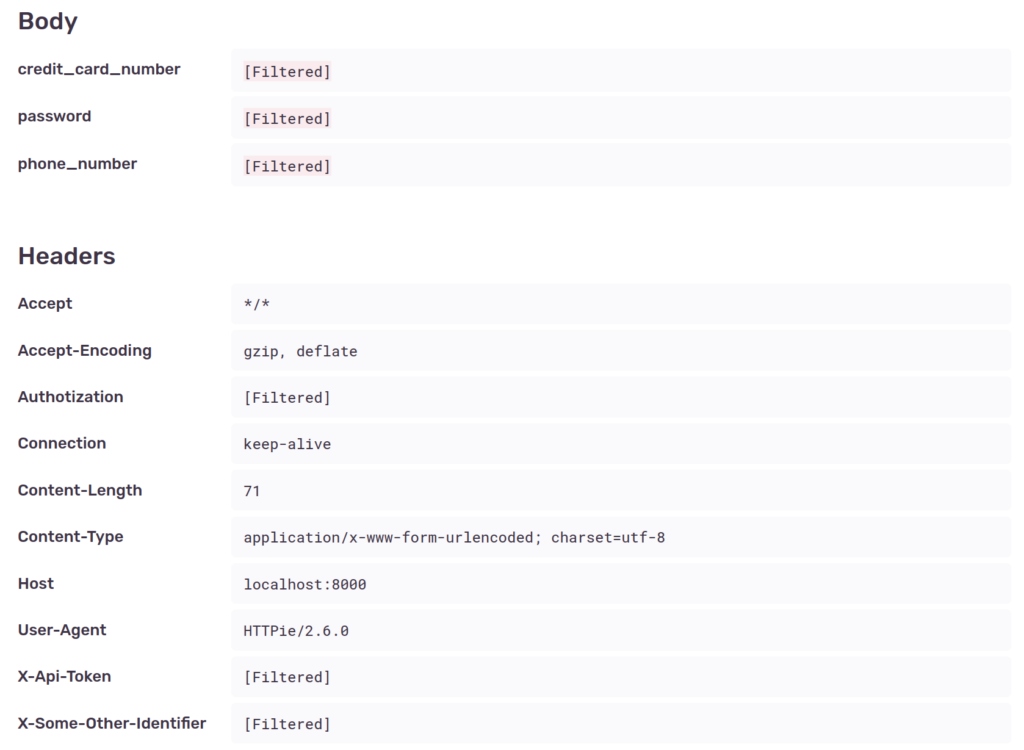
    Screenshot of Sentry's error page, focusing on the section that shows the contents of the request. Content is not filtered.

    Some sensitive contents of the request such as password, authorization and X-Api-Token are scrubbed from the data, both on local variables and on the shown request data. This is because the SDK’s default deny list checks for the following common items:

    ['password', 'passwd', 'secret', 'api_key', 'apikey', 'auth', 'credentials', 'mysql_pwd', 'privatekey', 'private_key', 'token', 'ip_address', 'session', 'csrftoken', 'sessionid', 'remote_addr', 'x_csrftoken', 'x_forwarded_for', 'set_cookie', 'cookie', 'authorization', 'x_api_key', 'x_forwarded_for', 'x_real_ip', 'aiohttp_session', 'connect.sid', 'csrf_token', 'csrf', '_csrf', '_csrf_token', 'PHPSESSID', '_session', 'symfony', 'user_session', '_xsrf', 'XSRF-TOKEN']

    However, other sensitive data is included, such as credit_card_number (assigned to the card variable), phone_number and the X-Some-Other-Identifier header.

    To avoid this, we should expand the list:

    DENY_LIST = DEFAULT_DENYLIST + [
        "credit_card_number",
        "phone_number",
        "card",
        "X-Some-Other-Identifier",
    ]
    
    sentry_sdk.init(
        dsn="<your dsn here>",
        send_default_pii=False,
        event_scrubber=EventScrubber(denylist=DENY_LIST),
    )

    If we check again, the information is not there for new errors:

    Screenshot of Sentry's error page, focusing on the section that shows the code that caused the error and the local variables. Variables are filtered.
    Screenshot of Sentry's error page, focusing on the section that shows the contents of the request. Content is filtered.

    This way we achieve our initial goal and just like Django’s decorators we can stop certain information from being included in the error reports.

    I still think that a deny list defined in the settings is a poorer experience and more prone to leaks, than the decorator approach used by Django error reporting. Nevertheless, both rely on a deny list, and without being careful, this kind of approach will eventually lead to leaks.

    As an example, look again at the last two screenshots. Something was “filtered” in one place, but not in the other. If you find it, please let me know in the comments.

  • So you need to upgrade Django

    No matter how much you try to delay and how many reasons you find to postpone, eventually the time comes. You need to update and upgrade your software, your system components, your apps, your dependencies, etc.

    This happens to all computer users. On some systems, this is an enjoyable experience, on other systems as painful as it can get.

    Most of the time, upgrading Django on our projects falls in the first category, due to its amazing documentation and huge community. Nevertheless, the upgrade path takes work and “now” rarely seems the right time to move forward with it, specially if you are jumping between LTS versions.

    So, today’s tip is a mention of 2 packages that can help you reduce the burden of going through your codebase looking for the lines that need to be changed. They are:

    Both of them do more or less the same thing, they will automatically detect the code that needs to be changed and then fix it according to the release notes. Attention, this is no excuse to avoid reading the release notes.

    django-upgrade is faster and probably the best choice, but django-codemod supports older versions of Python. Overall, it will depend on the situation at hand.

    And this is it… I hope these libraries are as helpful to you as they have been to me.

  • Secure PostgreSQL connections on your Django project

    Last week, an article was published with some interesting numbers about the security of PostgreSQL servers publicly exposed to the internet (You can find it here).

    But more than the numbers, what really caught my attention was the fact that most clients and libraries used to access and interact with the databases have insecure defaults:

    most popular SQL clients are more than happy to accept unencrypted connections without a warning. We conducted an informal survey of 22 popular SQL clients and found that only two require encrypted connections by default.

    Jonathan Mortensen

    The article goes on to explain how clients connect to the database server and what options there are to establish and verify the connections.

    So, this week, let’s see how we can set up things in Django to ensure our apps are communicating with the database securely over the network.

    Usually, we set up the database connection like this:

    DATABASES = {
        "default": {
            "ENGINE": "django.db.backends.postgresql",
            "NAME": "db_name",
            "USER": "db_user",
            "PASSWORD": "db_password",
            "HOST": "127.0.0.1",
            "PORT": "5432",
        }
    }

    The above information can also be provided using a single “URL” such as postgres://USER:PASSWORD@HOST:PORT/NAME, but in this case, you might need some extra parsing logic or to rely on an external dependency.

    Now, based on that article psycopg2 by default prefers to use an encrypted connection but doesn’t require it, or even enforces a valid certificate. How can we change that?

    By using the field OPTIONS and then set the sslmode:

    DATABASES = {
        "default": {
            "ENGINE": "django.db.backends.postgresql",
            "NAME": "db_name",
            "USER": "db_user",
            "PASSWORD": "db_password",
            "HOST": "127.0.0.1",
            "PORT": "5432",
            "OPTIONS": {
                "sslmode": "<mode here>"
            }
        }
    }

    The available modes are:

    • disable
    • allow
    • prefer
    • require
    • verify-ca
    • verify-full

    The obvious choice for a completely secure connection is verify-full, specially when the traffic goes through a public network.

    If you are using a URL, something like this should do the trick: postgres://USER:PASSWORD@HOST:PORT/NAME?sslmode=verify-full.

    And that’s it, at least on the client’s side.

    If the above is not an option for you, I recommend taking a look at pgproxy. You can find more details here.

  • Django Friday Tips: Deal with login brute-force attacks

    In the final tips post of the year, lets address a solution to a problem that most websites face once they have been online for a while.

    If you have a back-office or the concept of user accounts, soon you will face the security problem of attackers trying to hack into these private zones of the website.

    These attackers can either be people trying to login as somebody else, or even bots trying to find accounts with common/leaked passwords.

    Unfortunately we cannot rely on users to pick strong and unique passwords. We can help them, as I explained in a previous post, but it isn’t guaranteed that the user will make a good choice.

    Using a slow key derivation function, to slowdown the process and increase the time required to test an high number of possibilities, helps but isn’t enough.

    However we can go even further with this strategy, by controlling the number of attempts and only allowing a “given number of tries per time window”.

    This is very easy to achieve on Django projects by relying on the django-axes package. Here’s an explanation of what it does:

    Axes records login attempts to your Django powered site and prevents attackers from attempting further logins to your site when they exceed the configured attempt limit.

    django-axes documentation

    Basically you end up with record of attempts (that you can see in the admin) and allows you to define how the system will behave after multiple failed tries, by setting the maximum number of failures and cool-off periods.

    You can check the package here, it is very easy to setup and it shouldn’t require many changes to your code. The documentation can be found here and it covers everything you will need so I won’t provide any examples this time.

    I hope this tip ends up being useful and wish you a Merry Christmas. The tips will continue in 2022.

  • Django Friday Tips: Password validation

    This time I’m gonna address Django’s builtin authentication system, more specifically the ways we can build custom improvements over the already very solid foundations it provides.

    The idea for this post came from reading an article summing up some considerations we should have when dealing with passwords. Most of those considerations are about what controls to implement (what “types” of passwords to accept) and how to securely store those passwords. By default Django does the following:

    • Passwords are stored using PBKDF2. There are also other alternatives such as Argon2 and bcrypt, that can be defined in the setting PASSWORD_HASHERS.
    • Every Django release the “strength”/cost of this algorithm is increased. For example, version 3.1 applied 216000 iterations and the last version (3.2 at the time of writing) applies 260000. The migration from one to another is done automatically once the user logs in.
    • There are a set of validators that control the kinds of passwords allowed to be used in the system, such as enforcing a minimum length. These validators are defined on the setting AUTH_PASSWORD_VALIDATORS.

    By default when we start a new project these are the included validators :

    • UserAttributeSimilarityValidator
    • MinimumLengthValidator
    • CommonPasswordValidator
    • NumericPasswordValidator

    The names are very descriptive and I would say a good starting point. But as the article mentions the next step is to make sure users aren’t reusing previously breached passwords or using passwords that are known to be easily guessed (even when complying with the other rules). CommonPasswordValidator already does part of this job but with a very limited list (20000 entries).

    Improving password validation

    So for the rest of this post I will show you some ideas on how we can make this even better. More precisely, prevent users from using a known weak password.

    1. Use your own list

    The easiest approach, but also the more limited one, is providing your own list to `CommonPasswordValidator`, containing more entries than the ones provided by default. The list must be provided as a file with one entry in lower case per line. It can be set like this:

    {
      "NAME": "django.contrib.auth.password_validation.CommonPasswordValidator",
      "OPTIONS": {"password_list_path": "<path_to_your_file>"}
    }

    2. Use zxcvbn-python

    Another approach is to use an existing and well-known library that evaluates the password, compares it with a list of known passwords (30000) but also takes into account slight variations and common patterns.

    To use zxcvbn-python we need to implement our own validator, something that isn’t hard and can be done this way:

    # <your_app>/validators.py
    
    from django.core.exceptions import ValidationError
    from zxcvbn import zxcvbn
    
    
    class ZxcvbnValidator:
        def __init__(self, min_score=3):
            self.min_score = min_score
    
        def validate(self, password, user=None):
            user_info = []
            if user:
                user_info = [
                    user.email, 
                    user.first_name, 
                    user.last_name, 
                    user.username
                ]
            result = zxcvbn(password, user_inputs=user_info)
    
            if result.get("score") < self.min_score:
                raise ValidationError(
                    "This passoword is too weak",
                    code="not_strong_enough",
                    params={"min_score": self.min_score},
                )
    
        def get_help_text(self):
            return "The password must be long and not obvious"
    

    Then we just need to add to the settings just like the other validators. It’s an improvement but we still can do better.

    3. Use “have i been pwned?”

    As suggested by the article, a good approach is to make use of the biggest source of leaked passwords we have available, haveibeenpwned.com.

    The full list is available for download, but I find it hard to justify a 12GiB dependency on most projects. The alternative is to use their API (documentation available here), but again we must build our own validator.

    # <your_app>/validators.py
    
    from hashlib import sha1
    from io import StringIO
    
    from django.core.exceptions import ValidationError
    
    import requests
    from requests.exceptions import RequestException
    
    class LeakedPasswordValidator:
        def validate(self, password, user=None):
            hasher = sha1(password.encode("utf-8"))
            hash = hasher.hexdigest().upper()
            url = "https://api.pwnedpasswords.com/range/"
    
            try:
                resp = requests.get(f"{url}{hash[:5]}")
                resp.raise_for_status()
            except RequestException:
                raise ValidationError(
                    "Unable to evaluate password.",
                    code="network_failure",
                )
    
            lines = StringIO(resp.text).readlines()
            for line in lines:
                suffix = line.split(":")[0]
    
                if hash == f"{hash[:5]}{suffix}":
                    raise ValidationError(
                        "This password has been leaked before",
                        code="leaked_password",
                    )
    
        def get_help_text(self):
            return "Use a different password"
    

    Then add it to the settings.

    Edit: As suggested by one reader, instead of this custom implementation we could use pwned-passwords-django (which does practically the same thing).

    And for today this is it. If you have any suggestions for other improvements related to this matter, please share them in the comments, I would like to hear about them.

  • Documentation done right

    One critical piece of the software development process that often gets neglected by companies and also by many open-source projects is explaining how it works and how it can be used to solve the problem in question.

    Documentation is often lacking and people have an hard time figuring out how they can use or contribute to a particular piece of software. I think most developers and users have faced this situation at least once.

    Looking at it from the other side, it isn’t always easy to pick and share the right information so others can hit the ground running. The fact that not everybody is starting from the same point and have the same goal, makes the job a bit harder.

    One approach to solve this problem that I like is Divio’s documentation system.

    Divio's documentation system explained. Showing the 4 quadrants and their relations.
    The components of Divio’s documentation system.

    It splits the problems in 4 areas targeting different stages and needs of the person reading the documentation. Django uses this system and is frequently praised for having great documentation.

    From a user point of view it looks solid. You should take a look and apply it on your packages/projects, I surely will.

  • Mirroring GitHub Repositories

    Git by itself is a distributed version control system (a very popular one), but over the years organizations started to rely on some internet services to manage their repositories and those services eventually become the central/single source of truth for their code.

    The most well known service out there is GitHub (now owned by Microsoft), which nowadays is synonymous of git for a huge amount of people. Many other services exist, such as Gitlab and BitBucked, but GitHub gained a notoriety above all others, specially for hosting small (and some large) open source projects.

    These centralized services provide many more features that help managing, testing and deploying software. Functionality not directly related to the main purpose of git.

    Relying on these central services is very useful but as everything in life, it is a trade-off. Many large open source organizations don’t rely on these companies (such as KDE, Gnome, Debian, etc), because the risks involved are not worth the convenience of letting these platforms host their code and other data.

    Over time we have been witnessing some of these risks, such as your project (and all the related data) being taken down without you having any chance to defend yourself (Example 1 and Example 2). Very similar to what some content creators have been experiencing with Youtube (I really like this one).

    When this happens, your or your organizations don’t lose the code itself since you almost certainly have copies on your own devices (thanks to git), but you lose everything else, issues, projects, automated actions, documentation and essentially the known used by URL of your project.

    Since Github is just too convenient to collaborate with other people, we can’t just leave. In this post I explain an easy alternative to minimize the risks described above, that I implemented myself after reading many guides and tools made by others that also tried to address this problem before.

    The main idea is to automatically mirror everything in a machine that I own and make it publicly available side by side with the GitHub URLs, the work will still be done in Github but can be easily switched over if something happens.

    The software

    To achieve the desired outcome I’ve researched a few tools and the one that seemed to fit all my requirements (work with git and be lightweight) was “Gitea“. Next I will describe the steps I took.

    The Setup

    This part was very simple, I just followed the instructions present on the documentation for a docker based install. Something like this:

    version: "3"
    
    networks:
      gitea:
        external: false
    
    services:
      server:
        image: gitea/gitea:latest
        container_name: gitea
        environment:
          - USER_UID=1000
          - USER_GID=1000
        restart: always
        networks:
          - gitea
        volumes:
          - ./gitea:/data
          - /etc/timezone:/etc/timezone:ro
          - /etc/localtime:/etc/localtime:ro
        ports:
          - "3000:3000"
          - "222:22"

    If you are doing the same, don’t copy the snippet above. Take look here for updated instructions.

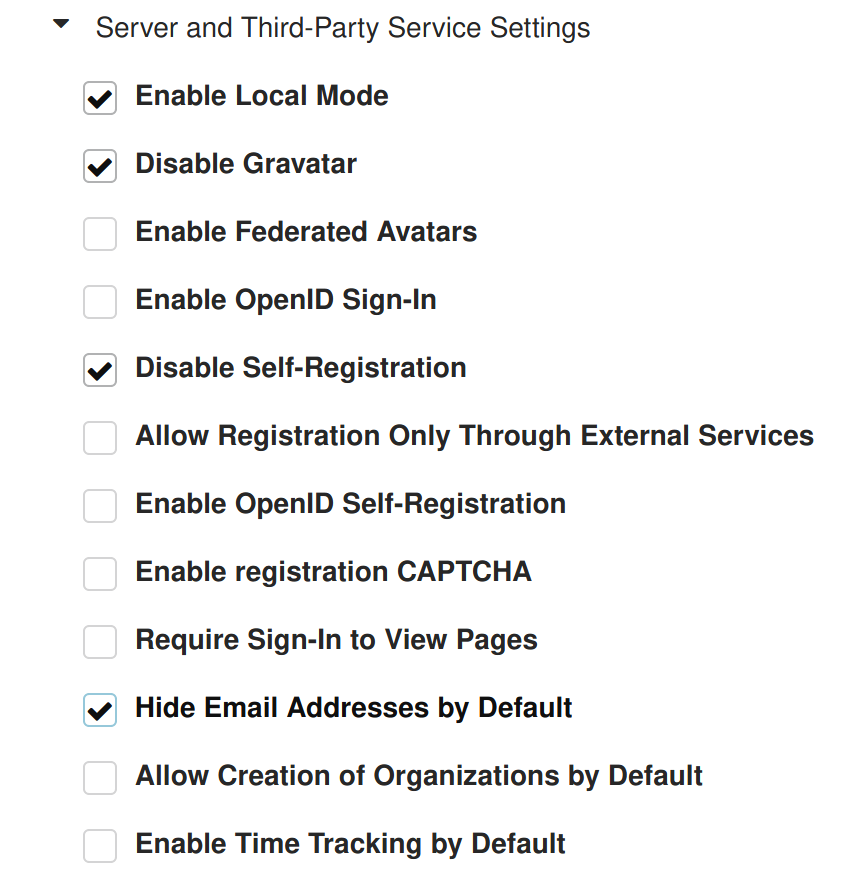
    Since my website is not supposed to have much concurrent activity, using an SQLite database is more than enough. So after launching the container, I chose this database type and made sure I disabled the all the functionality I won’t need.

    Part of Gitea's configuration page. Server and Third-Party Service Settings.
    Part of the Gitea’s configuration page

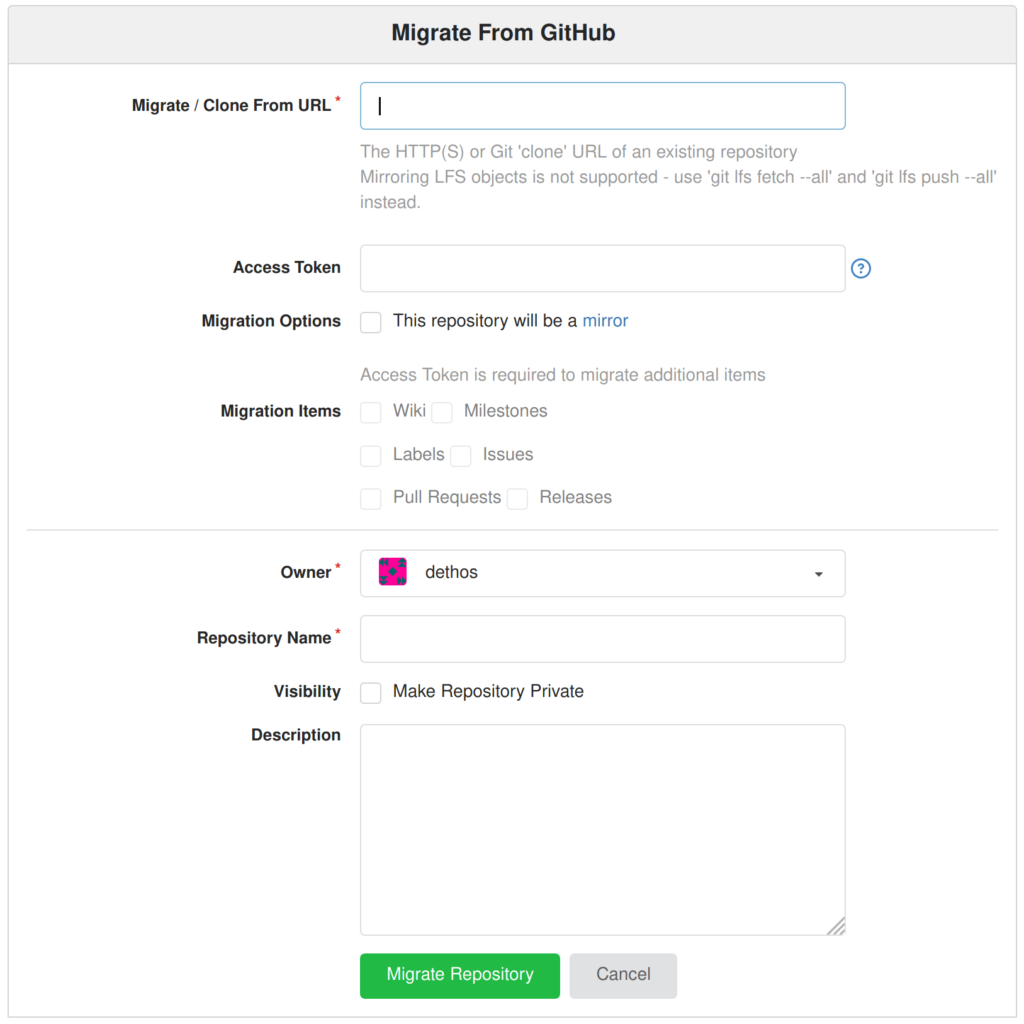
    After this step, you should be logged in as an admin. The next step is to create a new migration on the top right menu. We just need to choose the “Github” option and continue. You should see the below screen:

    Screenshot of the page that lets the users create a new migration/mirror in Gitea.
    Creating a new Github migration/mirror in Gitea.

    If you choose This repository will be a mirror option, Gitea will keep your repository and wiki in sync with the original, but unfortunately it will not do the same for issues, labels, milestones and releases. So if you need that information, the best approach is to uncheck this field and do a normal migration. To keep that information updated you will have to repeat this process periodically.

    Once migrated, do the same for your other repositories.

    Conclusion

    Having an alternative with a backup of the general Github data ended up being quite easy to set up. However the mirror feature would be much more valuable if it included the other items available on the standard migration.

    During my research for solutions, I found Fossil, which looks very interesting and something that I would like to explore in the future, but at the moment all repositories are based on Git and for practical reasons that won’t change for the time being.

    With this change, my public repositories can be found in:

    Edit: Due to the described limitations of the mirror functionality in Gitea. My self-hosted mirror ended up being less useful than previously estimated. For that reason, it was shutdown on 12/07/2024.

  • Why you shouldn’t remove your package from PyPI

    Nowadays most software developed using the Python language relies on external packages (dependencies) to get the job done. Correctly managing this “supply-chain” ends up being very important and having a big impact on the end product.

    As a developer you should be cautious about the dependencies you include on your project, as I explained in a previous post, but you are always dependent on the job done by the maintainers of those packages.

    As a public package owner/maintainer, you also have to be aware that the code you write, your decisions and your actions will have an impact on the projects that depend directly or indirectly on your package.

    With this small introduction we arrive to the topic of this post, which is “What to do as a maintainer when you no longer want to support a given package?” or ” How to properly rename my package?”.

    In both of these situations you might think “I will start by removing the package from PyPI”, I hope the next lines will convince you that this is the worst you can do, for two reasons:

    • You will break the code or the build systems of all projects that depend on the current or past versions of your package.
    • You will free the namespace for others to use and if your package is popular enough this might become a juicy target for any malicious actor.

    TLDR: your will screw your “users”.

    The left-pad incident, while it didn’t happen in the python ecosystem, is a well known example of the first point and shows what happens when a popular package gets removed from the public index.

    Malicious actors usually register packages using names that are similar to other popular packages with the hope that a user will end up installing them by mistake, something that already has been found multiple times on PyPI. Now imagine if that package name suddenly becomes available and is already trusted by other projects.

    What should you do it then?

    Just don’t delete the package.

    I admit that in some rare occasions it might be required, but most of the time the best thing to do is to leave it there (specially for open-source ones).

    Adding a warning to the code and informing the users in the README file that the package is no longer maintained or safe to use is also a nice thing to do.

    A good example of this process being done properly was the renaming of model-mommy to model-bakery, as a user it was painless. Here’s an overview of the steps they took:

    1. A new source code repository was created with the same contents. (This step is optional)
    2. After doing the required changes a new package was uploaded to PyPI.
    3. Deprecation warnings were added to the old code, mentioning the new package.
    4. The documentation was updated mentioning the new package and making it clear the old package will no longer be maintained.
    5. A new release of the old package was created, so the user could see the deprecation warnings.
    6. All further development was done on the new package.
    7. The old code repository was archived.

    So here is what is shown every time the test suite of an affected project is executed:

    /lib/python3.7/site-packages/model_mommy/__init__.py:7: DeprecationWarning: Important: model_mommy is no longer maintained. Please use model_bakery instead: https://pypi.org/project/model-bakery/

    In the end, even though I didn’t update right away, everything kept working and I was constantly reminded that I needed to make the change.

  • CSP headers using Cloudflare Workers

    Last January I made a small post about setting up a “Content-Security-Policy” header for this blog. On that post I described the steps I took to reach a final result, that I thought was good enough given the “threats” this website faces.

    This process usually isn’t hard If you develop the website’s software and have an high level of control over the development decisions, the end result ends up being a simple yet very strict policy. However if you do not have that degree of control over the code (and do not want to break the functionality) the policy can end up more complex and lax than you were initially hoping for. That’s what happened in my case, since I currently use a standard installation of WordPress for the blog.

    The end result was a different security policy for different routes and sections (this part was not included on the blog post), that made the web-server configuration quite messy.

    (With this intro, you might have already noticed that I’m just making excuses to redo the initial and working implementation, in order to test some sort of new technology)

    Given the blog is behind the Cloudflare CDN and they introduced their “serverless” product called “Workers” a while ago, I decided that I could try to manage the policy dynamically on their servers.

    Browser <--> CF Edge Server <--> Web Server <--> App

    The above line describes the current setup, so instead of adding the CSP header on the “App” or the “Web Server” stages, the header is now added to the response on the last stage before reaching the browser. Let me describe how I’ve done it.

    Cloudflare Workers

    First a very small introduction to Workers, later you can find more detailed information on Workers.dev.

    So, first Cloudflare added the v8 engine to all edge servers that route the traffic of their clients, then more recently they started letting these users write small programs that can run on those servers inside the v8 sandbox.

    The programs are built very similarly to how you would build a service worker (they use the same API), the main difference being where the code runs (browser vs edge server).

    These “serverless” scripts can then be called directly through a specific endpoint provided by Cloudflare. In this case they should create and return a response to the requests.

    Or you can instruct Cloudflare to execute them on specific routes of your website, this means that the worker can generate the response, execute any action before the request reaches your website or change the response that is returned.

    This service is charged based on the number of requests handled by the “workers”.

    The implementation

    Going back to the original problem and based on the above description, we can dynamically introduce or modify the “Content-Security-Policy” for each request that goes through the worker which give us an high degree of flexibility.

    So for my case a simple script like the one below, did the job just fine.

    addEventListener('fetch', event => {
      event.respondWith(handleRequest(event.request))
    })
    
    /**
     * Forward the request and swap the response's CSP header
     * @param {Request} request
     */
    async function handleRequest(request) {
      let policy = "<your-custom-policy-here>"
      let originalResponse = await fetch(request)
      response = new Response(originalResponse.body, originalResponse)
      response.headers.set('Content-Security-Policy', policy)
      return response
    }

    The script just listens for the request, passes it to a handler function (lines 1-3), forwards to the origin server (line 12), grabs the response (line 13), replaced the CSP header with the defined policy (line 14) and then returns the response.

    If I needed something more complex, like making slight changes to the policy depending on the User-Agent to make sure different browsers behave as expected given the different implementations or compatibility issues, it would also be easy. This is something that would be harder to achieve in the config file of a regular web server (nginx, apache, etc).

    Enabling the worker

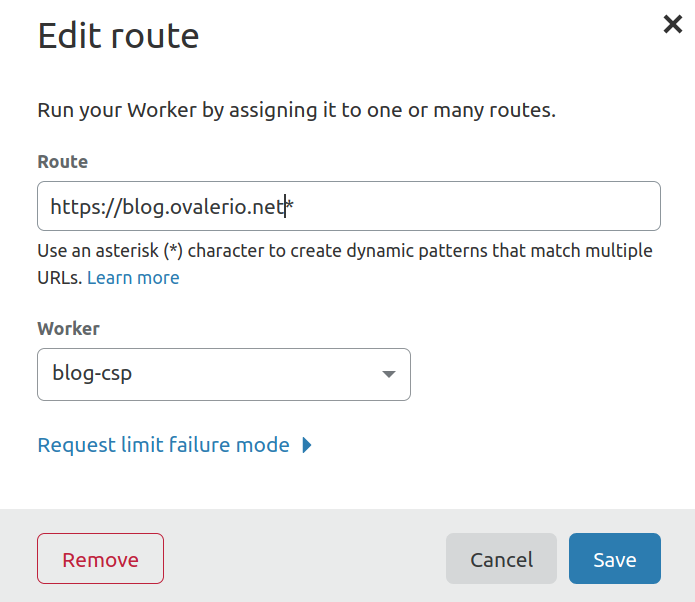
    Now that the script is done and the worker deployed, in order to make it run on certain requests to my blog, I just had to go to the Cloudflare’s dashboard of my domain, click on the “workers” section and add the routes I want it to be executed:

    cloudflare workers routes modal
    Configuring the routes that will use the worker

    The settings displayed on the above picture will run the worker on all requests to this blog, but is can be made more specific and I can even have multiple workers for different routes.

    Some sort of conclusion

    Despite the use-case described in this post being very simple, there is potential in this new “serverless” offering from Cloudflare. It definitely helped me solve the problem of having different policies for different sections of the website without much trouble.

    In the future I might comeback to it, to explore other user-cases or implementation details.

  • Rust examples and exercises

    Learning to program in Rust is as easy like other languages out there, because it ends up having different constrains and new concepts that you will have to go through, in the beginning everybody fights the compiler at least a little bit.

    I started this journey a while ago, however I’ve been progressing slowly just dedicating some time once in a while when I don’t anything else to do.

    I did what many recommendations on the internet tell you to do, start by reading the official book, that is in fact pretty good. But after reading one or two chapters, we need to practice and play with the language to have a feel of it and explore the new concepts you had just learned.

    So in this small post I just want to share two open resources that can be used while you read the book to practice what you have just learned.

    The first one is a website with examples you can modify and execute live in the browser called Rust by Example.

    The second is an official rust project that will put your knowledge up to a test called Rustlings.

    You can use it like the above video or with rustlings watch that stop and reload each exercise until you solve it.

    This is it, I hope they end being helpful to someone else as well.

  • Keep your dependencies under check

    Nowadays most software projects with a “decent size” rely on many software dependencies, or in other words: libraries and tools, developed by other people. That usually are under constant change.

    The reasons for these are clear and can go from implementing common patterns and avoid repeating ourselves, to accelerate the development, to use mature implementations and avoid some pitfalls, etc. Sometimes many projects rely on way too many dependencies for simples things (Remember the left-pad fiasco?).

    Once these dependencies are loaded, integrated and working as expected, people often forget they are there and many times they stay untouched for long periods of time. Even when newer versions are released, unless something starts breaking, nobody remembers to keep them up to date, a situation that might lead to security vulnerabilities, not in your code but on the code your project depends on.

    Of course I’m not telling you anything new, what I pretend to achieve with this post, is to show that there are many tools available to help you fight this problem. When you integrate them on your CI or on another step of your development process, they will keep you informed about what dependencies have known security vulnerabilities and what you should upgrade as soon as possible.

    The majority of the programming languages have this sort of tools, so a little search should help you find the one that better suits you stack. Below are some examples:

    As an example here is what I needed to do in order to check the dependencies of Hawkpost (an open-source project that I’m deeply involved with at the moment):

    $ safety check --full-report -r requirements/requirements.txt
    safety report
    ---
    No known security vulnerabilities found

    For most of these tools the basic check is this simple to do and in the long run it might save you from some headaches.

    Update (26-06-2018): Added cargo-audit to the list