Category: Technology and Internet

Everything related to technology and the Internet. Tutorials, projects, news…

  • Meet the InfoSec Planet

    If you are a frequent reader of this blog, you might already know that I created a small tool to generate a simple webpage plus an RSS feed, from the content of multiple other RSS sources, called worker-planet.

    This type of tool is often known as a “planet”:

    In online media a planet is a feed aggregator application designed to collect posts from the weblogs of members of an internet community and display them on a single page.

    Wikipedia

    While the tool is open-source, a person needs to deploy it before being able to see it in action. Not great.

    This brings us to last week. I was reading a recent issue of a popular newsletter, when I found an OPML file containing 101 infosec related sources curated by someone else.

    Instead of adding them to my newsreader, which to be honest, already contains a lot of cruft that I never read and that I should remove anyway, I saw a great fit to build a demo site for `worker-planet`.

    Preparing the sources

    The first step was to extract all the valid sources from that file. This is important because there is the chance that many of the items might not be working or online at all, since the file is more than 2 years old.

    A quick python script can help us with this task:

    # Extract existing URLs
    urls = []
    tree = ET.parse(opml_file)
    for element in tree.getroot().iter("outline"):
        if url := element.get("xmlUrl"):
            urls.append(url)
    
    # Make sure they are working
    def check_feed(url):
        try:
            response = urlopen(url)
            if 200 <= response.status < 300:
                body = response.read().decode("utf-8")
                ET.fromstring(body)
                return url
        except Exception:
            pass
    
    working_urls = []
    with ThreadPoolExecutor(max_workers=20) as executor:
        for result in executor.map(check_feed, urls):
            if result:
                working_urls.append(result)

    As expected, from the 101 sources present in the file, only 54 seem to be working.

    Deploying

    Now that we already have the inputs we need, it is time to set up and deploy our worker-planet.

    Assuming there aren’t any customizations, we just have to copy the wrangler.toml.example to a new wrangler.toml file and fill configs as desired. Here’s the one I used:

    name = "infosecplanet"
    main = "./worker/script.js"
    compatibility_date = "2023-05-18"
    node_compat = true
    account_id = "<my_id>"
    
    workers_dev = true
    kv_namespaces = [
        { binding = "WORKER_PLANET_STORE", id = "<namespace_id_for_prod>", preview_id = "<namespace_id_for_dev"> },
    ]
    
    [vars]
    FEEDS = "<all the feed urls>"
    MAX_SIZE = 100
    TITLE = "InfoSec Planet"
    DESCRIPTION = "A collection of diverse security content from a curated list of sources. This website also serves as a demo for \"worker-planet\", the software that powers it."
    CUSTOM_URL = "https://infosecplanet.ovalerio.net"
    CACHE_MAX_AGE = "300"
    
    [triggers]
    crons = ["0 */2 * * *"]

    Then npm run build plus npm run deploy. And it is done, the new planet should now accessible through my workers.dev subdomain.

    The rest is waiting for the cron job to execute and also configure any custom routes / domains on Cloudflare’s dashboard.

    The final result

    The new “Infosec Planet” is available on “https://infosecplanet.ovalerio.net” and lists the latest content in those infosec related sources. A united RSS feed is also available.

    In the coming weeks, I will likely improve a bit the list of sources to improve the overall quality of the content.

    One thing I would like to highlight, is that I took a special precaution to not include the full content of the feeds in the InfoSec Planet’s output.

    It was done this way because I didn’t ask for permission from all those authors, to include the contents of their public feeds in the page. So just a small snippet is shown together with the title.

    Nevertheless, if some author wishes to remove their public feed from the page, I will gladly do it so once notified (by email?).

  • So you need to upgrade Django

    No matter how much you try to delay and how many reasons you find to postpone, eventually the time comes. You need to update and upgrade your software, your system components, your apps, your dependencies, etc.

    This happens to all computer users. On some systems, this is an enjoyable experience, on other systems as painful as it can get.

    Most of the time, upgrading Django on our projects falls in the first category, due to its amazing documentation and huge community. Nevertheless, the upgrade path takes work and “now” rarely seems the right time to move forward with it, specially if you are jumping between LTS versions.

    So, today’s tip is a mention of 2 packages that can help you reduce the burden of going through your codebase looking for the lines that need to be changed. They are:

    Both of them do more or less the same thing, they will automatically detect the code that needs to be changed and then fix it according to the release notes. Attention, this is no excuse to avoid reading the release notes.

    django-upgrade is faster and probably the best choice, but django-codemod supports older versions of Python. Overall, it will depend on the situation at hand.

    And this is it… I hope these libraries are as helpful to you as they have been to me.

  • Improving your online privacy: An update

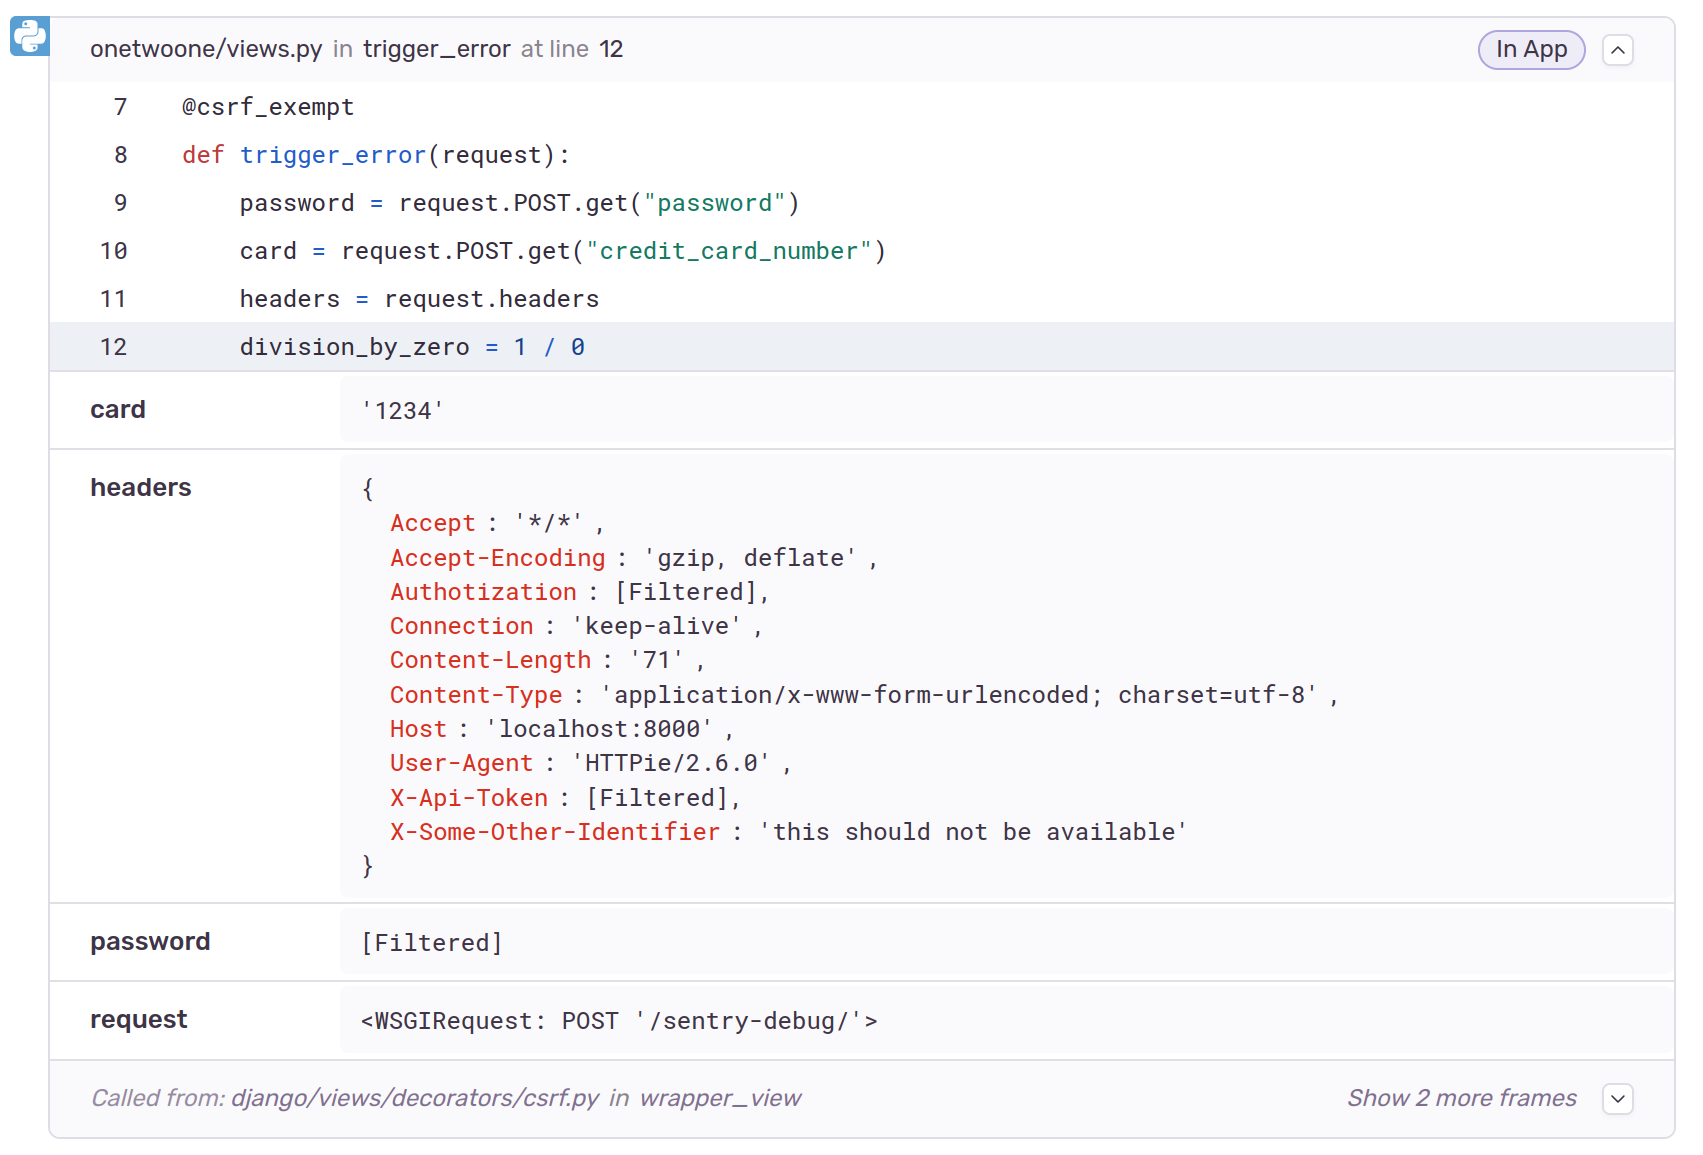
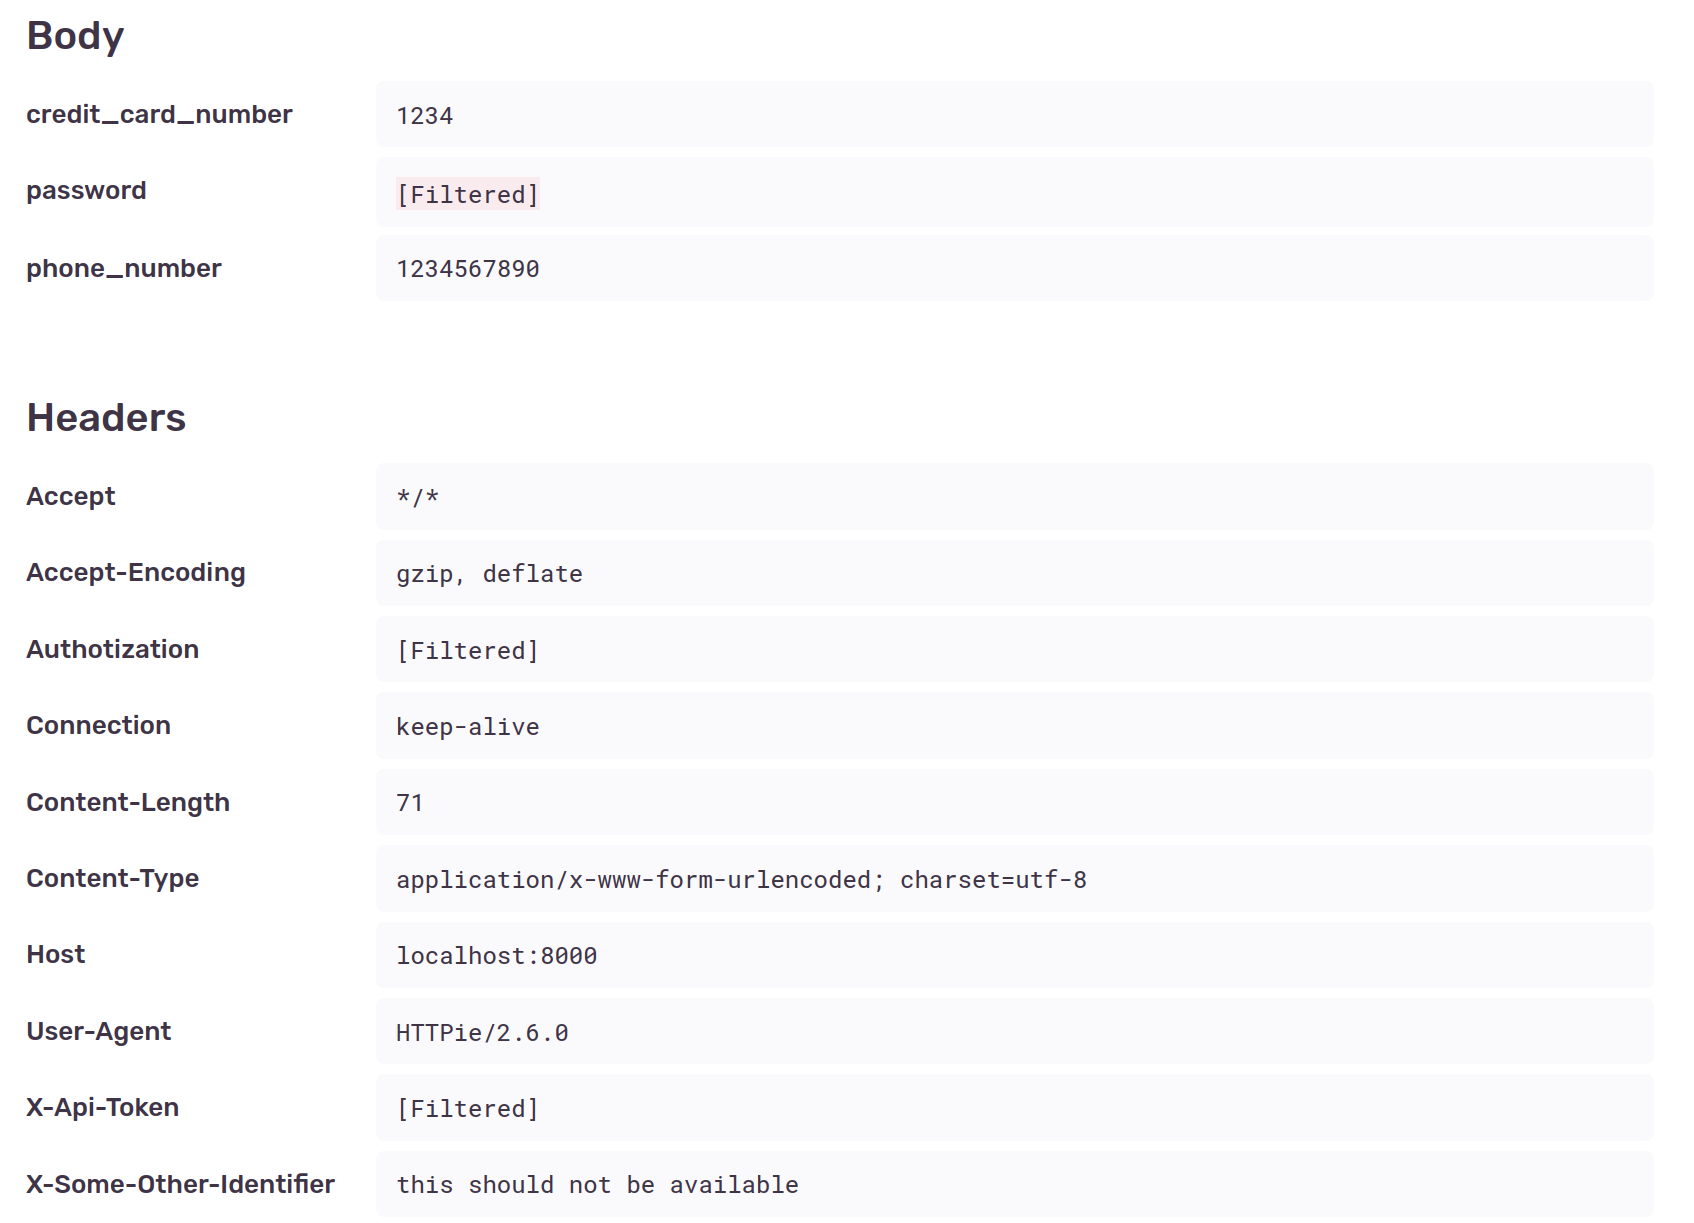
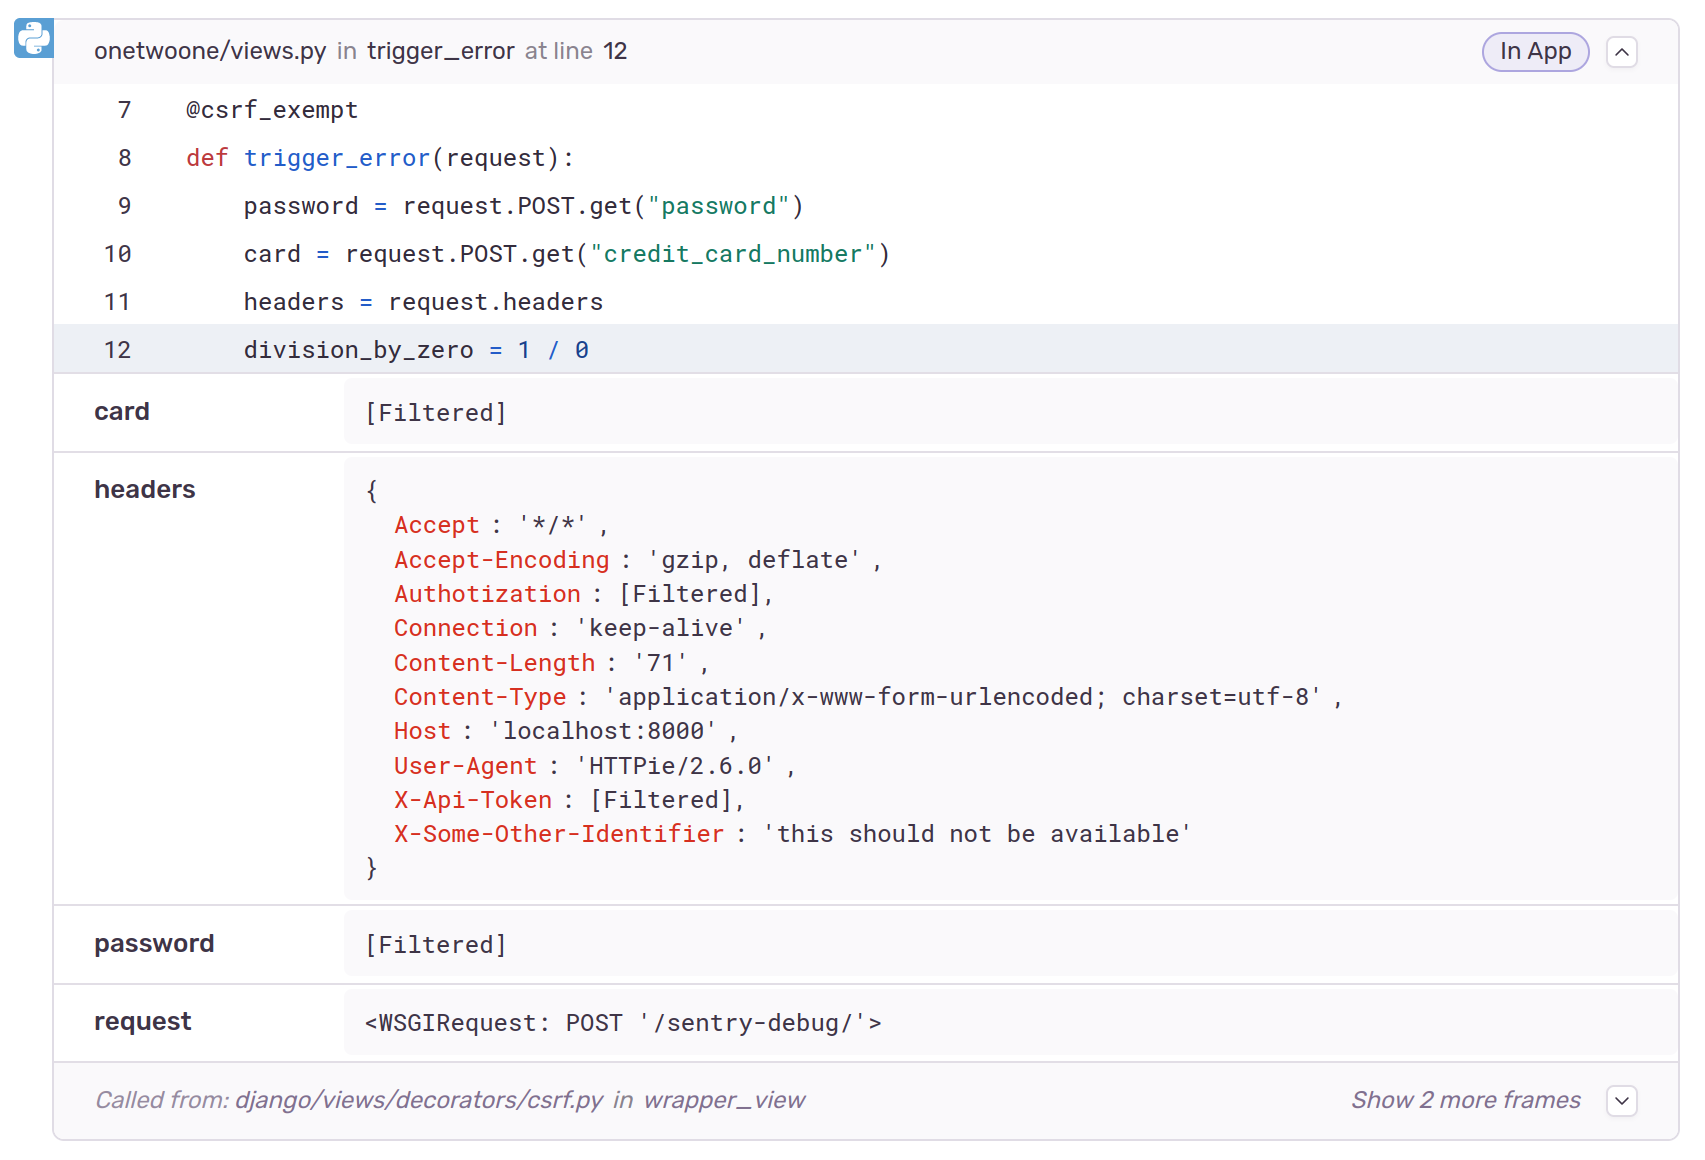
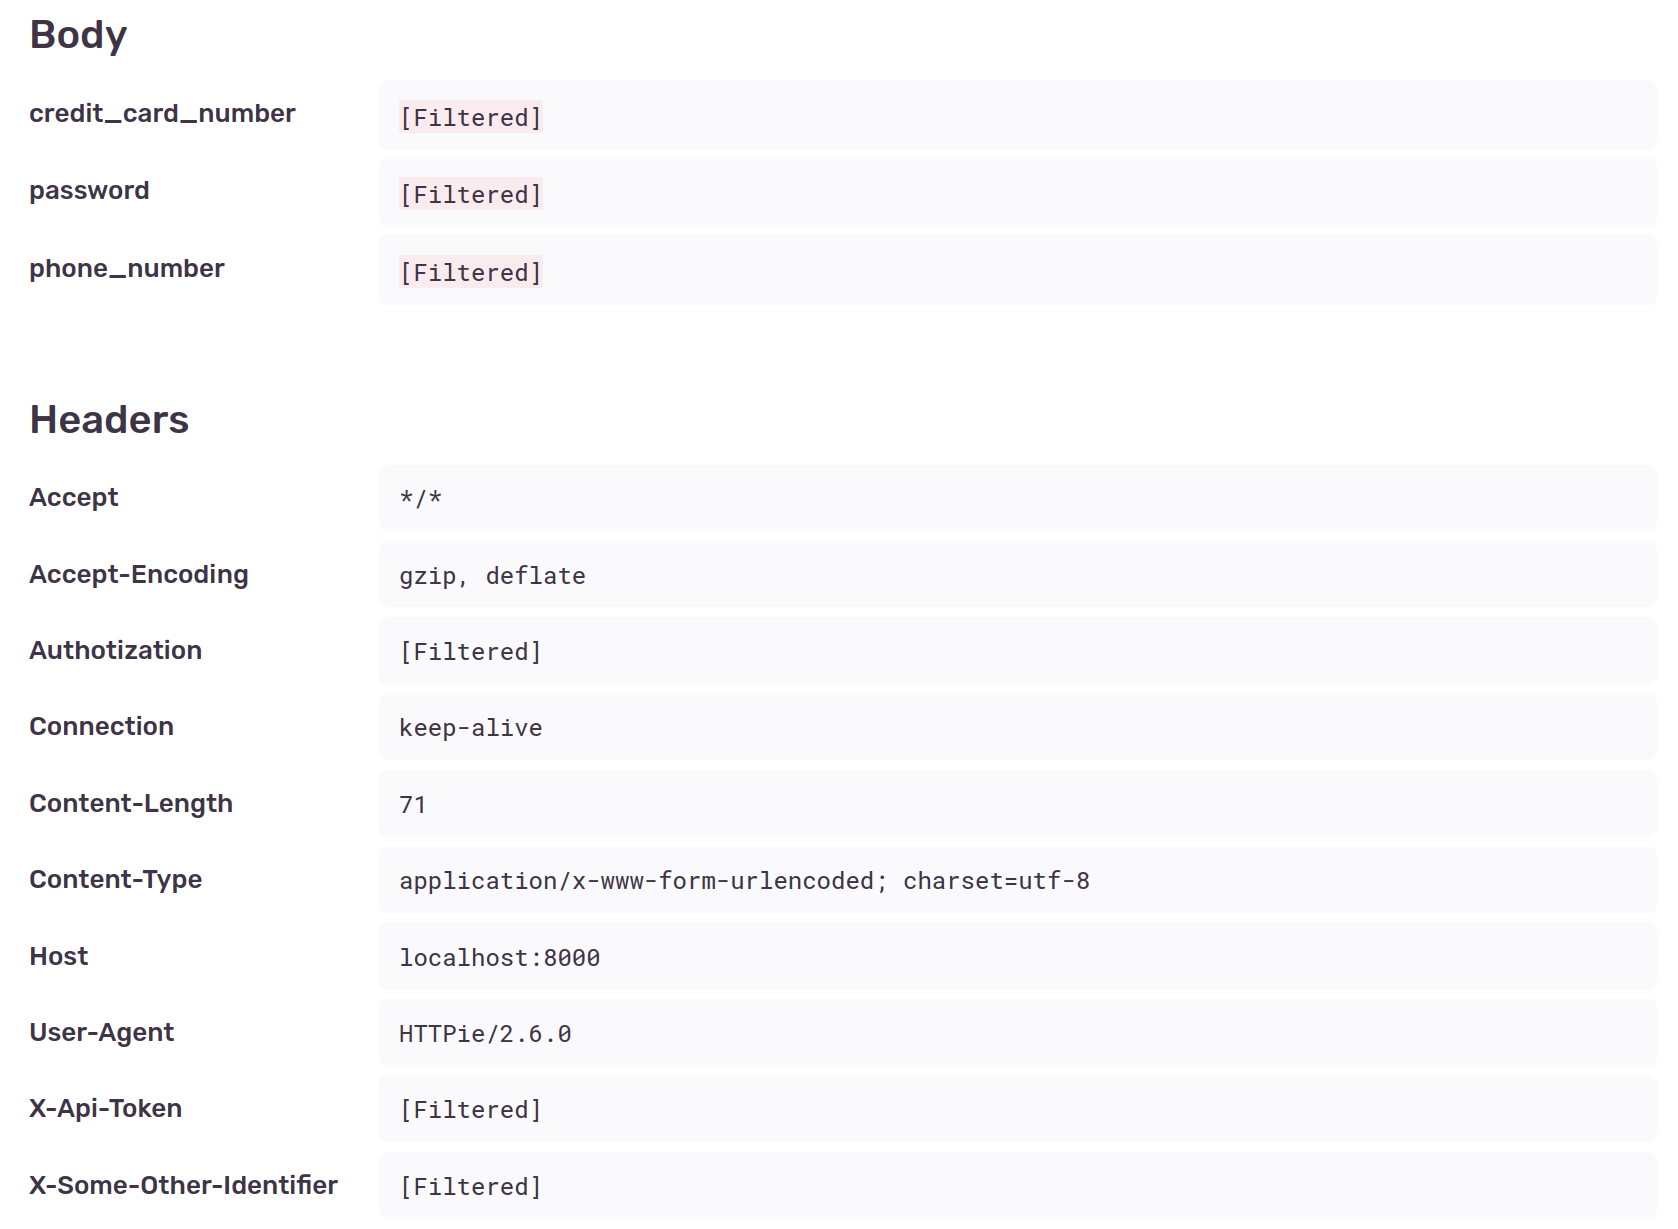
    Ten years ago, after it became clear to almost everyone that all our online activity was being tracked and stored, I wrote a blog post about simple steps a person could take to improve their privacy online.

    Essentially, it contains a few recommendations that everyone could follow to reduce their fingerprint without much effort. It wasn’t meant to be exhaustive, and it wasn’t meant to make you invisible online. If your personal situation needs more, you have a lot more ground to cover, which was totally out of the scope of that post.

    The target audience was the average Joe, that doesn’t like to be spied on. Specially by commercial companies that just want to show you ads, sell you stuff or use your habits against you.

    Many things have changed in the last 10 years, while others remained the same. With this in mind, I think it is time for an update to my suggestions, keeping in mind that no specialized knowledge should be required and the maximum amount of effort should not surpass 30 minutes.

    1. Pick an ethical browser

    For regular users on any computer or operating system, the main window to the outside world is the browser. Nowadays, this app is of the utmost importance.

    My initial suggestion remains valid these days, you should install and use Firefox.

    There are other browsers that could also do the trick, such as Brave or Safari, but my preference still goes to Mozilla’s browser.

    No matter your choice, you should avoid Chrome and Edge. If you want a more detailed comparison, you can check this website.

    Expected effort: 5 minutes

    2. Install important extensions

    Unfortunately, the default configuration of a good browser is not enough, even considering it already includes many protections enabled from the start.

    For a minimal setup, I consider 2 extensions indispensable:

    These will ensure that most spyware, included in a huge number of websites, isn’t loaded and does not leak your private information to third-parties. They will also block ads and other junk that make the web slow and waste your bandwidth.

    Expected effort: 2 minutes

    3. Opt out of any data collection

    This topic is specially problematic for Microsoft Windows users. However, it is becoming an increase prevalent practice in all software vendors.

    They will tell you they are collecting anonymous data to improve their products and services, while often the data is not that anonymous and/or the purposes are far wider than the ones they make you believe initially.

    Nowadays, Windows is an enormous data collection machine, so to minimize the damage, you should disable as much of this as possible. If this is your operating system, you can find a step-by-step tutorial of the main things to disable here (note: you should evaluate if the last 3 steps make sense for your case).

    If you use a different operating system, you should do a small research about what data the vendor collects.

    The next action is to do the same on your browser. In this case, in Firefox you should paste about:preferences#privacy in the URL bar, look for Firefox Data Collection and Use and then disable all options.

    Expected effort: 2–8 minutes

    4. Use a better DNS resolver

    This suggestion is a bit more technical, but important enough that I decided to include it in this guide that only covers the basics.

    With the new configuration that we set up on points 2 and 3, in theory, we are well protected against these forms of tracking. However, there are 2 big holes:

    • Are you sure the operating system settings are being respected?
    • Trackers on the browser are being blocked, but what about the other installed applications? Are they spying on you?

    To address the 2 points above, you can change your default DNS server to one that blocks any queries to sites tracking your activity. Two examples are Mullvad DNS and Next DNS, but there are others.

    Changing your DNS server can also help you block tracking on other devices you have less control, such as your phone or TV.

    The links contain detailed guides on how to proceed.

    Expected effort: 4–10 minutes

    5. Segregate your activity

    This step is more related to your behavior and browsing habits than to any tools that you need to install and configure.

    The goal here is to clean any data websites leave behind to track you across visits and websites through time.

    You should configure your browser to delete all cookies and website related data at the end of each session, and by this, I mean when you close your browser.

    In Firefox, you should again to about:preferences#privacy search for “Cookies and Site Data” and check the option: “Delete cookies and site data when Firefox is closed“.

    Sometimes this is impractical because it will force you to login into websites and apps all the time. A good compromise is to use “Multi-Account Containers“, they allow you to segregate your activity into multiple isolated containers, so you can limit any tracking capabilities.

    Expected effort: 3 minutes

    6. Prefer privacy preserving tools and services

    Most online services that common folk use, go to huge lengths to track your activities. For most of them, this is their business model.

    Luckily, there are drop-in replacements for common tools that will provide you with similar or better service:

    The above are just a few examples, these choices will depend on your own needs. At first, you might find them strange, but experience tells me that soon enough you will get used to them and discover they are superior in many ways.

    Expected effort: 3–5 minutes

    7. Adopt better habits

    I’m already a few minutes over budget, but hey, privacy is hard to achieve nowadays.

    For this last point, the lesson is that you must be careful with the information you share and make use of GDPR to control when someone is overstepping.

    Here are a few tips, just for you to get an idea:

    • Don’t provide your personal data just because they ask (input random data if you think it will not be necessary).
    • Always reject cookies and disable data collection when websites show those annoying pop-ups. Look for the “reject all” button, they usually hide it.
    • Even if websites don’t prompt you about privacy settings, go to your account preferences and disable all data collection.
    • Use fake profiles / identities.
    • When too much information is needed, and you don’t see the point, search for other alternatives.

    The main message is: Be cautious and strict with all the information you share online.

    Concluding

    If you followed up to this point, you already made some good progress. However, this is the bare minimum and I only covered what to do on your personal computer, even though some of these suggestions will also work on your other devices (phone, tablet, etc.).

    I avoided suggesting tools, services and practices that would imply monetary costs for the reader, but depending on your needs they might be necessary.

    Nowadays, it is very hard not to be followed around by a “thousand companies and other entities”, specially when we carry a tracking device in our pockets, attached to our wrists, or move around inside one of them.

    In case you want to dig deeper, there are a many sources online with more detailed guides on how to go a few steps further. As an example, you can check “Privacy Guides“.

    Now, to end my post with a question (so I could also learn something new), what would you recommend differently? Would you add, remove or replace any of these suggestions? Don’t forget about the 30-minute rule.

  • New release of worker-planet

    Two years ago, I made a small tool on top of Cloudflare’s Workers to generate a single feed by taking input from multiple RSS sources, a kind of aggregator or planet software as it was usually known a few years ago. You can read more about it here and here.

    This is a basic tool that is meant to be easy to deploy. The codebase itself doesn’t need too much maintenance.

    However, after all this time, the code started to become outdated to the point it could become unusable soon, since the ecosystem has moved on.

    So during this last week, I did a few upgrades and released a new version. The changes include:

    • It now uses a recent version of wrangler.
    • The development workflow was updated.
    • A new example template was added.
    • A new template helper and new context data were added to help with the development of new templates.

    You can grab a copy here. Any bugs or improvements, feel free to create new issues on the GitHub repository or contribute with new patches.

  • What to use for “TOTP” in 2023?

    At the start of last week, we received great news regarding new improvements to a very popular security app, “Google Authenticator”. A feature it was lacking for a long time was finally implemented, “cloud backups”.

    However, after a few days, the security community realized the new feature wasn’t as good as everybody was assuming. It lacks “end-to-end encryption”. In other words, when users back up their 2FA codes to the cloud, Google has complete access to these secrets.

    Even ignoring the initial bugs (check this one and also this one), it is a big deal because any second factor should only be available to the “owner”. Having multiple entities with access to these codes, defeats the whole purpose of having a second factor (ignoring again any privacy shortcomings).

    Summing up, if you use Google Authenticator, do not activate the cloud backups.

    And this brings us to the topic of today’s post: “What app (or mechanism) should I use for 2FA?”

    This question is broader than one might initially expect, since we have multiple methods at our disposal.

    SMS codes should be on their way out, for multiple reasons, but specially because of the widespread SIM swapping vulnerabilities.

    Push-based authenticators don’t seem to be a great alternative. They are not standardized, they tie the user to proprietary ecosystems, and they can’t be used everywhere.

    In an ideal scenario, everyone would be using FIDO2 (“Webauthn”) mechanisms, with hardware keys or letting their device’s platform handle the secret material.

    While support is growing, and we should definitely start using it where we can, the truth is, it is not yet widely accepted. This means we still need to use another form of 2FA, where FIDO2 isn’t supported yet.

    That easy to use and widely accepted second factor is TOPT.

    This still is the most independent and widely used form of 2FA we have nowadays. Basically, you install an authenticator app that provides you temporary codes to use in each service after providing the password. One of the most popular apps for TOPT is the “problematic” Google Authenticator.

    What are the existing alternatives?

    Many password managers (1Password, Bitwarden, etc.) also offer the possibility to generate these codes for you. However, I don’t like this approach because the different factors should be:

    • Something you know
    • Something you have
    • Something you are

    In this case, the password manager already stores the first factor (the “something you know”), so having all eggs in the same basket doesn’t seem to be a good idea.

    For this reason, from now on, I will focus on apps that allow me to store these codes in a separate device (the “something you have”).

    My requirements for such an app are:

    • Data is encrypted at rest.
    • Access is secured by another form of authentication.
    • Has easy offline backups.
    • It is easy to restore a backup.
    • Secure display (tap before the code is displayed on the screen).
    • Open source.
    • Available for android.

    There are dozens of them, but many don’t comply with all the points above, while others have privacy and security issues that I can’t overlook (just to give you a glimpse, check this).

    In the past, I usually recommended “andOTP“. It checks all the boxes and is indeed a great app for this purpose. Unfortunately, it stopped being maintained a few months ago.

    While it is still a solid app, I don’t feel comfortable recommending it anymore.

    The bright side is that I went looking for a similar app and I found “Aegis“, that happens to have great reviews, fulfills all the above requirements and is still maintained. I guess this is the one I will be recommending when I’m asked “what to use for 2FA nowadays”.

  • New release of “inlinehashes”

    Last year, I built a small tool to detect inline styles and scripts in a given webpage/document and then calculate their hashes. It can be useful for someone trying to write a strict “Content-Security-Policy” (CSP) for pre-built websites. I described the reasoning at the time in this blog post.

    Today, I’m writing to announce that I released the version 0.0.5 of inlinehashes. The main changes are:

    • CSP directives are now displayed for each hash, helping you to know right away where to place them.
    • The --target option now uses CSP directives to filter the output instead of needing to remember any custom value.
    • New output formats were added, instead of relying just on JSON.
    Screenshot of the output of inlinehashes 0.0.5

    One problem of this version is that it only supports Python 3.11. So for other interpreter versions, you are stuck with version 0.0.4. I expect to fix this soon and make everything work for, at least, the last three versions of Python.

    You can find out more on PyPI and on the source code repo.

  • Secure PostgreSQL connections on your Django project

    Last week, an article was published with some interesting numbers about the security of PostgreSQL servers publicly exposed to the internet (You can find it here).

    But more than the numbers, what really caught my attention was the fact that most clients and libraries used to access and interact with the databases have insecure defaults:

    most popular SQL clients are more than happy to accept unencrypted connections without a warning. We conducted an informal survey of 22 popular SQL clients and found that only two require encrypted connections by default.

    Jonathan Mortensen

    The article goes on to explain how clients connect to the database server and what options there are to establish and verify the connections.

    So, this week, let’s see how we can set up things in Django to ensure our apps are communicating with the database securely over the network.

    Usually, we set up the database connection like this:

    DATABASES = {
        "default": {
            "ENGINE": "django.db.backends.postgresql",
            "NAME": "db_name",
            "USER": "db_user",
            "PASSWORD": "db_password",
            "HOST": "127.0.0.1",
            "PORT": "5432",
        }
    }

    The above information can also be provided using a single “URL” such as postgres://USER:PASSWORD@HOST:PORT/NAME, but in this case, you might need some extra parsing logic or to rely on an external dependency.

    Now, based on that article psycopg2 by default prefers to use an encrypted connection but doesn’t require it, or even enforces a valid certificate. How can we change that?

    By using the field OPTIONS and then set the sslmode:

    DATABASES = {
        "default": {
            "ENGINE": "django.db.backends.postgresql",
            "NAME": "db_name",
            "USER": "db_user",
            "PASSWORD": "db_password",
            "HOST": "127.0.0.1",
            "PORT": "5432",
            "OPTIONS": {
                "sslmode": "<mode here>"
            }
        }
    }

    The available modes are:

    • disable
    • allow
    • prefer
    • require
    • verify-ca
    • verify-full

    The obvious choice for a completely secure connection is verify-full, specially when the traffic goes through a public network.

    If you are using a URL, something like this should do the trick: postgres://USER:PASSWORD@HOST:PORT/NAME?sslmode=verify-full.

    And that’s it, at least on the client’s side.

    If the above is not an option for you, I recommend taking a look at pgproxy. You can find more details here.

  • Preparing for Hacktoberfest

    It already starts tomorrow… the next edition of “Hacktoberfest”. For those who don’t know, it basically is an initiative that incentivizes participants to contribute to open-source software.

    During the month of October, those who do 4 contributions or more, can either receive a t-shirt or opt for a tree to be planted in their name.

    While the last editions seem to have been plagued with spam problems (as in “low-value contributions”), I still think it is an important initiate. Perhaps raising the bar for participation or completion would prevent these issues, but that is not the point of this post.

    Having already participated twice in the past, this year I will try to do it again (as you might have guessed from the post’s title).

    With this in mind, I spent a “few minutes” looking at my currently active/maintained repositories to see which ones could make use of a few extra contributions (the others will probably be archived).

    Here are the ones I ended up enabling for the “event”:

    • hawkpost – This old project that is still used, allows you to receive content in a secure end-to-end way from people without any encryption knowledge. Nowadays, there are better alternatives, but in some use cases it still is useful. The project has been unmaintained for a while and the idea for the next month is to upgrade its dependencies, fix the CI, improve the documentation and bring it to shape by making a new release.
    • inlinehashes – is a small CLI tool that takes an HTML document and produces the hashes of all inline elements that would need to be whitelisted in the Content-Security-Policy. Currently, the project only looks for styles and some places where JavaScript can be used. In the next month it would be good to extend the project’s coverage such as other inline JS possibilities, objects, etc.
    • worker-planet – Is a “Cloudflare Worker” that generates a single web page/feed with content from multiple sources. It is useful for communities where each member publishes content using his own blog/website. During the next month, it would be useful to include a few extra themes (and better ones).
    • worker-ddns – An elementary DDNS solution built on top of Cloudflare Workers and Cloudflare DNS. This project is very stable and could be considered complete, so I’m not expecting any significant changes. However, documentation could be improved, and we could also address systems that don’t support an agent written in python.

    Of course there are other improvements that could be made to all them, but these are my “priorities”.

    If you are participating on Hacktoberfest and still don’t know where to start, please give the above project’s a shot.

  • Shutting Down Webhook-logger

    A few years ago I built a small application to test Django’s websocket support through django-channels. It basically displayed on a web page in real time all the requests made to a given endpoint (you could generate multiple of them) without storing anything. It was fun and it was very useful to quickly debug stuff , so I kept it running since that time.

    If you are interested in more details about the project itself, you can find a complete overview here.

    However today, Heroku, the platform where it was running, announced the end of the free tier. This tier has been a godsend for personal projects and experiments over the last decade and heroku as a platform initially set the bar really high regarding the developer experience of deploying those projects.

    “Webhook-logger” was the only live project I had running on Heroku’s free tier and after some consideration I reached the conclusion it was time to turn it off. Its functionality is not unique and there are better options for this use case, so it is not worth the work required to move it to a new hosting provider.

    The code is still available in case anyone still want to take a look or deploy by their own.

  • Controlling the access to the clipboard contents

    In a previous blog post published earlier this year I explored some security considerations of the well known “clipboard” functionality that most operating systems provide.

    Long story short, in my opinion there is a lot more that could be done to protect the users (and their sensitive data) from many attacks that use of clipboard as a vector to trick the user or extract sensitive material.

    The proof-of-concept I ended up building to demonstrate some of the ideas worked in X11 but didn’t achieve one of the desired goals:

    It seems possible to detect all attempts of accessing the clipboard, but after struggling a bit, it seems that due to the nature of X11 it is not possible to know which running process owns the window that is accessing the clipboard. A shame.

    Myself, last blog post on this topic

    The good news about the above quote, is that it no longer is true. A kind soul contributed a patch that allows “clipboard-watcher” to fetch the required information about the process accessing the clipboard. Now we have all ingredients to make the tool fulfill its initial intended purpose (and it does).

    With this lengthily introduction we are ready to address the real subject of this post, giving the user more control over how the clipboard is used. Notifying the users about an access is just a first step, but restricting the access is what we want.

    On this topic, several comments to the previous post mentioned the strategy used by Qubes OS. It relies on having one clipboard specific to each app and a second clipboard that is shared between apps. The later requires user intervention to be used. While I think this is a good approach, it is not easy to replicate in a regular Linux distribution.

    However as I mentioned in my initial post, I think we can achieve a similar result by asking the user for permission when an app requests the data currently stored on the clipboard. This was the approach Apple implemented on the recent iOS release.

    So in order to check/test how this could work, I tried to adapt my proof-of-concept to ask for permission before sharing any data. Here’s an example:

    Working example of clipboard-watcher requesting permission before letting other apps access the clipboard contents.

    As we can see, it asks of permission before the requesting app is given the data and it kinda works (ignore the clunky interface and UX). Of course that there are many possible improvements to make its usage bearable, such as whitelisting certain apps, “de-duplicate” the content requests (apps can generate a new one for each available content type, which ends up being spammy), etc.

    Overall I’m pleased with the result and in my humble opinion this should be a “must have” security feature for any good clipboard manager on Linux. I say it even taking into account that this approach is not bulletproof, given that a malicious application could continuously fight/race the clipboard manager for the control of the “X selections”.

    Anyhow, the new changes for the proof-of-concept are available here, please give it a try and let me know what you think and if you find any other problems.

  • Django Friday Tips: Less known builtin commands

    Django management commands can be very helpful while developing your application or website, we are very used to runserver, makemigrations, migrate, shell and others. Third party packages often provide extra commands and you can easily add new commands to your own apps.

    Today lets take a look at some less known and yet very useful commands that Django provides out of the box.


    diffsettings

    $ python manage.py diffsettings --default path.to.module --output unified

    Dealing with multiple environments and debugging their differences is not as rare as we would like. In that particular scenario diffsettings can become quite handy.

    Basically, it displays the differences between the current configuration and another settings file. The default settings are used if a module is not provided.

    - DEBUG = False
    + DEBUG = True
    - EMAIL_BACKEND = 'django.core.mail.backends.smtp.EmailBackend'
    + EMAIL_BACKEND = 'django.core.mail.backends.console.EmailBackend'
    - TIME_ZONE = 'America/Chicago'
    + TIME_ZONE = 'UTC'
    + USE_SRI = True
    - USE_TZ = False
    + USE_TZ = True
    ...

    sendtestemail

    $ python manage.py sendtestemail my@address.com

    This one does not require an extensive explanation. It lets you test and debug your email configuration by using it to send the following message:

    Content-Type: text/plain; charset="utf-8"
    MIME-Version: 1.0
    Content-Transfer-Encoding: 7bit
    Subject: Test email from host on 2022-04-28 19:08:56.968492+00:00
    From: webmaster@localhost
    To: my@address.com
    Date: Thu, 28 Apr 2022 19:08:56 -0000
    Message-ID: <165117293696.405310.3477251481753991809@host>
    
    If you're reading this, it was successful.
    -----------------------------------------------------------

    inspectdb

    $ python manage.py inspectdb

    If you are building your project on top of an existing database (managed by other system), inspectdb can look into the schema and generate the respective models for Django’s ORM, making it very easy to start using the data right away. Here’s an example:

    # This is an auto-generated Django model module.
    # You'll have to do the following manually to clean this up:
    #   * Rearrange models' order
    #   * Make sure each model has one field with primary_key=True
    #   * Make sure each ForeignKey and OneToOneField has `on_delete` set to the desired behavior
    #   * Remove `managed = False` lines if you wish to allow Django to create, modify, and delete the table
    # Feel free to rename the models, but don't rename db_table values or field names.
    
    ...
    
    class AuthPermission(models.Model):
        content_type = models.ForeignKey('DjangoContentType', models.DO_NOTHING)
        codename = models.CharField(max_length=100)
        name = models.CharField(max_length=255)
    
        class Meta:
            managed = False
            db_table = 'auth_permission'
            unique_together = (('content_type', 'codename'),)
    ...

    showmigrations

    $ python manage.py showmigrations --verbosity 2

    When you need to inspect the current state of the project’s migrations in a given environment the above command is the easiest way to get that information. It will tell you what migrations exist, which ones were applied and when.

    admin
     [X] 0001_initial (applied at 2021-01-13 19:49:24)
     [X] 0002_logentry_remove_auto_add (applied at 2021-01-13 19:49:24)
     [X] 0003_logentry_add_action_flag_choices (applied at 2021-01-13 19:49:24)
    auth
     [X] 0001_initial (applied at 2021-01-13 19:49:24)
     [X] 0002_alter_permission_name_max_length (applied at 2021-01-13 19:49:24)
     [X] 0003_alter_user_email_max_length (applied at 2021-01-13 19:49:24)
    ...

    There are many other useful management commands that are missing in the base Django package, to fill that gap there are some external packages available such as django-extensions. But I will leave those to a future post.

  • Inlineshashes: a new tool to help you build your CSP

    Content-Security-Policy (CSP) is an important mechanism in today’s web security arsenal. Is a way of defending against Cross-Site Scripting and other attacks.

    It isn’t hard to get started with or to put in place in order to secure your website or web application (I did that exercise in a previous post). However when the systems are complex or when you don’t fully control an underlying “codebase” that frequently changes (like it happens with of-the-shelf software) things can get a bit messier.

    In those cases it is harder to build a strict and simple policy, since there are many moving pieces and/or you don’t control the code development, so you will end up opening exceptions and whitelisting certain pieces of content making the policy more complex. This is specially true for inline elements, making the unsafe-inline source very appealing (its name tells you why you should avoid it).

    Taking WordPress as an example, recommended theme and plugin updates can introduce changes in the included inline elements, which you will have to review in order to update your CSP. The task gets boring very quickly.

    To help with the task of building and maintaining the CSP in the cases described above, I recently started to work on a small tool (and library) to detect, inspect and whitelist new inline changes. You can check it here or download it directly from PyPI.

  • Django Friday Tips: Admin Docs

    While the admin is a well known and very useful app for your projects, Django also includes another admin package that isn’t as popular (at least I never seen it being heavily used) but that can also be quite handy.

    I’m talking about the admindocs app. What it does is to provide documentation for the main components of your project in the Django administration itself.

    It takes the existing documentation provided in the code to developers and exposes it to users that have the is_staff flag enabled.

    This is what they see:

    Django admindocs main page.
    A view of the main page of the generated docs.
    Checking documentation for existing views.
    Checking a model reference in the admin documentation.
    Checking a model reference.

    I can see this being very helpful for small websites that are operated by teams of “non-developers” or even for people providing support to customers. At least when a dedicated and more mature solution for documentation is not available.

    To install you just have to:

    • Install the docutils package.
    • Add django.contrib.admindocs to the installed apps.
    • Add path('admin/doc/', include('django.contrib.admindocs.urls')) to the URLs.
    • Document your code with “docstrings” and “help_text” attributes.

    More details documentation can be found here. And for today, this is it.

  • Who keeps an eye on clipboard access?

    If there is any feature that “universally” describes the usage of computers, it is the copy/paste pattern. We are used to it, practically all the common graphical user interfaces have support for it, and it magically works.

    We copy some information from one application and paste into another, and another…

    How does these applications have access to this information? The clipboard must be something that is shared across all of them, right? Right.

    While very useful, this raises a lot of security questions. As far as I can tell, all apps could be grabbing what is available on the clipboard.

    It isn’t uncommon for people to copy sensitive information from one app to another and even if the information is not sensitive, the user generally has a clear target app for the information (the others don’t have anything to do with it).

    These questions started bugging me a long time ago, and the sentiment even got worse when Apple released an iOS feature that notifies users when an app reads the contents of the clipboard. That was brilliant, why didn’t anyone thought of that before?

    The result? Tons of apps caught snooping into the clipboard contents without the user asking for it. The following articles can give you a glimpse of what followed:

    That’s not good, and saying you won’t do it again is not enough. On iOS, apps were caught and users notified, but what about Android? What about other desktop operating systems?

    Accessing the clipboard to check what’s there, then steal passwords, or replace cryptocurrency addresses or just to get a glimpse of what the user is doing is a common pattern of malware.

    I wonder why hasn’t a similar feature been implemented in most operating systems we use nowadays (it doesn’t need to be identical, but at least let us verify how the clipboard is being used). Perhaps there exists tools can help us with this, however I wasn’t able to find any for Linux.

    A couple of weeks ago, I started to look at how this works (on Linux, which is what I’m currently using). What I found is that most libraries just provide a simple interface to put things on the clipboard and to get the current clipboard content. Nothing else.

    After further digging, I finally found some useful and interesting articles on how this feature works on X11 (under the hood of those high level APIs). For example:

    Then, with this bit of knowledge about how the clipboard works in X11, I decided to do a quick experiment in order to check if I can recreate the clipboard access notifications seen in iOS.

    During the small periods I had available in the last few weekends, I tried to build a quick proof of concept, nothing fancy, just a few pieces of code from existing examples stitched together.

    Here’s the current result:

    Demonstration of clipboard-watcher detecting when other apps access the contents

    It seems possible to detect all attempts of accessing the clipboard, but after struggling a bit, it seems that due to the nature of X11 it is not possible to know which running process owns the window that is accessing the clipboard. A shame.

    The information that X11 has about the requesting client must be provided by the client itself, which makes it very hard to know for sure which process it is (most of the time it is not provided at all).

    Nevertheless, I think this could still be a very useful capability for existing clipboard managers (such as Klipper), given the core of this app works just like one.

    Even without knowing the process trying to access the clipboard contents, I can see a few useful features that are possible to implement, such as:

    • Create some stats about the clipboard access patterns.
    • Ask the user for permission, before providing the clipboard contents.

    Anyhow, you can check the proof of concept here and give it a try (improvements are welcome). Let me know what you think and what I’ve missed.

  • Django Friday Tips: Deal with login brute-force attacks

    In the final tips post of the year, lets address a solution to a problem that most websites face once they have been online for a while.

    If you have a back-office or the concept of user accounts, soon you will face the security problem of attackers trying to hack into these private zones of the website.

    These attackers can either be people trying to login as somebody else, or even bots trying to find accounts with common/leaked passwords.

    Unfortunately we cannot rely on users to pick strong and unique passwords. We can help them, as I explained in a previous post, but it isn’t guaranteed that the user will make a good choice.

    Using a slow key derivation function, to slowdown the process and increase the time required to test an high number of possibilities, helps but isn’t enough.

    However we can go even further with this strategy, by controlling the number of attempts and only allowing a “given number of tries per time window”.

    This is very easy to achieve on Django projects by relying on the django-axes package. Here’s an explanation of what it does:

    Axes records login attempts to your Django powered site and prevents attackers from attempting further logins to your site when they exceed the configured attempt limit.

    django-axes documentation

    Basically you end up with record of attempts (that you can see in the admin) and allows you to define how the system will behave after multiple failed tries, by setting the maximum number of failures and cool-off periods.

    You can check the package here, it is very easy to setup and it shouldn’t require many changes to your code. The documentation can be found here and it covers everything you will need so I won’t provide any examples this time.

    I hope this tip ends up being useful and wish you a Merry Christmas. The tips will continue in 2022.